Sharing updates, answering frequently asked questions, providing feedback, and more: These are some of the problems that a ChatGPT-powered Telegram Bot solves on the spot by automatically replying to incoming messages.
While this is not a native Telegram feature, it’s easy to build it with Make.
In this tutorial, we’ll show you how to build a Telegram bot that replies to messages with incredible accuracy and purpose as it’s powered by ChatGPT.
The resulting solution is also available as a Make template (a pre-configured scenario that you can deploy in minutes), but following the tutorial is useful if you want to learn how to create automation solutions from scratch.
共享更新、回答常见问题、提供反馈等等:这些是由 ChatGPT 驱动的 Telegram 机器人通过自动回复传入消息来当场解决的一些问题。
虽然这不是 Telegram 的原生功能,但使用 Make 可以轻松构建它。
在本教程中,我们将向您展示如何构建 Telegram 机器人,该机器人由 ChatGPT 提供支持,能够以令人难以置信的准确性和目的性回复消息。
生成的解决方案还可以作为 Make 模板(您可以在几分钟内部署的预配置方案)使用,但如果您想学习如何从头开始创建自动化解决方案,遵循本教程会很有用。
Generate Telegram Bot responses with ChatGPT
Before we jump into the details, make sure you have what’s needed to deploy this solution:
-
A Make account (Core Plan or above).
-
A ChatGPT account with API tokens.
-
A Telegram account.
All set? Then let’s not waste another minute!
Step 1: Create a new scenario and install a Telegram Bot
The first thing we’ll do is install a Telegram Bot. Here’s a quick guide that shows you how to do it.
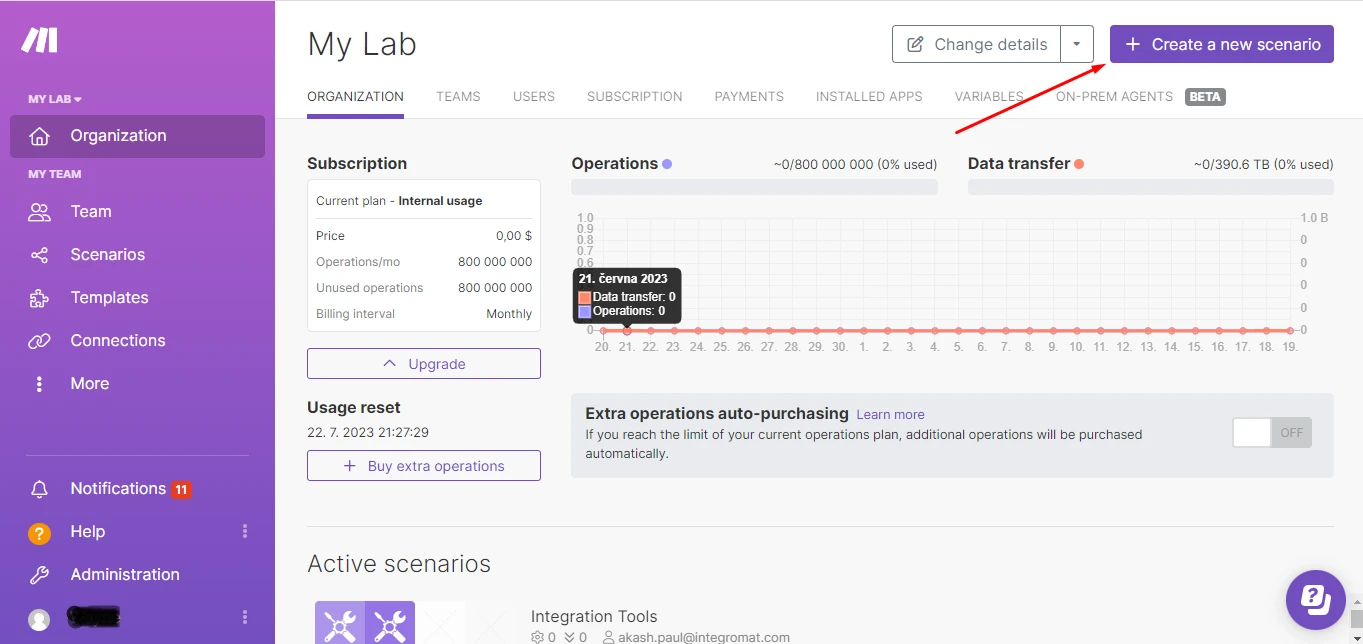
Next, log into your Make account, and click the Create a new scenario button to open the scenario builder.
在我们深入了解详细信息之前,请确保您拥有部署此解决方案所需的条件:
可以了,好了?那么我们不要再浪费一分钟了!
第 1 步:创建一个新场景并安装 Telegram Bot
我们要做的第一件事是安装 Telegram 机器人。这是一个快速指南,向您展示如何操作。
接下来,登录您的 Make 帐户,然后单击**“创建新场景”**按钮以打开场景构建器。
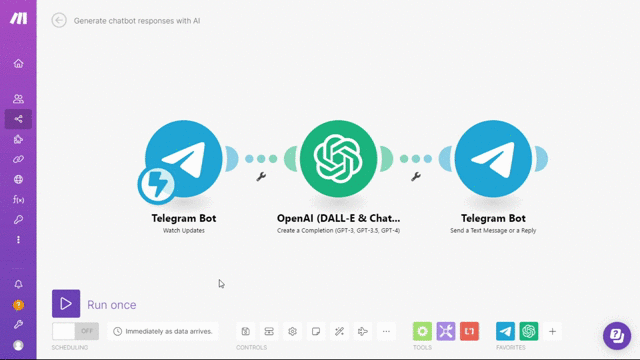
The first app we’re to going add to the scenario is the Telegram Bot app. Search for the app and select the Watch Updates module.
我们要添加到场景中的第一个应用程序是Telegram Bot应用程序。搜索该应用程序并选择**“观看更新”**模块。
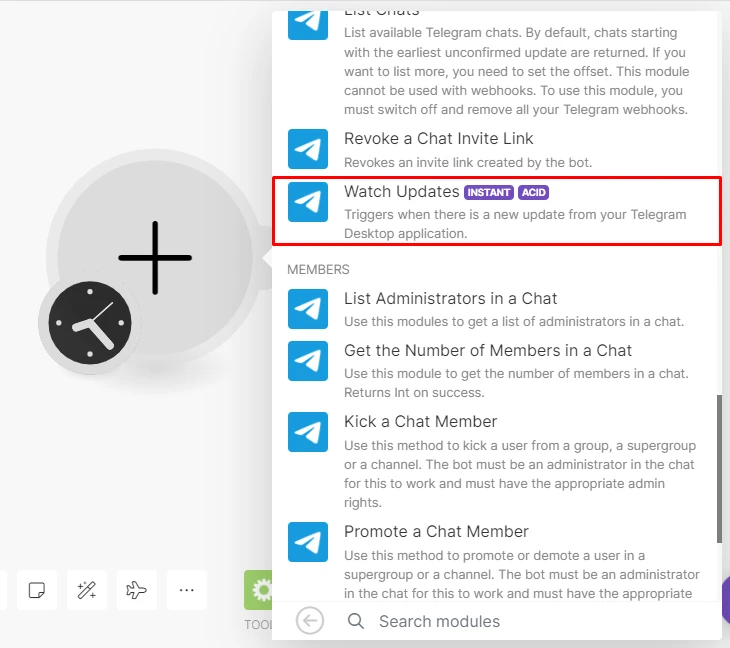
This module relies on a webhook that will instantly trigger the scenario when new messages are received in Telegram.
In the module’s configuration box, click Add to create a webhook.
You will need to connect your Telegram account to Make and then click Save to create the webhook.
该模块依赖于一个 webhook,当 Telegram 中收到新消息时,该 webhook 将立即触发该场景。
在模块的配置框中,单击**“添加”**以创建 Webhook。
您需要将 Telegram 帐户连接到 Make,然后单击**“保存”**以创建 Webhook。
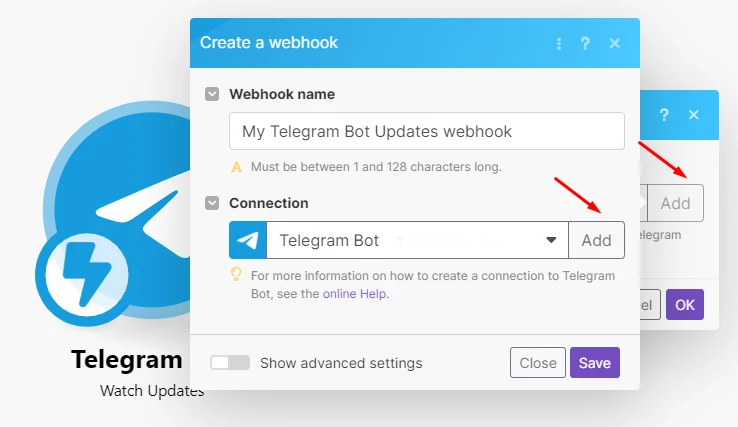
There’s nothing more to do here since Make automatically attaches the webhook in Telegram for you, so once ready, click OK and move on to the next step.
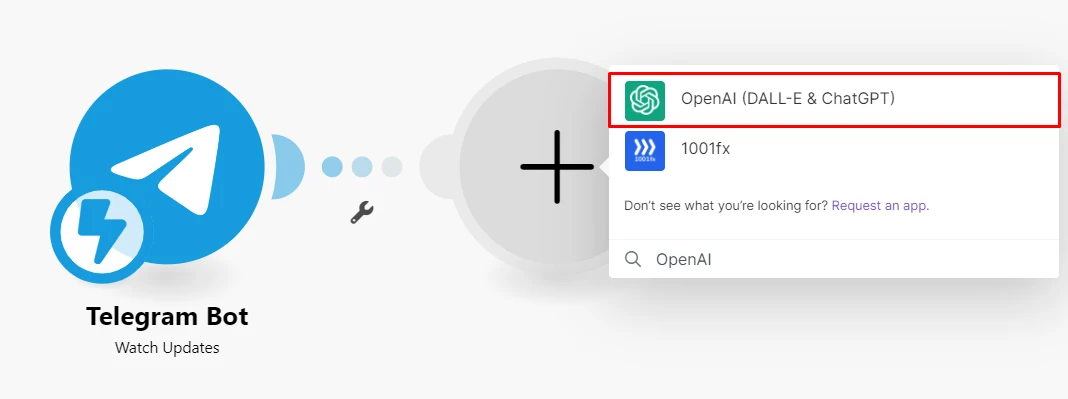
Step 2: Add the OpenAI module
The next step is to add the OpenAI app to create a reply to the message received.
Click the plus sign on the side of the Telegram Bot module to open the search box, search for the OpenAI (DALL-E & ChatGPT) app, select it, and then pick the Create a Completion module.
这里没有什么可做的,因为 Make 会自动为您附加 Telegram 中的 webhook,因此准备好后,单击“**确定”**并继续下一步。
步骤2:添加OpenAI模块
下一步是添加OpenAI应用程序以创建对收到的消息的回复。
单击 Telegram Bot 模块侧面的加号打开搜索框,搜索OpenAI(DALL-E 和 ChatGPT)应用程序,选择它,然后选择创建完成模块。
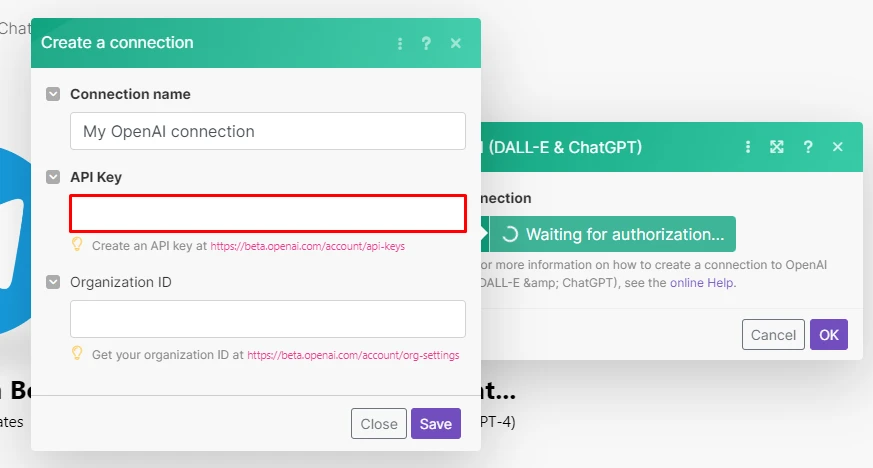
Start configuring this module by connecting your OpenAI account to Make.
You’ll need your API key to do this, which you’ll find in your OpenAI account’s user settings.
通过将您的 OpenAI 帐户连接到 Make 来开始配置此模块。
您需要 API 密钥才能执行此操作,您可以在 OpenAI 帐户的用户设置中找到该密钥。
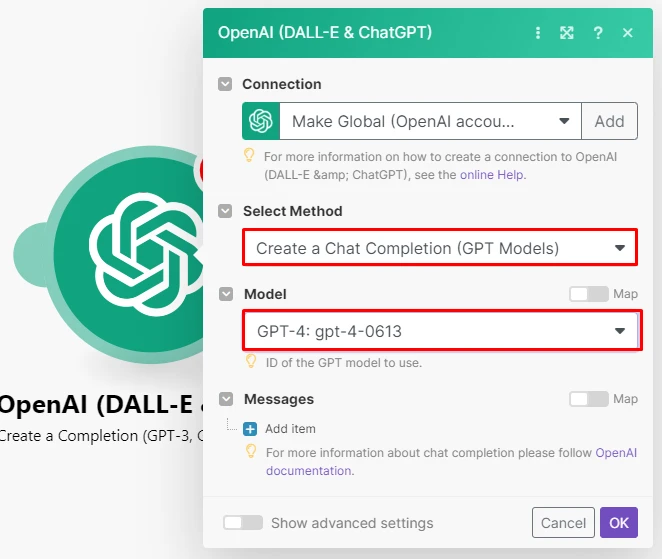
Next, select the Create a Chat Completion option, as this will output a full reply for you.
Then select the latest language model, or alternatively, the one for which you’ve purchased the corresponding tokens.
接下来,选择**“创建聊天完成”**选项,因为这将为您输出完整的回复。
然后选择最新的语言模型,或者选择您为其购买了相应令牌的语言模型。
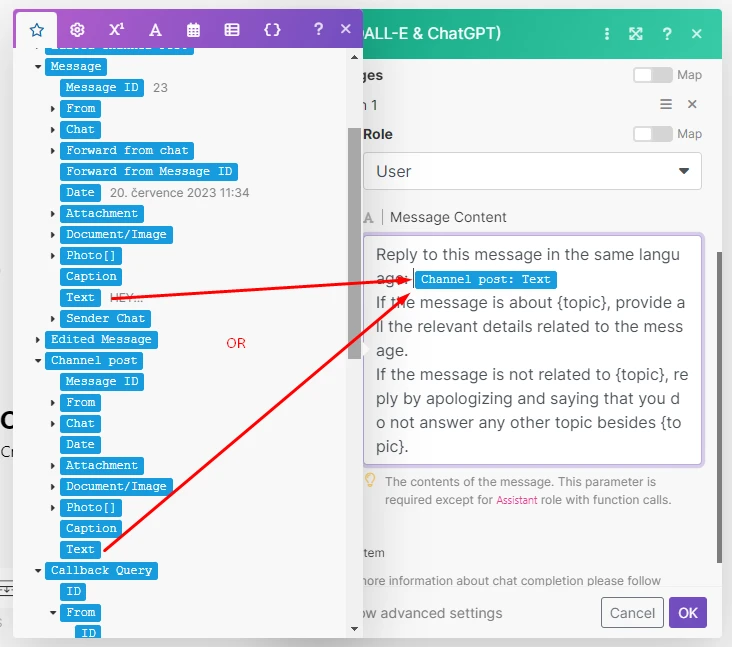
Let’s keep going. Select User as the Role, and use the following prompt:
Reply to this message in the same language: {channel_post.text}
If the message is about {topic}, provide all the relevant details related to the message.
If the message is not related to {topic}, reply by apologizing and saying that you do not answer any other topic besides {topic}.
Important: Replace {topic} with your own topic. The prompt ensures that no other topic questions or requests will be answered.
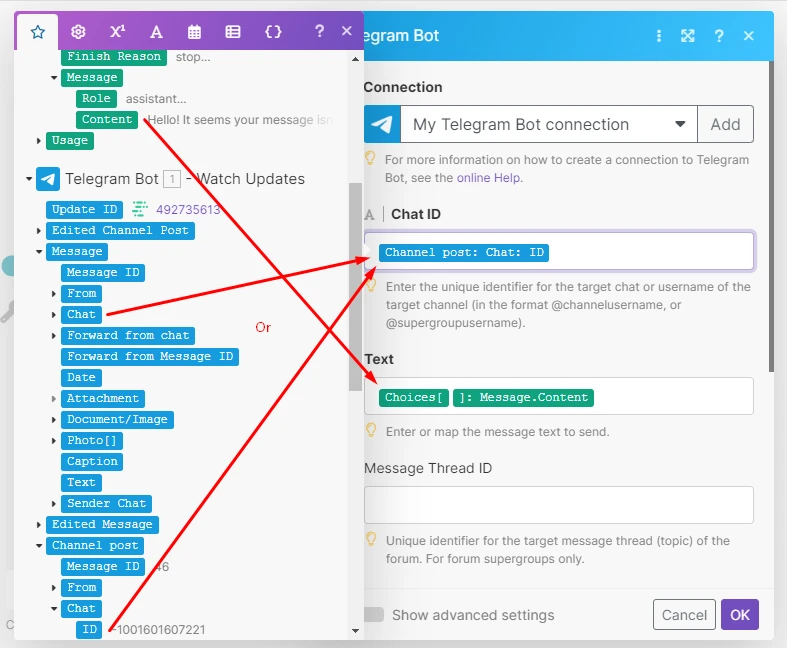
Depending if the Bot will be receiving direct messages or via a channel, replace {channel_post.text} with either the message text or channel text data item from the Telegram Bot module. See the image below for reference.
Bonus: The prompt creates a reply in the sender’s language!
我们继续吧。选择User作为Role,然后使用以下提示:
用相同的语言回复此消息:{channel_post.text}
如果消息与 {topic} 有关,请提供与该消息相关的所有相关详细信息。
如果该消息与{topic}无关,请道歉并表示您不会回答除{topic}之外的任何其他主题。
**重要提示:**将 {topic} 替换为您自己的主题。该提示确保不会回答其他主题问题或请求。
根据 Bot 是接收直接消息还是通过频道接收消息,将*{channel_post.text}替换为来自Telegram Bot模块的*消息文本 或频道文本数据项。请参阅下图以供参考。
**奖励:**提示会以发件人的语言创建回复!
Step 3: Add the final Telegram module
The last step is to send the reply back to Telegram. To achieve this, we have to add the Telegram - Send a Text Message or a Reply module to our scenario.
第 3 步:添加最终的 Telegram 模块
最后一步是将回复发送回 Telegram。为了实现这一点,我们必须将Telegram - 发送短信或回复模块添加到我们的场景中。

Select your Telegram connection (it’ll be there as you already connected your Telegram account to Make), and configure the module as follows:
-
Map the Message: Chat: ID data item (for direct Bot messages) or the Channel post: Chat: ID item (for channel messages) from the Telegram > Watch Updates module to the Chat ID field.
-
Map the Choices []: Message.Content item from the OpenAI module to the Text field.
选择您的 Telegram 连接(它会在那里,因为您已经将 Telegram 帐户连接到 Make),并按如下方式配置模块:
-
将Message: Chat: ID数据项(对于直接 Bot 消息)或Channel post: Chat: ID项(对于频道消息)从Telegram > Watch Updates模块映射到Chat ID字段。
-
将OpenAI模块中的Choices []: Message.Content项映射到Text字段。
Now that your scenario is fully configured, click Save and switch the scenario on.
现在您的场景已完全配置完毕,请单击**“保存”**并打开场景。
That’s it - your Telegram Bot that auto-replies is now fully operational!
Want to automate further? Check our Use Cases section for inspiration, sign up for a Make account, and start today!
就是这样 - 您的自动回复 Telegram 机器人现在可以全面运行了!