Angel “Java” Lopez was one of the first core developers of the RSKj platform. Back in 2016, he created a DSL (domain specific language) to easily create RSK unit tests involving transactions, blocks and contracts. Sadly, Angel is no longer with us, but to honor him we will name this useful (but yet unnamed) language AngelLang.
I‘ve recently had the chance to play with AngelLang for a bit. I wanted to create this tiny story to take advantage of my recent experience, in case this can help anyone else who’s trying to use them and can’t find documented ways for using them successfully. I’m writing this article in a way either a senior or a junior developer can follow it. You can find the full example in this repo.
Creating a Smart Contract with AngelLang
As explained in “Mastering Ethereum”, contracts in both Ethereum and RSK are deployed using the Zero Address. The way to specify this in the AngelLang language is by setting the receiverAddress to 0, 00 or if you prefer not including the receiverAddress it will default to this same behavior.
Imagine we have a smart contract, and we want to create a test case that uses this contract. The first step we want to take is to create a transaction tx01, that we’ll include in the first block b01. Our contract will be called “Payable”, and we will add basic operations like deposit, transfer or withdrawal to it. Here’s the code of the contract.
In RSK, as in Ethereum, a contract is created under a special transaction, where the calldata is the encoded ByteCode of the contract. In order to get this call data you can use any of the following approaches:
- Remix: The compiler tab allows you to pick the ByteCode
After you paste this code into an editor, you’ll see that there is a json-like object that contains an “object” field. The content of that field is the contract that you’ll use as the calldata in your transaction.
- Solc: Using Solidity compiler to compile the contract as described here. The output file will contain the encoded ByteCode of your contract.
- Solcjs: As described in here. The output file will contain the encoded ByteCode of your contract.
The resulting ByteCode has to be placed in the “data” parameter of the contract creation transaction, as displayed in the following image:
Notice that if your ByteCode contains a 0x prefix, you may need to remove it.
Once you’ve set this up, you have the contract deployment transaction properly configured.
Then we can create the first block and connect it to the blockchain.
Using a Smart Contract with AngelLang
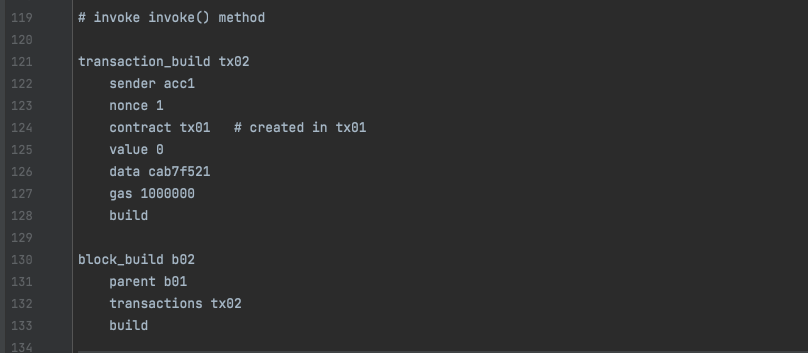
Once we create the smart contract and deploy it in our first block, we may want to use it, so we need a second transaction that calls one of the functions of our contract.
In order to be able to call the contract, we need to understand how calling a contract works, taking into account that the transaction must contain the information about what function to call, and how to send parameters to that function. In Ethereum (and in RSK), there’s a specific format to send the data to the contract, so it understands what you are trying to do with it. To simplify the theory, we will say that we need to send the first 4 bytes of the hex-encoded signature of the function, and if the function receives arguments, we send those arguments encoded according to the ABI specification of this function. For a more detailed explanation, feel free to read this section of “Mastering Ethereum” or the Solidity specification.
The easiest way to get all this information is by using Remix. If we’ve used remix in our previous step (deploying the contract), we will be able to interact with it easily through the Remix interface, under the deployment tab. We can make a call to the function we want to use from our test, with the parameters we want to give to it. Let’s imagine I want to call the “deposit()” function, which doesn’t receive any arguments, and I send 300 WEI to the contract.
In order to extract the input data from Remix so we can use it in our AngelLang example, we can check the debug console, expand the desired transaction and pick the content of the “input” field, which is exactly what we need (first 4 bytes of the encoded function signature + the encoded arguments as specified in the ABI specification). There’s also a way to achieve this by using web3 or ethersjs, but I found it a bit simpler to use a GUI like Remix.
Then we can simply go to our AngelLang definition and put that input data as the transaction’s call data.
With AngelLang in RSK, you can make assertions directly in the definition of the blockchain, as there are a few commands that you can use to validate the state of your blockchain and/or the transactions you performed. In this case I want to validate that my contract has effectively received the 300 wei I sent, and the block 2 (b02) has been successfully connected to the blockchain (it’s become the best block after all).
The way to use this AngelLang specification from the code, is to create a test case that uses that file, parses its content and builds the blockchain as in any of the examples that already exist in the RSKj DSL tests folder.
TDD with AngelLang
As you might have noticed, the AngelLang is a quite powerful tool when you want to create controlled scenarios where you need to perform changes to the behavior of the blockchain, in a way you can assure nothing gets broken in the middle. It’s a perfect match if you want to use TDD for your development. However, it’s hardly documented so it can be fuzzy how to use it at the very beginning. I hope you guys found this helpful. See you in the next story!