
目前的钱包(包括MetaMask)覆盖用户程度不高,可能会增加用户的使用门槛,这也是StepN内置钱包的原因(StepN所处的solana链钱包覆盖度更低),本文将介绍如何在我们的DApp中内置钱包。
在如何发行一款NFT(下)的官方搭建中,我们支持了MetaMask钱包,但如果是一款希望能够"破圈"的应用,目前的钱包(包括MetaMask)覆盖用户程度不高,可能会增加用户的使用门槛,这也是StepN内置钱包的原因(StepN所处的solana链钱包覆盖度更低),本文将介绍如何在我们的DApp中内置钱包。
钱包基础概念
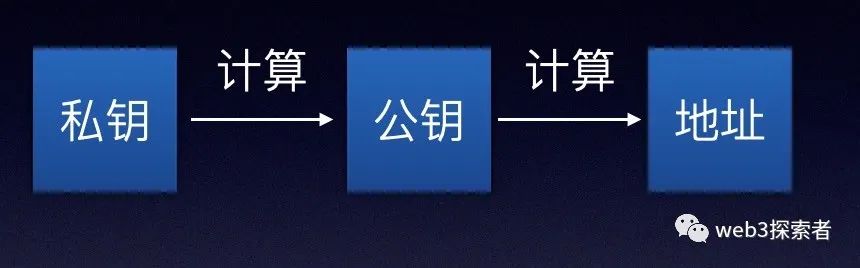
如上图所示,私钥可以计算出公钥,公钥可以计算出钱包账户地址,每一步都是单向可行,比如,通过公钥是无法计算出私钥的。所以对于钱包账户,我们的核心数据只有1个,那就是私钥,有了私钥我们就可以推导公钥和钱包账户地址。 钱包内的余额等信息均存储于链上,链上存储着钱包账户地址->余额的映射,如果发生转账等操作需要进行私钥签名,公钥验证。
目标规划
1.连接钱包: 用户需要能够连接到我们的内置钱包,同时支持新创建钱包账户并连接或者导入之前已创建的钱包账户并连接两种方式。

2. 展示已连接钱包账户信息,包括钱包账户地址,余额,私钥(默认不展示),并支持断开已连接的钱包账户。
3.使用已连接钱包账户完成转账,并支持在转账前进行二次弹窗确认。
技术选型
- 基础框架:由于我们是在之前的NFT官网基础上继续完善,所以我们依旧还是使用react+mobx+ether的组合。
- 持久化:由于我们需要持久化保存钱包账户的连接,避免页面刷新连接断开,所以我们使用localStorage持久化已连接的钱包账户。
- 节点代理(管理节点):由于我们不再使用metamask,所以我们需要自己去连接以太坊节点来进行链上操作,在如何发行一款NFT(上)中我们介绍过Infura,我们继续使用Infura作为节点服务代理。本文不再介绍如何申请Key相关,如果有疑问可以参考如何发行一款NFT(上)中的介绍。
连接钱包
创建新钱包账户并连接
在wallet_utils.js中新增创建钱包账户,连接钱包的方法。创建钱包本质就是寻找1个随机数作为私钥,并使用这个私钥生成公钥和钱包地址。
//创建一个新的钱包账户
export const createNewWallet = (): Wallet => {
    const wallet = ethers.Wallet.createRandom();
    return wallet;
}

const NETWORK = "rinkeby"
const API_KEY = "在infura中申请的key"

//连接内置钱包账户
export const connectCustomWallet =  (wallet:Wallet) : Wallet => {
    const provider = new ethers.providers.InfuraProvider(NETWORK, API_KEY);
    const conncetWallet = wallet.connect(provider);
    return conncetWallet;
}
新增内置钱包的组件CustomWalletComponent.js并在App.js中添加,这个组件将会负责管理内置钱包连接页面和展示内置钱包信息页面。
import { Store } from '../Store';
import './wallet-page.css';
import { observer } from 'mobx-react';
import ConnectCustomWalletComponent from './ConnectCustomWalletComponent';
import CustomWalletInfoComponent from './CustomWalletInfoComponent';

//使用observer修饰组件,observable的值发生变化组件重新渲染
const CustomWalletComponent = observer(() => {
    switch (Store.customWalletPageShow.get()) {
        case Custom_Wallet_Page_Show_Type.show_connect_page:
            //内置钱包连接组件
            return <ConnectCustomWalletComponent />;
        case Custom_Wallet_Page_Show_Type.show_info_page:
            //内置钱包信息组件
            return <CustomWalletInfoComponent/>;
        default:
            //默认不展示
            return <div className='display-none'></div>;
    }
});

export default CustomWalletComponent;

//定义组件展示形态枚举
//hidden: 不展示弹窗
//show_connect_page:展示内置钱包连接页面
//show_connect_page:展示内置钱包信息页面
export const Custom_Wallet_Page_Show_Type = {
    hidden: 0,
    show_connect_page: 1,
    show_info_page: 2
}
在内置钱包连接组件ConnectCustomWalletComponent中新增我们的创建新钱包账户组件CreateNewCustomWalletComponent。
import { Store } from '../Store';
import './wallet-page.css';
import { useState } from 'react';
import { connectCustomWallet, createNewWallet } from '../utils/wallet_utils';
import { Custom_Wallet_Page_Show_Type } from './CustomWalletComponent';

const CreateNewCustomWalletComponent = () => {
    const [address, setAddress] = useState("");
    const [privateKey, setPrivateKey] = useState("");
    const [wallet, setWallet] = useState(null);
    //调用createNewWallet创建新钱包账户,并展示其公钥和私钥,暂存wallet
    const create_wallet_click = () => {
        const wallet = createNewWallet()
        setWallet(wallet);
        setPrivateKey(wallet.privateKey);
        setAddress(wallet.address);
    }
    //调用connectCustomWallet连接钱包账户,并更新全局状态
    const connect_wallet_click = () => {
        const connctWallet = connectCustomWallet(wallet);
        Store.updataCustomWallet(connctWallet);
        Store.customWalletPageShow.set(Custom_Wallet_Page_Show_Type.hidden);
    }
    return (
        <div className='custom-wallet-page-panel-item-create'>
            <h2 >创建新账户</h2>
            <div className='custom-wallet-page-panel-item-button' onClick={e => { create_wallet_click() }}> 创建账户 </div>
            <div className='custom-wallet-page-panel-item-text'>账户地址</div>
            <div className='custom-wallet-page-panel-item-text'>{address}</div>
            <div className='custom-wallet-page-panel-item-text'>私钥:</div>
            <div className='custom-wallet-page-panel-item-text'>{privateKey}</div>
            <div className='custom-wallet-page-panel-item-button' onClick={e => { connect_wallet_click() }}> 连接钱包 </div>
        </div>
    );
};

export default CreateNewCustomWalletComponent;
管理钱包账户状态
钱包账户状态是1个全局状态,而且页面退出再进入也应该保持连接状态,所以我们将钱包账户持久化到本地,并在页面初始化的时候读取本地存储的钱包账户。那么钱包账户里面信息很多,我们是否需要全部存储?按照我们开始介绍的钱包基础概念,钱包账户核心就是私钥,只要有私钥我们就可以计算得到钱包账户的其他信息,所以我们持久化私钥即可。 先在wallet_utils.js中新增通过私钥生成钱包账户的方法
//通过私钥恢复钱包账户其他信息
export const restoreConnectCustomWallet = (privateKey) => {
    const wallet = new ethers.Wallet(privateKey);
    const provider = new ethers.providers.InfuraProvider(NETWORK, API_KEY);
    const conncetWallet = wallet.connect(provider);
    return conncetWallet;
}
我们在Store.js中对本地钱包账户做一次缓存,这样方便页面内状态监听。
const customWallet = observable.box(null);

//初始化方法
const init = () => {
    //判断是否本地有存储内置钱包账户私钥,如果有则恢复连接,没有则开始监听MetaMask
    const privateKey = localStorage.getItem("wallet_private_key");
    if (privateKey) {
            console.log("already connect " + privateKey);
            customWallet.set(restoreConnectCustomWallet(privateKey));
    } else {
        registerAccountChange();
    }
}

//更新钱包账户,同时更新Store.js缓存和本地存储。
const updataCustomWallet = (wallet) => {
    customWallet.set(wallet);
    localStorage.setItem("wallet_private_key", wallet ? wallet.privateKey : "");
   }
调整合约交互
我们之前构建合约的时候都是默认使用MetaMask,但目前引入了内置钱包,我们需要进行区分构建,在contract_utils.js进行调整
const getContract = () => {
    const address = "合约地址";
    const abi = require("../abi/NFT_WEB3_EXPOLRER.json").abi;
    return new ethers.Contract(address, abi, getProvider());
}

const getProvider = () => {
    //是否有已经连接的内置钱包账号,有则使用Infura节点代理,没有则使用MetaMask
    if (Store.customWallet.get()) {
        return new ethers.providers.InfuraProvider(NETWORK, API_KEY);
    } else {
        return new ethers.providers.Web3Provider(window.web3.currentProvider);
    }
}
导入钱包账户
如果我们已经拥有1个钱包账户需要导入到内置钱包中,这一过程其实和我们页面初始化时从本地读取钱包账户一致,都是需要通过私钥恢复完整的钱包账户。
import { Store } from '../Store';
import './wallet-page.css';
import { useState } from 'react';
import { Custom_Wallet_Page_Show_Type } from './CustomWalletComponent';

const ImportCustomWalletComponent = () => {
    const [inputValue, setInputValue] = useState("");

    //通过用户输入的私钥导入钱包账户,并更新钱包账户的存储
    const import_wallet_click = () => {
        const connctWallet = restoreConnectCustomWallet(inputValue);
        Store.updataCustomWallet(connctWallet);
        Store.customWalletPageShow.set(Custom_Wallet_Page_Show_Type.hidden);
    }

    const handleChange = (event) => {
        console.log("input value is" + event.target.value);
        setInputValue(event.target.value);
    }
    return (
        <div className='custom-wallet-page-panel-item-import' >
            <h2>导入现有账户</h2>
            <h4>请输入已有账户私钥</h4>
            <input type='text' value={inputValue} onChange={handleChange}></input>
            <div className='custom-wallet-page-panel-item-button' onClick={e => { import_wallet_click() }}> 导入账户并连接 </div>
        </div>
    );
};

export default ImportCustomWalletComponent;
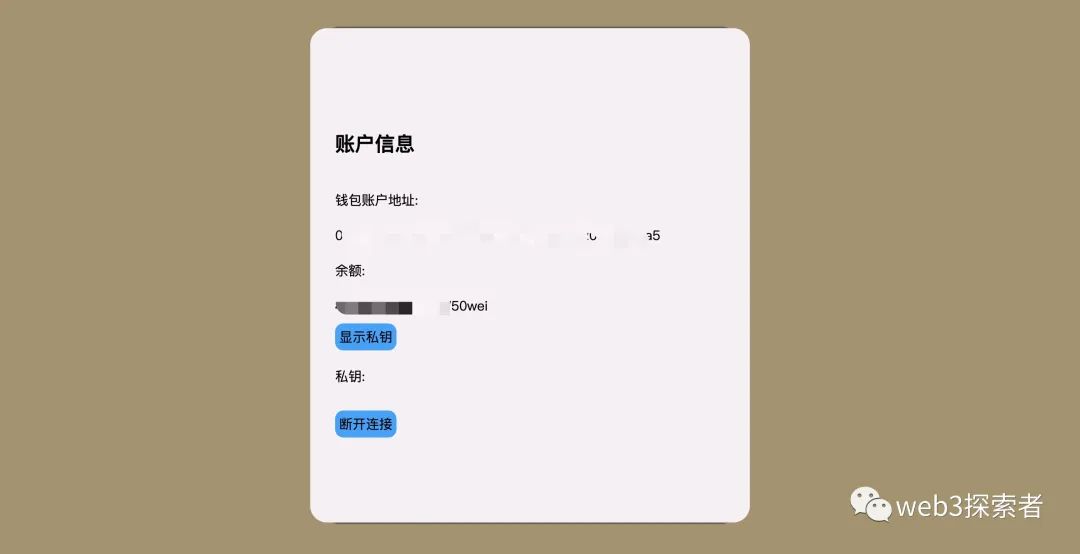
展示已连接钱包账户信息
之前我们页面右上角的连接钱包入口在连接完成后设定是无法点击的,现在有了内置钱包,我们将其修改为连接内置钱包账户时点击打开内置钱包账户的信息展示页面,展示钱包账户地址,余额,私钥(默认不展示),并在该页面中提供断开钱包账户连接的功能。其中按照开始介绍的钱包基础概念,钱包账户余额存在链上,所以获取余额需要请求节点代理是1个异步过程。断开钱包账户连接其实就是清空本地存储的私钥信息。
import { Store } from '../Store';
import './wallet-page.css';
import { useEffect, useState } from 'react';
import { Custom_Wallet_Page_Show_Type } from './CustomWalletComponent';

const CustomWalletInfoComponent = () => {
    const [balance, setBalance] = useState("");
    const [isShowPrivateKey, setShowPrivateKey] = useState(false);

    useEffect(() => {
        //获取当前内置钱包账户的余额,需要请求节点代理
        Store.customWallet.get().getBalance()
            .then((b) => {
                console.log(b);
                setBalance(b?.toString());
            })
            .catch((e) => {
                console.error(e);
            });
    }, []);

    //私钥默认不展示
    const show_private_key = () => {
        setShowPrivateKey(true);
    }

    //断开连接,清空保存的账户信息
    const disconncet = () => {
        Store.updataCustomWallet(null);
        Store.customWalletPageShow.set(Custom_Wallet_Page_Show_Type.hidden);
    }

    console.log("privateKey" + Store.customWallet.get()?.privateKey);
    return (<div className='wallet-page-bg' onClick={() => { cancel_click() }}>
        <div className='custom-wallet-page-panel-info' onClick={e => { panel_click(e) }}>
            <div className='custom-wallet-page-panel-item-info' >
                <h2 >账户信息</h2>
                <div className='custom-wallet-page-panel-item-text'>钱包地址:</div>
                <div className='custom-wallet-page-panel-item-text'>{Store.customWallet.get()?.address}</div>
                <div className='custom-wallet-page-panel-item-text'>余额:</div>
                <div className='custom-wallet-page-panel-item-text'>{balance}wei</div>
                <div className='custom-wallet-page-panel-item-button' onClick={e => { show_private_key() }}> 显示私钥 </div>
                <div className='custom-wallet-page-panel-item-text'>私钥:</div>
                <div className='custom-wallet-page-panel-item-text'>{isShowPrivateKey ? Store.customWallet.get()?.privateKey : ""}</div>
                <div className='custom-wallet-page-panel-item-button' onClick={e => { disconncet() }}> 断开连接 </div>
            </div>
        </div>
    </div>);

};

export default CustomWalletInfoComponent;
使用已连接钱包完成转账
在我们的NFT官网中mint是一种转账操作,该操作需要向合约账户转一定数量的ETH,转账操作会需要私钥的签名,之前我们默认使用MetaMask的Singer,现在在contract_utils.js中新增方法,根据是否连接内置钱包选择不同的Singer。补充一点,Wallet继承自Singer,所以Wallet可以直接作为Singer使用。
const getSigner = () => {
    //已连接内置钱包,则优先使用内置钱包的账户
    if (Store.customWallet.get()) {
        return Store.customWallet.get();
    } else {
        const provider = new ethers.providers.Web3Provider(window.web3.currentProvider);
        return provider.getSigner();
    }
}
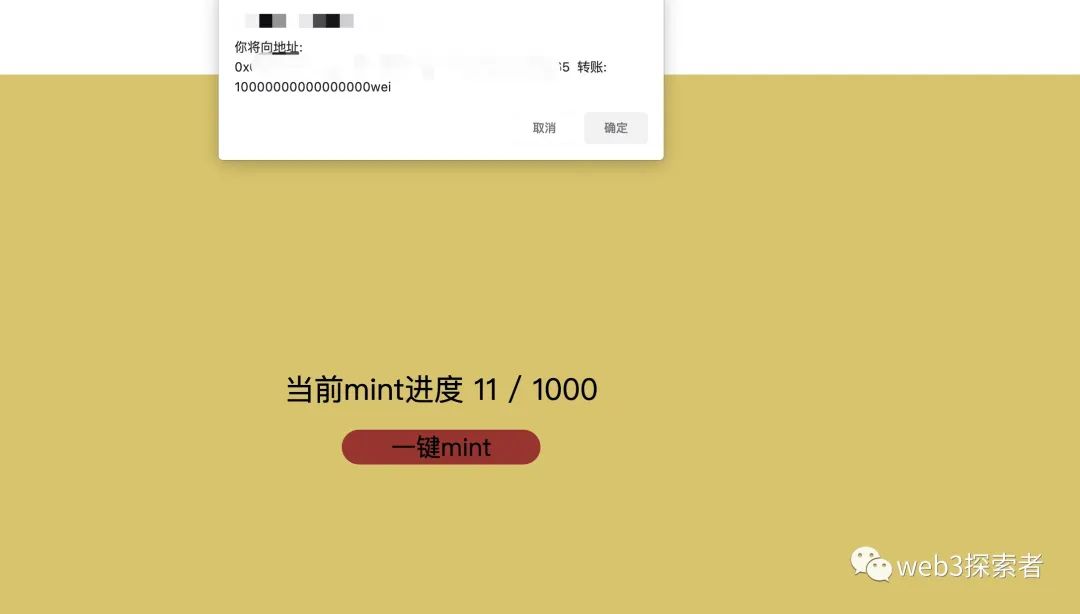
转账对用户进行提示
在官网进行转账操作,我们有义务提示用户进行二次确认,避免在用户不知情的情况下发生转账行为给用户带来资金损失,所以修改contract_utils.js中的mint方法,在执行Mint这一转账操作前,弹出弹窗让用户进行确认。
export const mint = async () => {
    const contract = getContract();
    const contractWithSigner = contract.connect(getSigner());
    const price = await contract.PRICE_PER_TOKEN();
    console.log("price is" + price);
    //调用Mint方法前先弹确认弹窗让用户进行确认
    const r = window.confirm("你将向地址: "+ contract.address + "  转账: " + price +"wei");
    if (r) {
        const tx = await contractWithSigner.mint(1, { value: price });
        console.log(tx);
        await tx.wait();
        window.alert("mint成功");
    }
}
至此,我们为我们的Dapp增加了1个功能完整的内置钱包。
结尾
由于以太坊中账户校验规则都是一致的,所以使用该内置钱包生成的账户也可连接到MetaMask, 或者将MetaMask生成的账户导入到内置钱包也可以正常使用。此外,为了减少篇幅没有介绍助记词相关,如果有兴趣,可以了解BIP39在本文基础上很容易拓展支持助记词。内置钱包可以减少用户使用Dapp的门槛,希望各位小伙伴早日探索开发出可以破圈的Dapp。