In this step-by-step tutorial, we will help you deploy Avax on Tencent Cloud.
Step 1: Start an Ubuntu instance on Tencent Cloud
Go to the Console page, Select the Cloud Virtual Machine in the below.
Note: If you have not created an Tencent Cloud account, create one first. For more information, see sign up with Tencent Cloud.

Buy VM Instance
- Select a good region of instance. (Not in China).

- Click the Buy Now button.

- In the Basic configurations step, configure parameters and click Next.

- Select an
Ubuntu 20.04 64bitImage for OS.


- As the official hardware requirement, you’d better select CPU 8core, RAM 16GB, disk: 1TB.
Config the firewall.
In the Networking step, configure the public IP address and bandwidth settings, as shown in the following figure. And we should open the 9651 port in firewall for avax node.
- Click create & security group.


- Add a 9651 port rule for avalanche node.

- Click Ok Button. and then click Add rule button.

- Add an inbound rule for 9651 port as below:
TCP:9651

- Remove other ports except 22, 80, 443, and 9651 port.

- Back to the creation page, select the Existing security group and select the group we created right now.

Create a login key pair for VM login use to have a high security level.
- click create a new one.

- Click New in Pop up window.

- Input a custom name for pair key, and click OK to download the .pem file to localhost.

- After create key pair, back to the instance creation page and select it.

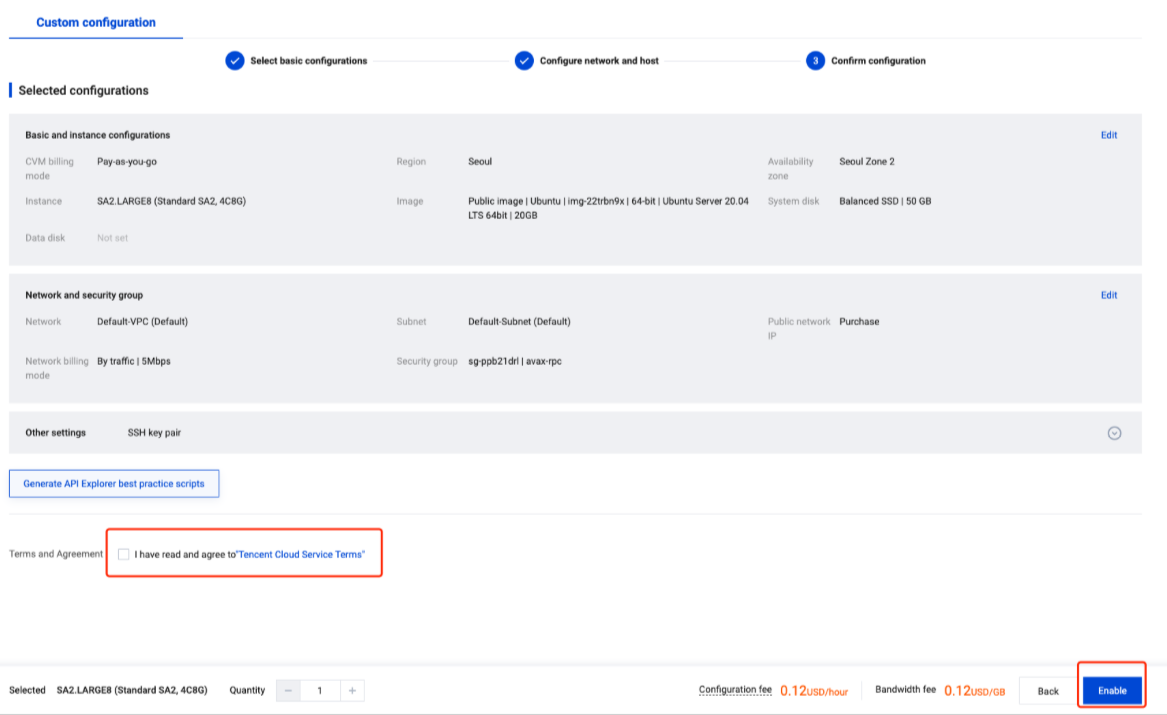
Preview the configurations.
In the Preview step, read and select the I have read and agree to Tencent Cloud Terms of Service. Then, click Enable.
Step 2: Install the Avax
Login to the Machine with the pem file.
- Get public IP address of instance.

- Use the following command to login into cloud server.
chmod 400 /PathTo/YourPemFile.pem

ssh -i /PathTo/YourPemFile.pem ubuntu@YourInstanceIPAddress

Download the Binary
If you want to download a pre-built binary instead of building it yourself, go to our releases page, and select the release you want (probably the latest one.)
Under Assets, select the appropriate file.
For Ubuntu on Tencent cloud :
Download: avalanchego-linux-amd64-<VERSION>.tar.gz

you can right click the item and copy the URL for download it in your server.
use the following command to download and unzip it.
wget https://github.com/ava-labs/avalanchego/releases/download/v1.9.5/avalanchego-linux-amd64-v1.9.5.tar.gz

tar -xzf ./avalanchego-linux-amd64-v1.9.5.tar.gz
The resulting folder, avalanchego-v1.9.1, contains the binaries.

Start a Node, and Connect to Avalanche
If you are using the pre-built binaries on Linux:
./avalanchego-v1.9.1/avalanchego
By default (without specifying any parameters), this node will connect to the Mainnet which may take much longer time to finish bootstrapping. See this for connecting to Fuji Testnet.
Make sure your 9651 port is open to public

When the node starts, it has to bootstrap (catch up with the rest of the network). You will see logs about bootstrapping. When a given chain is done bootstrapping, it prints logs like this:
[09-09|17:01:45.295] INFO <C Chain> snowman/transitive.go:392 consensus starting {"lastAcceptedBlock": "2qaFwDJtmCCbMKP4jRpJwH8EFws82Q2yC1HhWgAiy3tGrpGFeb"}
[09-09|17:01:46.199] INFO <P Chain> snowman/transitive.go:392 consensus starting {"lastAcceptedBlock": "2ofmPJuWZbdroCPEMv6aHGvZ45oa8SBp2reEm9gNxvFjnfSGFP"}
[09-09|17:01:51.628] INFO <X Chain> avalanche/transitive.go:334 consensus starting {"lenFrontier": 1}
This will take time to initialize, make sure the eta time is getting smaller.

Verify the Connection
To check if a given chain is done bootstrapping, in another terminal window call info.isBootstrapped by copying and pasting the following command:
curl -X POST --data '{
  "jsonrpc":"2.0",
  "id"     :1,
  "method" :"info.isBootstrapped",
    "params": {
    "chain":"X"
  }
}' -H 'content-type:application/json;' 127.0.0.1:9650/ext/info
If this returns true, the chain is bootstrapped; otherwise, it returns false. If you make other API calls to a chain that is not done bootstrapping, it will return API call rejected because chain is not done bootstrapping. If you are still experiencing issues please contact us on Discord.
Your node is running and connected now. If you want to use your node as a validator on the main net, check out this tutorial to find out how to add your node as a validator using the web wallet.
You can use Ctrl + C to kill the node.
To be able to make API calls to your node from other machines, when starting up the node include argument --http-host= (e.g. ./build/avalanchego --http-host=)
Connect to Fuji Testnet
To connect to the Fuji Testnet instead of the Mainnet, use argument --network-id=fuji. You can get funds on the Testnet from the faucet.
./avalanchego-v1.9.1/avalanchego --network-id=fuji
Run node in the background
If you want to run your avax node in the background, let it not close after you close the terminal. You can use one of the follow ways as you wish:
-
run node with
nohupcommand; -
run node with
pm2; -
run node in a
screentools;
nohup and screen are delivered with ubuntu, and pm2 needs to be installed by yourself.