
Mock Testing allows you to isolate and test your code in different states without interference. To put it simply, we replace our original object with the mock object with the modified conditions that we want to test. This makes the unit testing for those conditions very smooth.
Note: Some smart-contract development and familiarity with Openzeppelin contracts will help you follow this article. The project I used for the demo is built with Foundry, but you can use any other tools (e.g., Hardhat and Brownie) as I outline in this article.
Goal
Imagine you have an NFT (non-fungible token) contract with a maximum supply of 100. How do you test that this contract will not mint more than 100? What if it is a set of 10,000? We don’t want to deploy our contracts untested. The same goes for the limit of your ERC-20 tokens, treasuries, staking pools, etc. Situations like these are where mock testing your contract is essential. And that is exactly what we will be going through in this article.
Order of operations:
- Set up an NFT contract with a maximum supply of 100.
- Mock the contract with the state of
tokenIdbeing 100. - Write unit-test to
minttoken after max supply is reached.
Project Setup
For this project, we will be using a repository that I created a few days ago for my article on Foundry basics. But you can use any smart contract development tool like Hardhat, Truffle, or Brownie. Let’s take a quick look at the contract. It is a simple foundry project for an NFT called Figbot. First, we install Openzeppelin to use the Ownable, ERC721URIStorage, and Counters module for our NFT.

As you can see, we have :
- Implemented
Counters.solto help us withtokenIds - State variables for
MAX_SUPPLY,COST, andTOKEN_URI - Setup
constructorfor ERC721 - An event to broadcast when
withdrawFundsfunction is successfully executed - Written functions for
mint,totalSupply, andwithdrawFunds
Mocking the contract
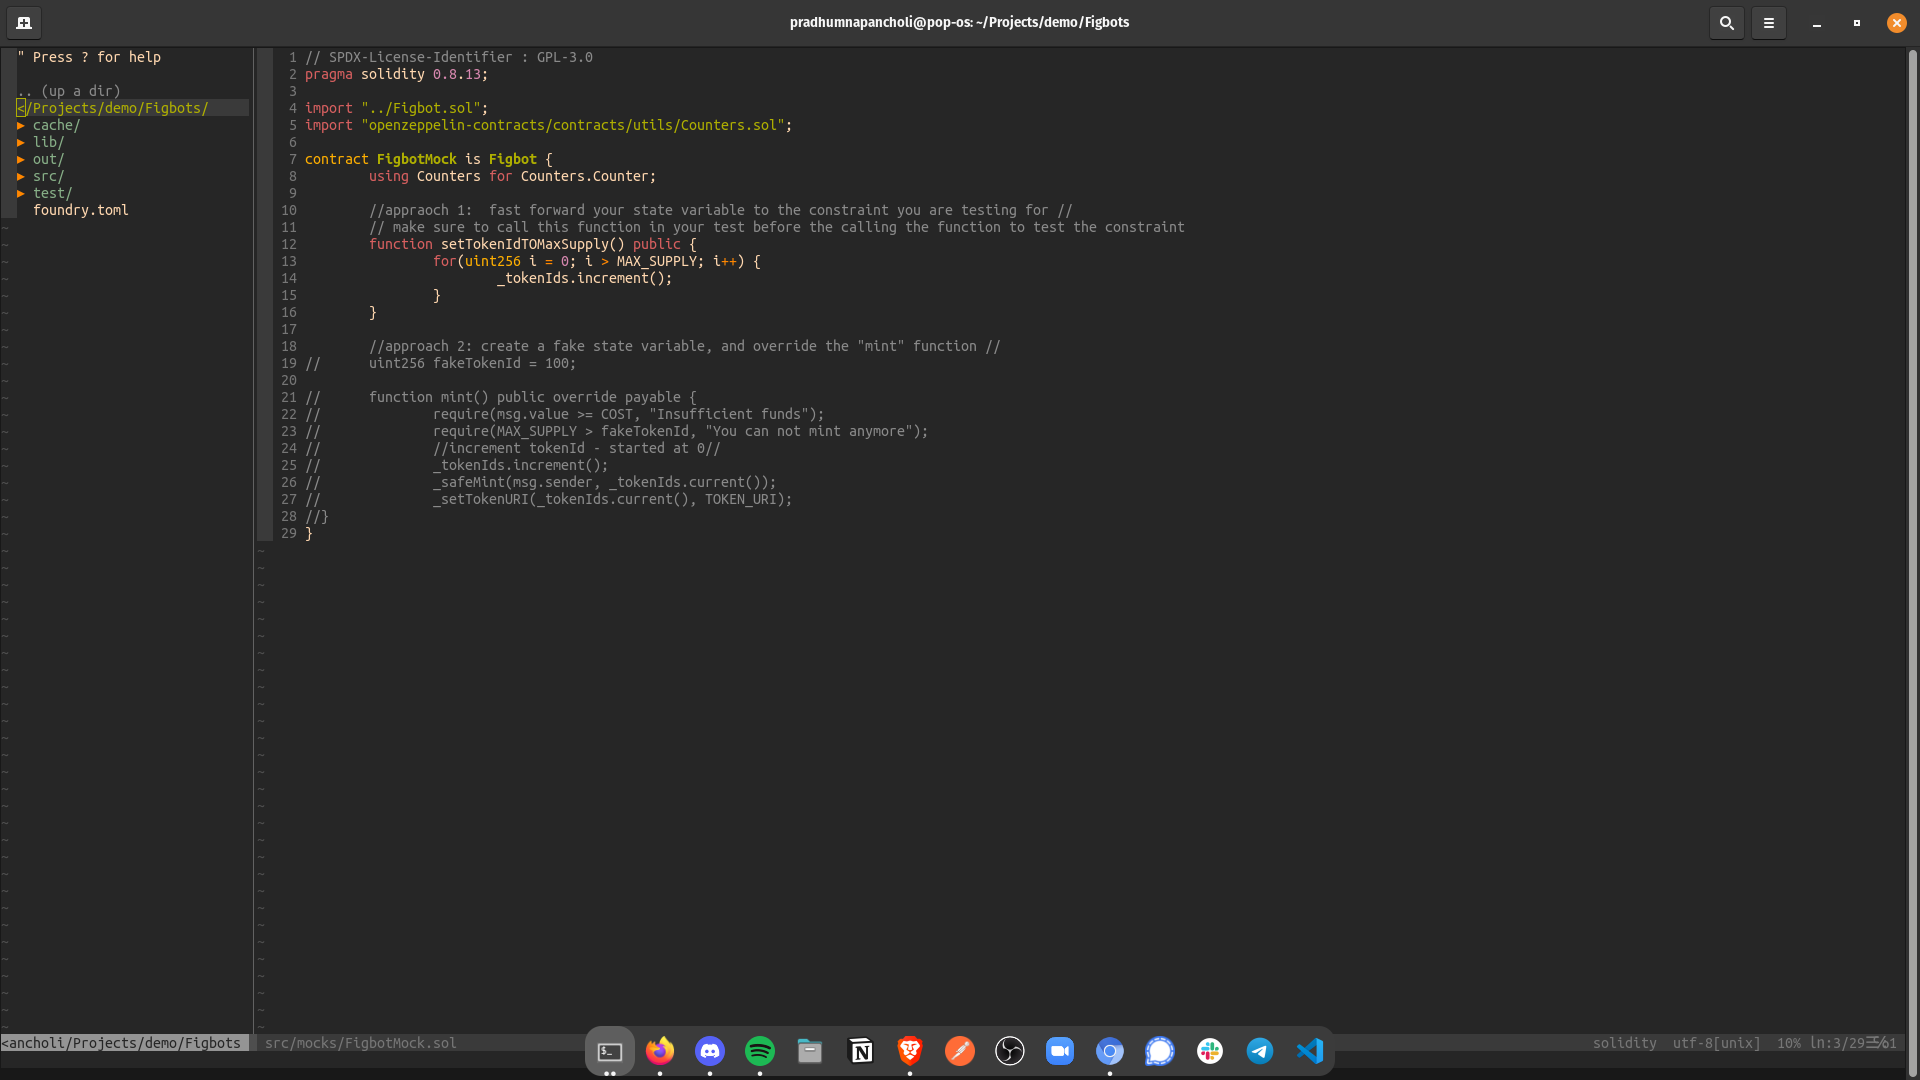
Now, we will mock our contract to test that no one can mint any more than the max supply. Our NFT contract has a maximum supply of 100 tokens. We need to manipulate our state in this mocked contract to test that. As you can see, we are using Counters to index tokenIds. I am going to demonstrate two approaches to accomplish this.
Let’s create a mocks directory inside our src directory (inside the contracts directory if you are using Hardhat or Brownie). Now, create a file called FigbotMock.sol inside the mocks directory. To set up the mock, we need to perform the following:
- Import the contract we intend to mock.
- Import the libraries that are being used in the contract.
- Declare the mock contract by inheriting the base contract.

Now, I will show you two approaches to handle this, and you will find yourself using both of these depending on the case. Later on in the article, I will explain preferences and what to look out for.
The function that updates state:
As I mentioned earlier, we use Counters.sol from Openzeppelin contracts. We created our state variable tokenIds (we use this variable to check current tokenId against max supply) using this library, which provides an increment function. So, we can write a function in our mock contract to run a loop and get this state variable’s value to 100. We can call this function in our tests and perform mint to test the constraint of MAX_SUPPLY. This method is super clean, efficient, and easy to test.
function setTokenIdToMaxSupply() public {
  for(uint256 i = 0; i <= MAX_SUPPLY; i++) {
    _tokenIds.increment();
  }
}
Time to test it!
Now, all we have to do is to call this function setTokenIdToMaxSupply inside out test. This will set our tokenIds to 100 and if we try to mint after that, we should get “You can not mint anymore”.
function testMintAfterMaxSupply() public {
  vm.startPrank(alice);
  vm.deal(alice, 1 ether);
  figbot.setTokenIdToMaxSupply();
  vm.expectRevert(bytes("You can not mint anymore"));
  figbot.mint{value: 0.69 ether}();
}
Running the tests with forge test will give you an [PASS] as the contract should not allow users to mint more than 100 tokens.
Overriding the function:
This is another approach that you will find yourself doing often. However, I recommend using it as little as possible.
With this approach, we override our function with “fake” variables. In our case, we will create a new variable called fakeTokenIds and use that variable to check our conditions instead of _tokenIds. One requirement to override a function is to use the virtual keyboard while defining the function you want to override.
So, let’s do that.
- Make the
mintfunction in Figbot.sol a virtual function - Create
fakeTokenIdsvariable and set its value to 100 - Override the
mintfunction inside FigbotMock.sol by replacingfakeTokenIdswith_tokenIds


Time to test it!
As always, we want to write tests for our contracts to ensure that everything works as it should.
function testMintAfterMaxSupply() public {
  vm.startPrank(alice);
  vm.deal(alice, 1 ether);
  vm.expectRevert(bytes("You can not mint anymore"));
  figbot.mint{value: 0.69 ether}();
}
Keep in mind that I am using foundry cheatcodes here. The first two lines set the user to “alice” and give their wallet a balance of 1 ether. And then, we have an expectRevert with the reason for the transaction to fail. In our case, the contract spits out, “You can not mint anymore” if the MAX_SUPPLY of 100 is reached.
Run forge test, and you can see it [PASS] in the results.
Wrapping up:
I hope this article helped you with learning, and now you can test your smart contracts with 100% coverage. I have shared two approaches for the same scenario. The first one is cleaner and easier to test. It also forces better system design, in my opinion. The second approach has to be used often, but I highly suggest avoiding it to make sure that we don’t mess up anything in our function logic. I hope you find this helpful and feel free to share your thoughts.