In Kamigotchi World, there are a lot of base-game mechanics that are intricately designed by the team to ensure there is a certain level of balance. These mechanics are hard to understand, but can help you maximize your MUSU harvests and minimize risk. This guide is a bit higher-level in terms of understanding the game mechanics, if you’re wondering about stats and other aspects, please check out my previous guide.
In this guide, I will be going over and doing some deep-dives into the following:
-
Leveling: Experience needed and the time-scale of leveling
-
Harvesting: Affinity Matchups, MUSU Gain, Strain and Recovery
-
Liquidations: Threshold, Salvage, Spoils, Cooldown and Recoil
-
Build Tier Lists: Harvester, Guardian, Enlightened and Predator
Please keep in mind that the values and equations here might be changed in the future.
Leveling
Levels are one of the most important factors in Kamigotchi world, as your Kamis need levels to be able to skill their additional boosts. Levels start off at a baseline experience increase of 40, and then increase in a polynomial fashion:
Where i is the current level.
This means that as your Kami levels, it gets harder and harder to keep leveling it. According my calculations, leveling up from level 1 to level 38 needs the same amount of experience as leveling up from level 38 to level 41. This mimics the progression in other RPGs, with the most notable comparison being OSRS.
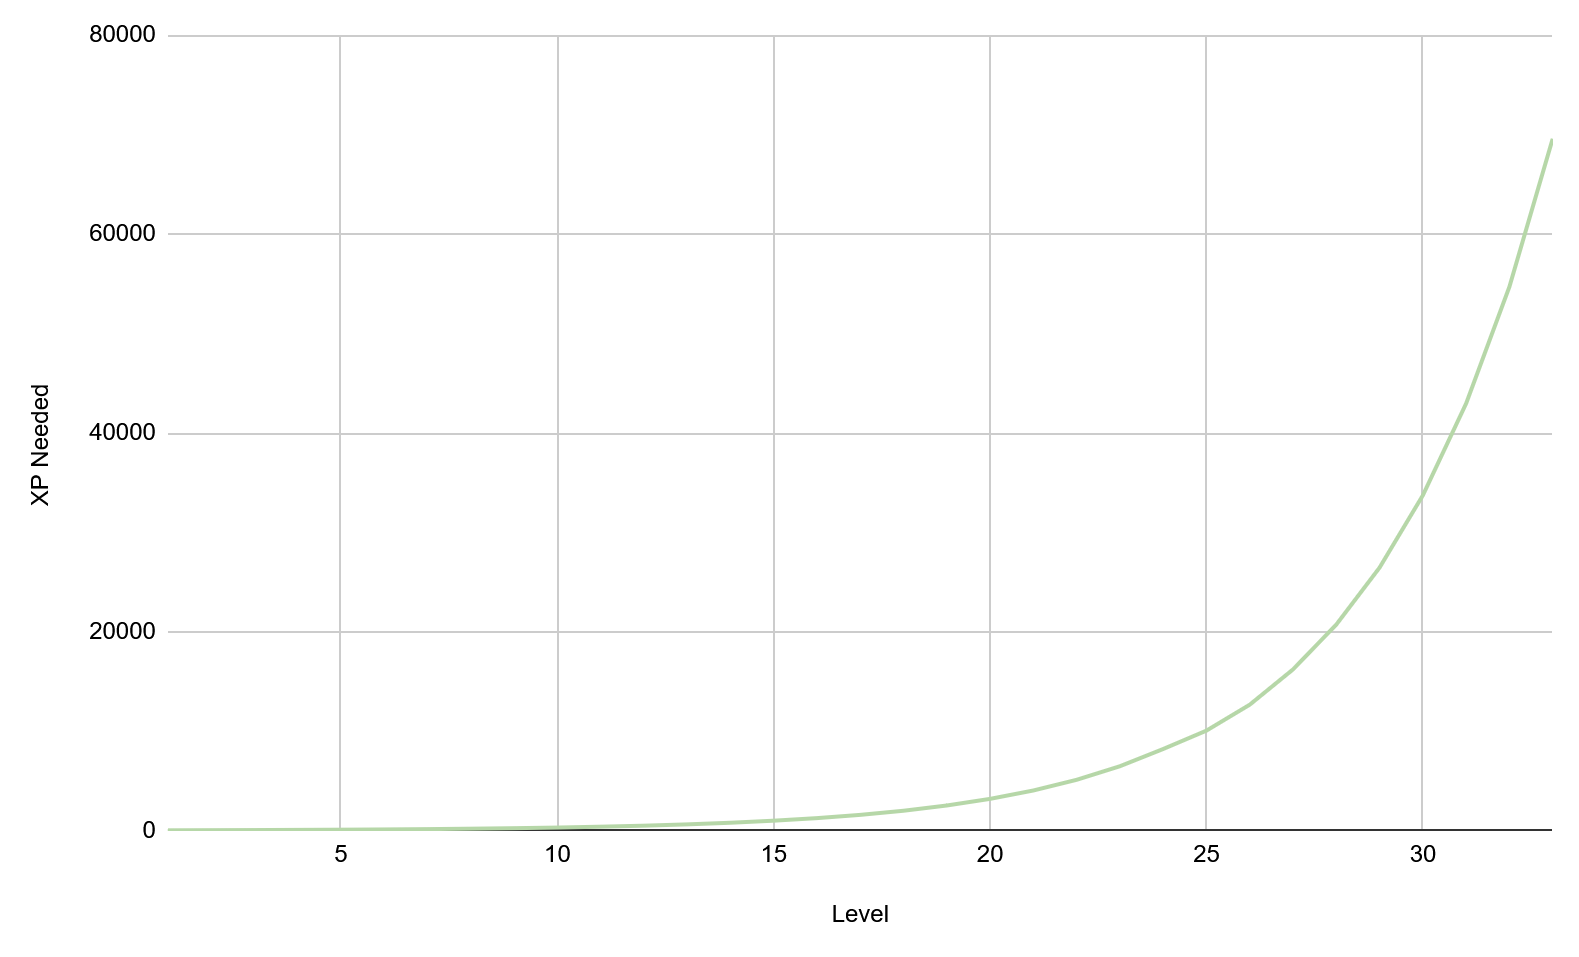
To paint a picture, the team stated that it should take players a year to reach the last tier (level 55) of the talent tree. This means that talent trees will likely be resettable at multiple points for your Kami, as you can harvest mint at a much faster pace than you can level your Kami.
Harvesting
When you’re harvesting, two main things matter: MUSU gain and damage taken. These two main factors determine how efficient your Kami is at harvesting MUSU. They’re affected by the following:
-
Power: The basis of harvesting is Power, as it directly increases the base MUSU your Kami gains per hour.
-
Intensity: Intensity is a ramping mechanic, where the longer your Kami harvests, the more MUSU/hr it gains.
-
Bounty Boost: The overall boost to MUSU bounty, applies with both Power and Intensity.
-
Fertility Boost: The affinity based boost to MUSU bounty. Only applies for Type matchups, does not apply for Intensity, and not for [Normal/Normal] matchups.
-
Strain: The damage your Kami takes when harvesting MUSU.
Affinity Bonus
Affinity is the type matchup your Kami has when harvesting in a node. The logic is a bit complex, but the two following factors matter:
-
Affinity works part-by-part, body affinity has a 2.6x higher affect on affinity than hands affinity does.
-
Fertility boost does not get applied on non-matching or Normal parts.
So overall, if your Kami has matching [Body/Hand] types (e.g. [Eerie/Eerie]), this means that fertility boost is ideal, as it will have double the effect it would on non-matching Body/Hand (e.g. [Insect/Eerie]) types. If you have a [Normal/Normal] type Kami, you should never take fertility boost, as it will have 0 effect.
# Base Affinity Bonus
affinityBonus = 1

# Body Calculations
if body.type == Normal:
  affinityBonus += 0
if body.typeMatching == True and body.type != Normal:
  affinityBonus += 0.65 + fertilityBoost
if body.typeMatching == False and body.type != Normal:
  affinityBonus -= 0.25

# Hand Calculations
if hand.type == Normal:
  affinityBonus += 0
if hand.typeMatching == True and body.type != Normal:
  affinityBonus += 0.35 + fertilityBoost
if body.typeMatching == False and body.type != Normal:
  affinityBonus -= 0.10
Fertility boost is the value increased in the Harvester and Enlightened trees, and is usually increased by 5% per level.
To give an example calculation, if you were harvesting in an Eerie node with an [Eerie/Eerie] Kami, your affinity bonus would be:
While for an [Eerie/Insect] Kami, the affinity bonus would be (assuming harvest at an optimal node):
Harvest Fertility
Fertility is a pretty straightforward formula that accounts for the affinity bonus (or decrease) and multiplies it with Power and a base rate.
To give an example calculation, going back to that [Eerie/Eerie] Kami, assuming it has a fertility boost of 30% and 26 Power:
Intensity
Intensity is comprised of 3 main factors; time harvesting, intensity boost and violence. Time harvesting increases the overall MUSU gain from intensity, while the base violence amount adds a base multiplier to intensity.
To give some example calculations, going back to that [Eerie/Eerie] Kami, assuming it has a violence of 10 and no intensity boost:
If your Kami has just started harvesting:
If your Kami has been harvesting for 1 hour:
Harvest Bounty
Harvest bounty is the overall MUSU your Kami has harvested in the amount of time you have had it harvesting in a node. Besides the increases the fertility and intensity, it is multiplied by bounty boost, which usually is increased in the Enlightened or Harvester trees by 4% per level.
To give an example calculation, to finish up the harvest rate on that [Eerie/Eerie] Kami, assuming it has a bounty boost of 16%, the following is found:
This example applies to the real value that I calculated with my own Kami.
Bounty Boost vs. Fertility Boost
I have always wondered the following question: in what cases does fertility boost work better than bounty boost? Which skill should you prioritize on what Kamis?
Looking at the numbers, I wanted to keep a few things constant. In the discussion we’re having, there is no shift in Intensity (base of 10) and no shift in violence (base of 10). There is also a key assumption made that for Typed/Typed (different, e.g. [Insect/Eerie]), the owner will choose the best matchup, which is the body as the harvesting node. Also, [Normal/Normal] was not accounted for since it does not get fertility boost bonuses.
15 Power, 10 Violence:
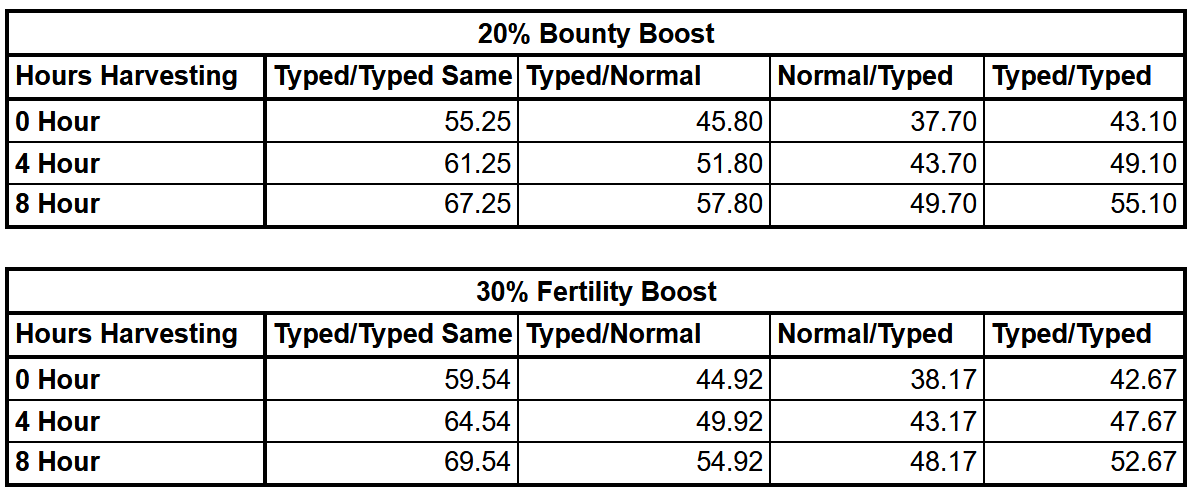
In the table above, it is obvious that fertility is better in two cases: when a Kami has [Typed/Typed] and [Normal/Typed] composition. However, for [Normal/Typed], after 4 hours of harvesting, bounty boost beats out fertility because of intensity gain. It’s interesting to see, as because hands give ~40% of the matchup bonus bodies give, the fertility boost addition is an 80% increase to the affinity bonus.
20 Power, 10 Violence:
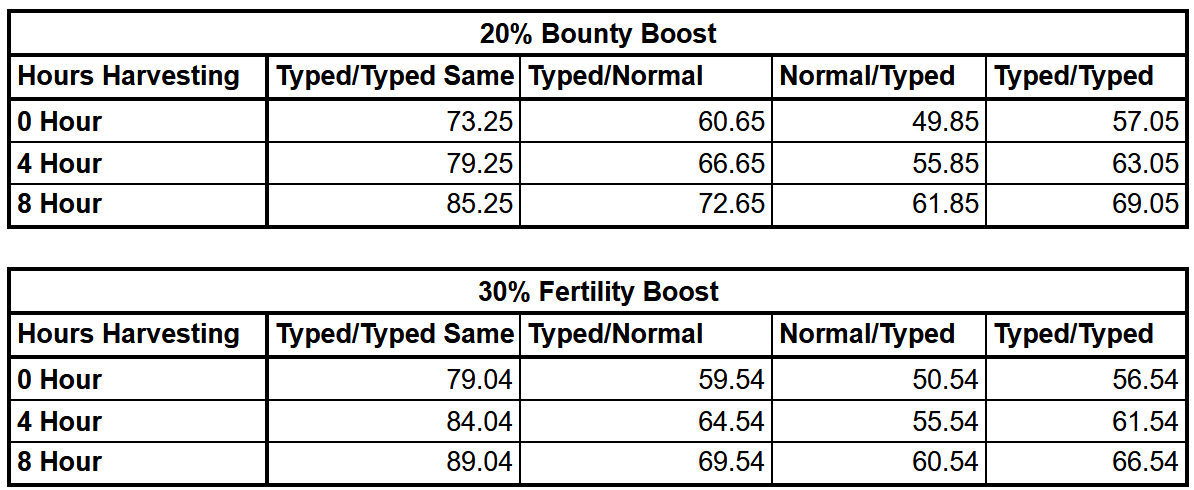
Even when increasing to 20 power (15 base power with +5 power from talents or 20 base), the cases in which the matchup wins remains the same, fertility boost is more effective on [Normal/Typed] and [Typed/Typed] Kamis.
As power increases further, the differences remain the same. Even applying at a theoretical 50 power, [Typed/Normal] and mismatching [Typed/Typed] just work better with bounty boost. Therefore, always take bounty boost first if you are working with a [Typed/Normal] or mismatching [Typed/Typed] Kami.
Strain
Strain is the amount of HP your Kami loses per MUSU gained. The main factors that affect it are strain decrease boost and harmony. Strain decrease boost is usually increased in the Harvester, Guardian and Enlightened trees, usually giving a 2.5% reduction.
To give an example calculation, let’s use a Kami which is harvesting at a rate of 114.31 MUSU/hr, has 12 total harmony and has -12.5% strain decrease:
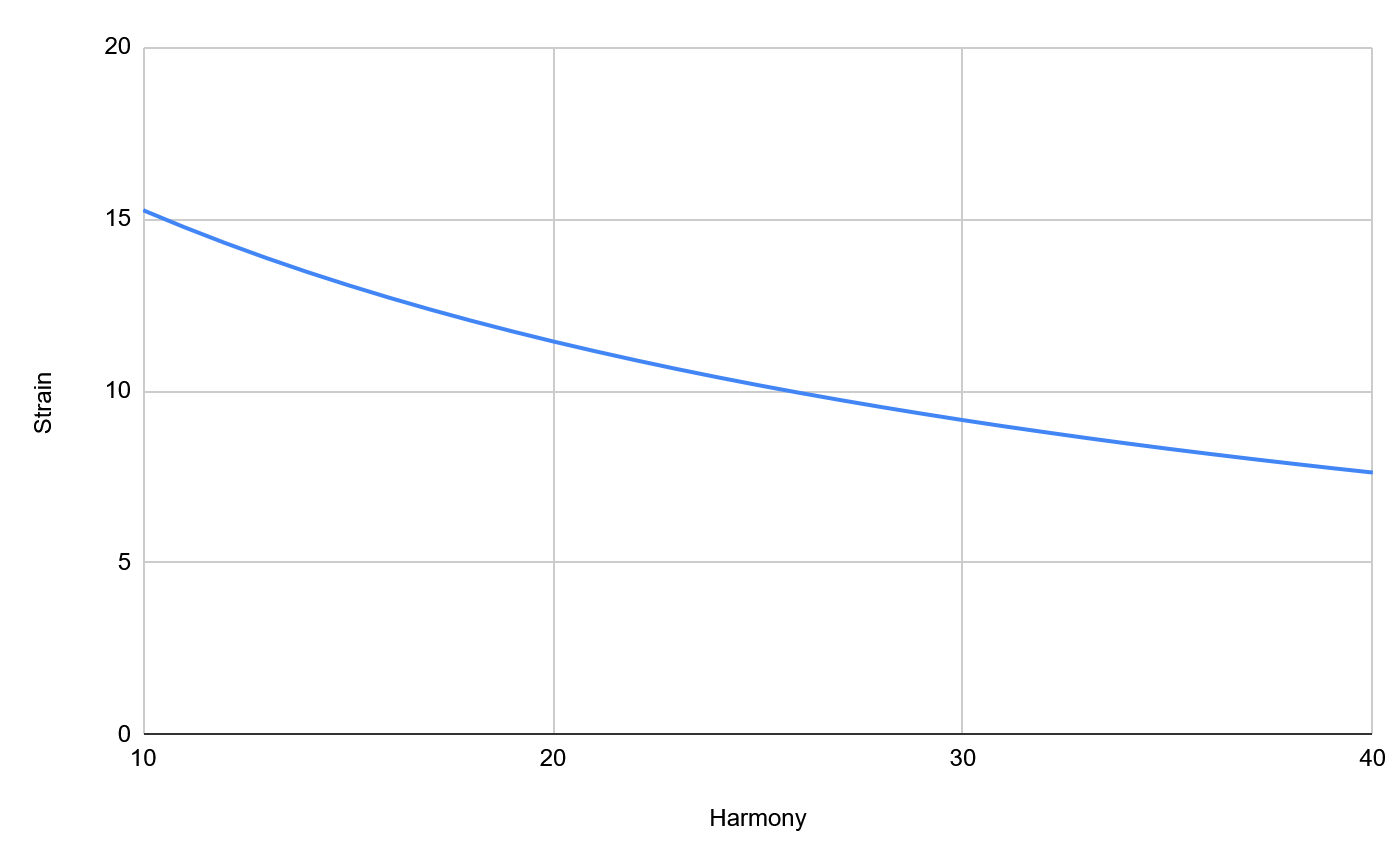
Diminishing Harmony
The strain decrease from harmony diminishes with each point that is put into harmony. This means that players might not want to prioritize harmony as much as some other skills. Below is a graph that showcases the parabolic curve for harmony, using the basis of a 20 Power Kami:
Another interesting correlation for harmony is that higher harmony diminishes the return from strain reduction bonuses. The below table shows this change for 12.5% vs. 0% strain reduction bonuses:
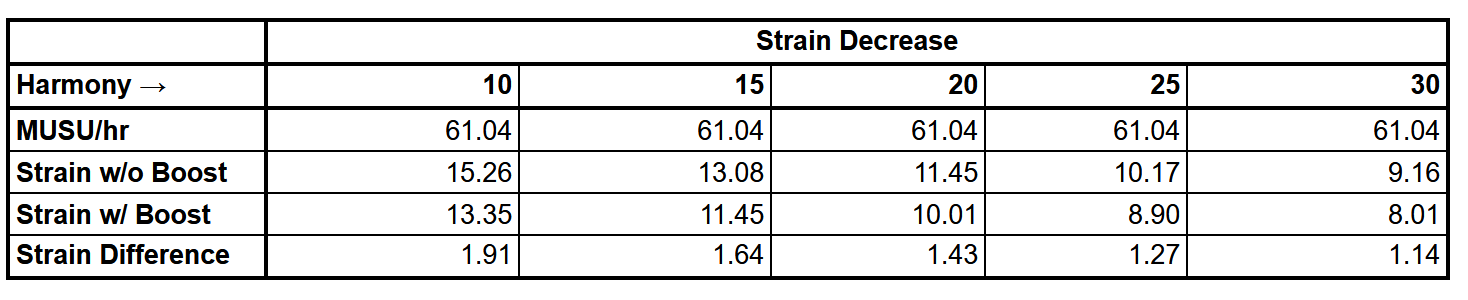
As you see above, the percentage change is the same, but the real change is different, as with three times the harmony, there is almost half the strain reduction. This means that to truly utilize strain reduction, one will probably have to use a medium-high harmony Kami.
Recovery
Recovery is a very straight forward calculation, and is primarily affected by harmony and metabolism boost (which is only found in the Enlightened tree):
Metabolism Boost vs. Harmony
At what point does skilling metabolism boost outweigh skilling harmony?
Well, the calculation for this is super simple. In pure terms, when a Kami has more than 25 harmony, any point into harmony will make it recover less than metabolism boost. But of course, this does not take into account the strain reduction and threshold increase that harmony gives. So, in terms of all of those, it would probably be above 30 harmony, where the bonus from metabolism boost is better than the bonus from harmony.
Liquidating
When you’re liquidating, three things matter: Liquidation Threshold, Recoil Damage and MUSU gain. These factors determine how effective your predator is in terms of cost-effectiveness and liquidation possibilities. These stats are affected by the following:
-
Violence: The basis of liquidation is Violence, as it directly increases the liquidation threshold against Kamis. Violence affects the base threshold ratio.
-
Power: Affects the MUSU gain in two ways; the spoils ratio of your predator and the salvage ratio of your victim.
-
Threshold Ratio Shift: Ratio shift increases the affinity based threshold which applies to the base threshold ratio. This means ratio shift is dependent on violence.
-
Threshold Shift: Threshold shift is a flat shift that is applied at the end of all of the calculations, so it is not affected by violence.
-
Recoil Damage: The damage your Kami takes (karma and MUSU damage) when liquidating another Kami.
Liquidation Threshold
Threshold is the key factor you’re looking at when running a predator Kami. The logic is once again a bit complex, but the following factors are what you should look out for:
-
Animosity: The maximum base animosity your Kami can have towards a victim is 40%, which is calculated using a ratio of your Kami’s violence and the victim’s harmony.
-
Threshold Ratio: Animosity is increased/decreased by the threshold ratio, which is determined through Hand-Body matchup and shifts that are skilled in the talent trees.
-
Threshold Shift: Threshold shift is a flat increase/decrease that is applied at the end of the calculations, this value is only increased by skills in the talent trees.
baseAnimosity = 1
if advantage == True:
  animosityRatio = baseAnimosity + 0.5
if advantage == True & type == Normal:
  animosityRatio = baseAnimosity + 0.2
if advantage == False:
  animosityRatio = baseAnimosity - 0.5

thresholdRatio = animosityRatio + ratioBoost - ratioDecrease
thresholdShift = thresholdIncrease - thresholdDecrease

liquidationThreshold = (NormCdf(ln(predatorViolence/victimHarmony)) * 40 * thresholdRatio) + thresholdShift
The NormCdf function is a cumulative probability function for finding the probability of a range of values within a base normal distribution (mean of 0, standard deviation of 1).
To give some example calculations, let’s assume we have a predator with Insect hands, 30 Violence, +25% ratio shift and +10% threshold shift. Below is the kill threshold calculated against a victim with 15 Harmony, 0% ratio shift, 0% threshold shift and Eerie body:
Below is the kill threshold for the same predator calculated against a victim with 10 Harmony, 25% ratio shift, 10% threshold shift and Scrap body:
And finally, below is the kill threshold for the same predator calculated against a victim with 20 Harmony, 0% ratio shift, 0% threshold shift and Normal body:
For non-affinity matchups, I’ve found that threshold ratio shift no longer applies in the calculations. This is a new addition after a recent balance patch to the game.
Threshold Shift vs. Ratio Shift
Which one is better suited for Guardian Kamis; threshold shift or ratio shift?
Below there is a table that showcases the differences. This table assumes the following: there is a predator Kami lurking with 35 violence, 20% threshold shift and 25% threshold ratio shift.

It is obvious from the graph above that the threshold shift beats ratio shift every time. It is not shown in the table, but even at 10 harmony, ratio shift is vastly outperformed by threshold shift.
The interesting thing is that, the higher harmony your Kami has, the bigger the difference is. This means that, unlike what is commonly thought, you should always prioritize threshold shift, even on typed bodies.
Diminishing Violence
Much like harmony, violence also diminishes as the value of it gets higher. Below is a graph showcasing kill thresholds against a Kami with 15 harmony without any boosts:
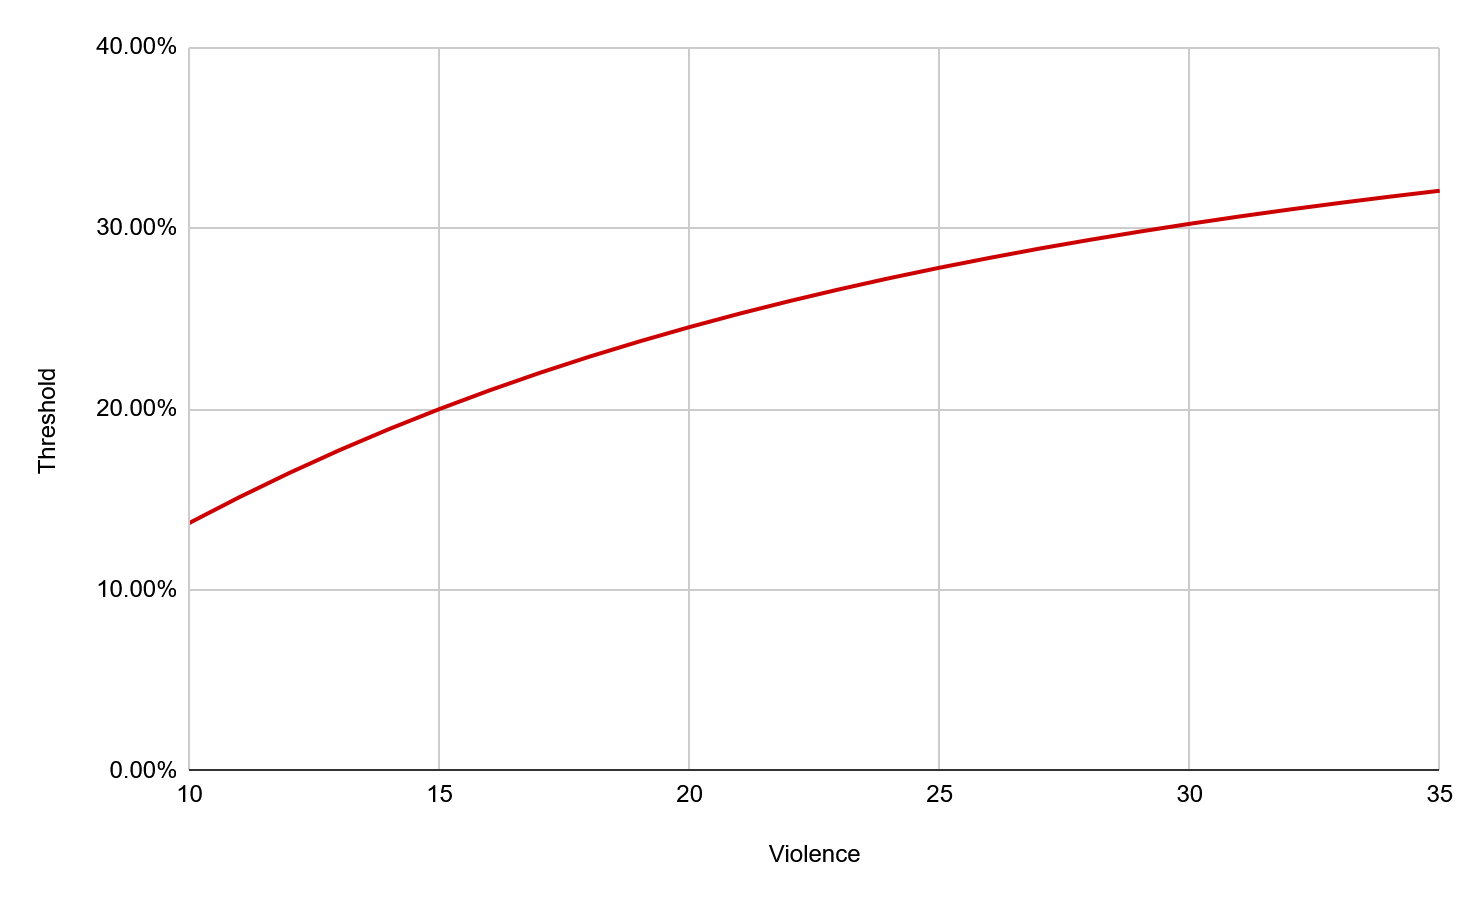
As you can see, over time the jumps in the liquidation threshold get smaller and smaller as violence gets higher. The same logic applies to harmony, where it diminishes in terms of threshold reduction as it increases.
Liquidation Salvage
When liquidated, a Kami keeps a certain ratio of their harvested MUSU. Thus, salvage ratio is a key factor in both how much MUSU your Kami gets from a liquidation and how much MUSU your victim keeps when being liquidated:
Where bonuses are primarily found in the Harvester and Predator paths, usually a 2% increase per level. Below is an example showcasing how much MUSU a Kami with 20 Power, 10% salvage ratio bonus and 100 MUSU retains when liquidated:
The Kami retains 30% of their MUSU when liquidated.
Liquidation Spoils
When liquidating, your Kami will get a certain ratio of the victim’s harvested MUSU. The spoils your Kami gets are also determined by the amount of MUSU the victim retains. So in this case, both the power of your Kami and the victim Kami affects MUSU gain.
Spoils shift can be found in the Predator path, usually at a 2% increase per level. Below is an example showcasing how much MUSU your predator with 10 Power and 10% spoils shift can get from the example Kami previously mentioned (30 MUSU retained).
Therefore, the example predator would gain 45.5 MUSU.
Complete Recoil Damage
Recently, the team added some minor changes to the recoil damage calculation to give predators more profitability, as MUSU damage was too high for predators to liquidate without high risk. The Karma damage multiplier was also reduced. Below is the recoil calculation formula:
Karma
Karma is the left portion of the damage your Kami takes, which is the damage taken based on the victim Kami’s Violence and your Kami’s Harmony.
To give an example, when liquidating a Kami with 20 Violence using a Kami with 15 Harmony:
MUSU Damage
MUSU damage is the right portion of the damage your Kami takes. This damage is pretty interesting, as the strain calculation from harvesting is what determines the damage taken by your Kami, which means that Harmony comes into play once again:
To give an example of MUSU damage, we will be using the same Kami from before with 15 Harmony and 0% strain decrease liquidating a Kami with 100 MUSU:
Harmony vs. Health
Is harmony good to skill on a predator Kami compared to health? I did some analysis on this in the table below. The analysis uses a victim Kami with 15 violence:
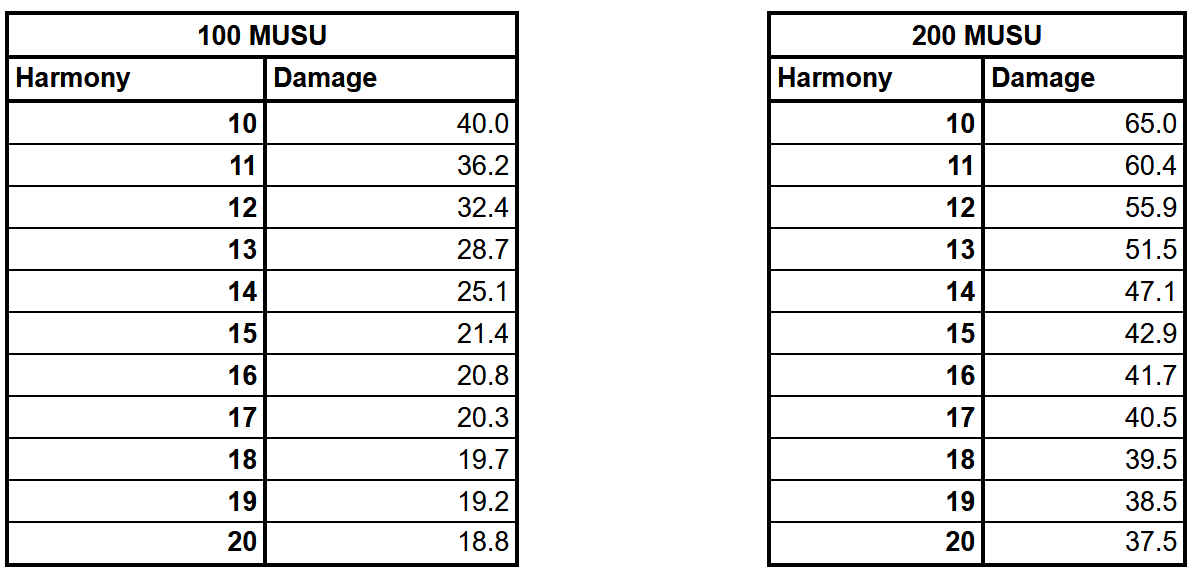
The higher the MUSU loot, the more effective the harmony increase is. On the base-line, harmony increases effective HP by +3 for predators, as it reduces recoil damage from the victim’s violence. However, it decreases damage diminishingly as it gets higher. In an overall sense, I’d say that a point into harmony would increase effective HP by ~4-5, which is worse than the real HP increase of 10.
Action Cooldown
Action cooldown is probably the most straightforward calculation done in the game. It can be reduced in the Predator tree, and it follows a linear decrease as shown:
Tier Lists
Now that we’ve covered equations and stat efficiencies, I want to make tier lists of upgrades in each tree. These tier lists are based on the numbers provided above, with a bit of subjectiveness mixed in based on my opinions.
Harvester
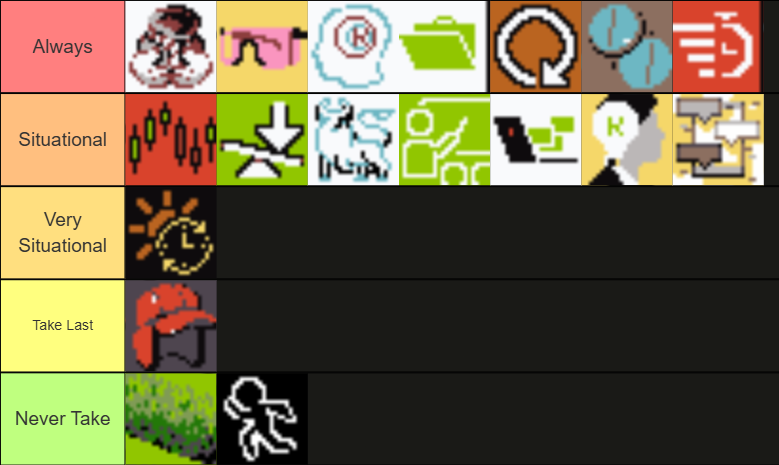
Prioritized: For Harvester, the most important aspects are: power, strain reduction, health and bounty boost. They should always be taken no matter what type of Kami you have, however the order in which you take them is up to you.
Situational: Tier 3/6 upgrades, harmony and fertility boost are pretty situational. Fertility boost should mainly be taken if you have a typed Kami (prioritized on double-typed ones).
Tier 3/6 upgrades are slightly interchangeable depending on what you are prioritizing and the stats your Kami has. For example, if your Kami has ~30 power by tier 3, you probably want to go for the bounty boost due to it’s multiplicative factor, while if your Kami has ~20 power, you probably want to take the power boost.
You can take threshold shift if your Kami is having a tough time with surviving harvests and has a pretty high base Power.
Low Priority: Violence and salvage ratio upgrades should be avoided unless you’re going for a build that utilizes them.
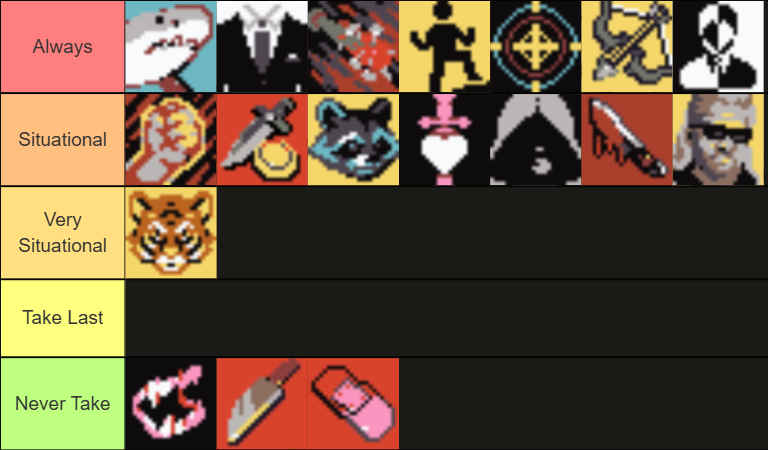
Guardian
Prioritized: For Guardian, the most important aspects are: harmony, threshold shift and intensity. They should always be taken no matter what type of Kami you have. Harmony reduces liquidation threshold, strain and increases recovery rate, it is the single best stat in the game. I recommend taking the +5 Harmony even on harvesters or predators.
To be honest, you also probably want to take Health if you’re going for a pure Guardian path, but because Enlightened/Guardian hybrid builds are becoming more commonplace, if your Kami has high enough health (100+) it can be skipped momentarily.
Situational: Tier 3/6 upgrades and threshold ratio shift are pretty situational. Ratio shift, as we discussed, is much less effective than threshold shift, especially if your Kami has high base harmony.
Tier 3/6 upgrades are slightly interchangeable depending on what you are prioritizing and the stats your Kami has. For example, if your Kami has low base Health/Harmony, you might want to take the harmony or strain reduction skills. But, most of the time you want to prioritize intensity boost, as it will allow your Kami to harvest much faster and for much longer.
Low Priority: Violence should be avoided until last, as it does add a base intensity level, but it is not as effective as other upgrades. I suppose you could utilize it if you’re going for a high-violence flash-farming Guardian build.
Enlightened
Enlightened has a lot more situational upgrades, as you can use it as a hybrid for either Guardian or Harvester Kamis.
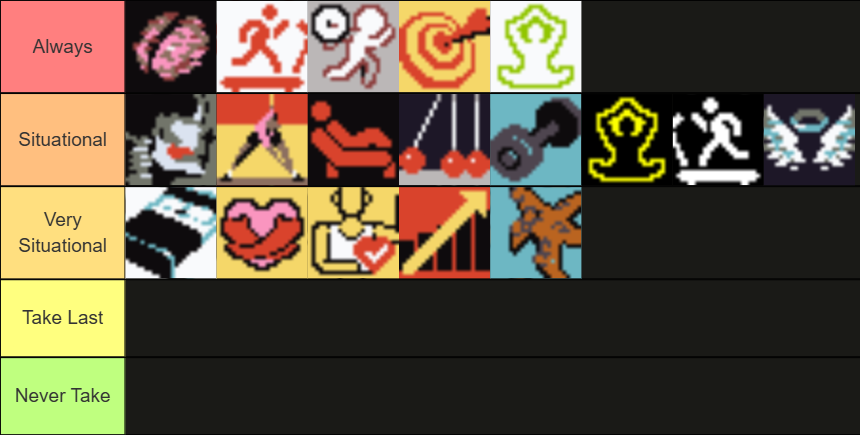
Prioritized: For Enlightened, the most important aspects are: strain reduction, health, bounty boost and threshold shift. Health should be taken no matter what build you’re going for. Strain reduction and threshold shift in the first 2 tiers should always be taken if you’re working with an Enlightened-Guardian hybrid. Bounty boost should be taken if you’re building a pure Enlightened or Enlightened-Harvester hybrid.
Situational: Tier 3/6 upgrades, intensity boost, bounty boost and threshold shift are pretty situational later down the line. Intensity boost and threshold shift are probably best to be prioritized with a Enlightened-Guardian hybrid. Meanwhile bounty boost is best to be prioritized with a pure Enlightened or Enlightened-Harvester hybrid build.
Tier 3/6 upgrades are slightly interchangeable depending on what you are prioritizing. The intensity upgrade should be taken if you are working with a Enlightened-Guardian hybrid in Tier 3, while bounty boost works best for the Enlightened-Harvester hybrid. The same applies to the Tier 6 upgrade, with the addition of +50 HP being a possible priority, but it being that down the line makes it not as appealing as the other two upgrades. Metabolism boost is very good on high health Kamis that need a long time to recover.
Low Priority: Fertility boost should only be taken in the event of a double-typed Kami, as the other upgrades are much better.
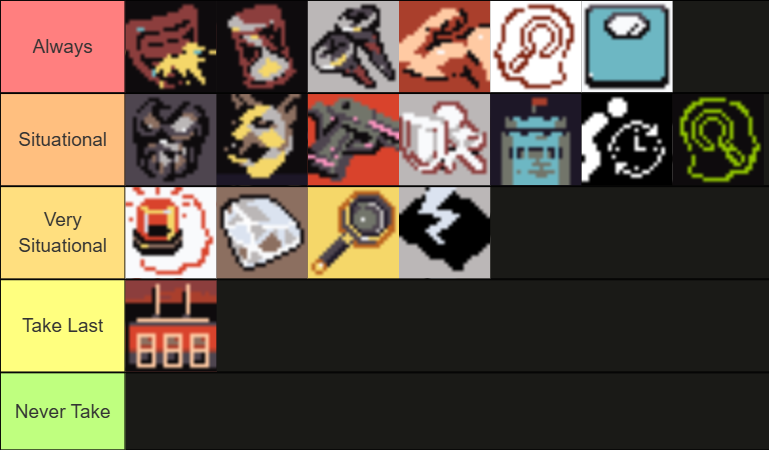
Predator
Prioritized: For Predator, the most important aspects are: threshold shift, ratio shift, cooldown reduction and HP. Threshold shift and ratio shift should be taken no matter what build you’re going for. You can skip health until the later levels depending on your Kami’s base stats. You want to take cooldown reduction usually, but it is best skilled in the late levels.
Situational: Tier 3/6 upgrades, violence and spoils ratio are situational. Violence in both the tier 1 and tier 3 upgrades can be skipped depending on what your Kami’s base violence is (for example for a ~30 base Violence, it is not really needed). Spoils ratio is similar, if your Kami has very high base power, you can skip it in the earlier stages, but I still think it’s a good pick-up as it allows a Kami to level up quickly.
Tier 3/6 upgrades are slightly interchangeable depending on what you are prioritizing. The spoils ratio upgrade is great for if you have a high base violence Kami already (30+), while cooldown reduction can maybe be taken if you have an insanely high base violence (~35+).
Low Priority: Unless you’re going for a very specific build, never upgrade salvage ratio, as ideally you don’t want your Predator to die. Violence that late in the game is also not that useful.