
This guide is covering the full setup of a Gnosischain validator using and installing DAppNode.
DappNode is open source project making easy packages for deploying and hosting DApps, P2P clients and blockchain nodes. Its a very easy to use platform that makes the process of installing and setting up nodes such as Ethereum or Gnosischain a few clicks. This make setup makes this super easy and convenient, while still giving you full control of your node without any centralized intermediaries.
DappNode has partnered with Gnosischain, where you can acquire prebuilt & preconfigured hardware with GNO required for up to 4 validators.
DappNode core: is a software platform can be installed on most hardware, can find instructions to do that here.
DappStore: hosts packages for DApps/ Nodes that can be accessed via DAppNode core software
Step 1: Connect your DAppNode Device
Once you have your DappNode device or you have installed DappNode on a compatible device, start up your device, which means connect to power and internet and allow about 5 minutes to boot up and connect to your network.
Step 2: Connect to DAppNode
Once DappNode is connected to your local network, you need to access the DappNode UI, and there are a number of ways to do this, head to this page to learn how to connect to your DappNode.
I’m using the WIFI to connect, which I found to be the easiest way without any problems
find in your WIFI connections, dappnodeWIFI
your password, on first start-up is just lowercase dappnode
head to this URL https://my.dappnode to connect from a browser, you will first be prompted to register, which is just creating username and password to access your device. Once created you will be given a recovery token, which you need to write down, this is if you ever lose access to your account password.

In your dashboard, look at notifications check for system Updates. you should change the default WIFI login password, so do that.
Step 3: Install an Execution Client
Head to the DAppStore on the left, and search for Nethermind Xdai, which you will need to Install. (note in later versions this will likely be Nethermind Gnosischain)

Install Nethermind and Enable auto-updates when asked to. Once Installed it will start syncing, which can be viewed from the logs like so

If you installed a full node on start up, (just nethermind), which is an Ethereum full node/ or execution client, which we would need if we wanted to run an Ethereum validator, you can either delete or pause this service, if you don’t intend to use.

Step 4: Install a Consensus Client
if you search gnosis in the DAppStore, you will find various consensus clients, in the description you should have “CL beacon chain + validator” as a Consensus client runs two nodes.

I’m selecting Teku for this instance, already running lighthouse so will chose something else for client diversity which is important for network health/decentralisation.

You will have some configurations to make
Graffiti: if selected to validate propose a block this will be custom text of your choosing, default is validating_from_dappnode but this can be whatever you want
Gnosis chain node URL: this is the RPC endpoint of your own execution layer node, which is the first package we installed Nethermind Xdai, its already detected and placed the address in for us.Note: you have to run one of your own, as going forward services like Infura and Alchemy will no longer work for beacon nodes/consensus clients, like what we are installing now.
Checkpoint for fast sync: if your setting up a beacon node, you can use a checkpoint address for a much faster sync. Note this address is deprecated and what you want to use is https://checkpoint.gnosischain.com
Fee Recipient address: should be your own ETH format address that you have full control of, this is where fees from transactions in blocks you get selected to validate will go.
web3 signer Gnosis: is an extra package that will manage our keystores in a secure way, this needs to be the same client as our consensus client, so Teku should be selected in this case as I have selected Teku.

Once confirmed, install and enable auto-updates, this will start the services and begin syncing your beacon node.
Check the logs, the consensus client is running two services validator node and beacon node.
The validator node, is what manages validator duties such as attestations/proposing blocks. we haven’t uploaded any keystores yet, so logs won’t show much.
At this stage you should have installed both execution and consensus client, which are running in the background.

these will be syncing, which means downloading & verifying the chain data and this will take somewhere between 12-24hrs really depending on your hardware.
Step 5: Generate Keys
Head to gnosischain GitHub, and look for the validator generator repository
scroll all the way down the README page, and we can find instructions to install, I’m using windows, this can also be done on Mac and Linux. if you want to do this on Linux using docker then you can look at any of my ‘easy guides to gnosischain validator’ which covers that step
This is the easiest and quickest way to generate keys, look for releases and download the binary of the latest version for your OS, using another device (not your DAppNode device, its also good practice to do this next steps disconnected from the internet for security reasons)

for Windows this is the file which is the data generator binary, download this. we can use something such as 7zip to decompress and extract the binary.
once extracted to a folder, (I’ve put in documents) open the command prompt and change to the directory of the extracted file

Generate Keystores
new-mnemonic: This will generate a new seed
num_validators: This is how many validator keystores we want to run, if you bought the DappNode package that comes with 4 GNO, then we need to create 4 keystores. You can of course create as many as you have GNO for, 1GNO per validator
eth1_withdrawal_address: this is an ETH1 format address that you are in full control of. you need to include this or it will default to the address derived from the seed which may cause issues
Example
deposit.exe new-mnemonic --num_validators=4 --chain=gnosis --eth1_withdrawal_address=0xf3bF9DDbA413825E5DdF92D15b09C2AbD8d190dd
You will need to enter a decrypt key (password) of your choosing, you need to remember/store this password, as you will need it later.
your seed will be displayed, and YOU NEED TO SECURE THIS AND STORE SAFELY do not store digitally do not share, write this down, store somewhere safe, make a backup you will need this to withdraw this is the only way to recover your GNO.
once done, this will generate the x4 keystores and store them along with deposit_data.json in folder called validator_keys

Step 6: Upload Keystores to web3 signer
Back to the dashboard, once our EL and CL have finished syncing.

we can now upload our keystores to our validator client with a package called web3 signer

Open the UI, this will open in your browser

Click on IMPORT KEYSTORES

Select ‘Use same password for every file’ if available and enter the same decrypt key you used earlier when generating keystores. Enable ‘Import slashing protection’ and click SUBMIT KEYSTORES

This should open a window, with imported successfully for each keystore, then you can view validator accounts like so. The keystores have now been imported to the Validator client
this can be checked anytime and a link to gnosis beacon explorer. to view your validator keys on chain.

You can check the keys have been imported by viewing the logs, for consensus client selecting the validator service.

Double check synced either by logs or dashboard, with all clients running and synced, with imported keystores you can now proceed to the Deposit.

Step 7: Make Deposit
You need to grab the deposit_data.json file in your validator_keys folder and head to the deposit UI
Confirm both URL and Contract address from the official docs.
Contract Address: 0x0B98057eA310F4d31F2a452B414647007d1645d9
Connect your web3 wallet (metamask) to gnosischain and to the deposit app, if using the GNO incentive program you will need to use the whitelisted address

Here you can upload your deposit_data.json and follow the steps, this will likely take a few days to confirm, as DappNode will be making the deposit.
If you are making deposit yourself, you will need the required GNO and xDAI in your wallet for fees.
Additional Info
Migrating Consensus Client
Update: 2/12/22
web3 signer package management has changed if you installed a consensus client web3 signer package installed will detect your consensus client and autofill the configuration.
Migrating Consensus Client
If you have more than one consensus client installed, or wish to change Consensus client, Staking management is handled in StakersUI
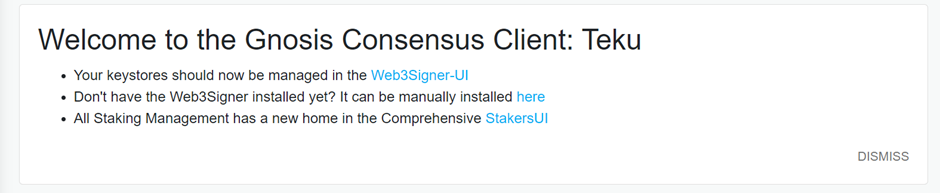
this can be accessed, you can find ‘Stakers’ on the left, if you have more than one consensus client installed (note at time of writing Prysm does not support Gnosischain) select the client you wish to use as your consensus layer. You can also mange some consensus client settings here such as changing your fee recipient address or Graffiti.

Scroll down, check the configuration, and click apply changes. this will autofill the configuration settings for your web3 signer package and will ensure you are using the one consensus client to validate.

You can check this has updated in your web3 signer config settings to the changes made in the StakersUI

Metrics with DappNode
Dappnode uses Prometheus exporter for metrics and there is a package for this available in the DappStore
Download the Dappnode Exporter

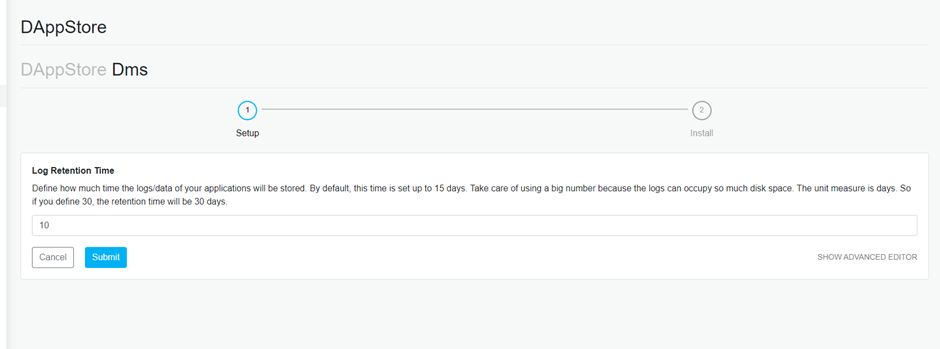
Download Dms package
If you can’t find in the store
Direct Link via DappNode Here: http://my.dappnode/#/installer/dms.dnp.dappnode.eth

Enter log retention time
Download Metrics Tools
Direct Link via DappNode Here: http://my.dappnode/#/installer/metrics-tools.dnp.dappnode.eth

Open Metrics Dashboard
Access via link http://dms.dappnode/ (you must be connected to DappNode WiFi)
head to Dashboards > manage, you can explore pre-built dashboards from the exporter

Validator Withdrawal
Validator withdrawal also known as voluntary exit, is when you wish to stop validating and no longer remain active.
Please NOTE: this is not reversible, if you wanted to stake again you would need to setup up once again with new keystores. Also note that as of writing withdrawals are not yet enabled, so your GNO will be locked until this feature is added.
Teku Consensus Client, has this feature under advanced settings in config
In the first env var called EXIT_VALIDATOR, we have to fill it with the phrase:
I want to exit my validators
The second var KEYSTORES_VOLUNTARY_EXIT, we need to write here the pubkey/s of the validators we want to do the exit: no spaces and comma separated like so

If you are sure about this click Update and you can confirm from the beacon explorer and validator logs to check.