
This guide is help you set up a Gnosis Validator, this will cover the full set up on a local device installed with Ubuntu 20.04 LTS. We will be using Lodestar for consensus layer client and Nethermind for our Execution layer client.
Gnosischain merge is on the horizon, this guide is intended to be merge ready the set up will cover steps and configuration needed to run post merge, and today.
Gnosischain is using Ethereum’s Proof of Stake consensus with the Beacon chain to select validators, a GNO validator requires only 1 GNO to run and the hardware requirements are similar to Ethereum. This makes it highly decentralised as it can be run locally without needing a data centre.

Hardware Requirements: Wired connection to a local device with at least 8GB memory (I am using 16GB with no issues), I would recommend starting with 1TB and to use higher grade SSDs or NVMe, as a node operator you're providing a service, so best to start with good hardware that will last and perform up to standard.
Assuming you have a fresh install of Ubuntu 20.04 LTS. Some experience with Linux will help, I’ve written this as best I can for those with minimal experience with the OS. Minimum install for security I would keep this as a dedicated device, some prefer a server but I find it easier to manage folders and files and mount USB’s with the UI.
1. Prerequisite Software
Update Ubuntu
sudo apt update && sudo apt upgrade -y
Install curl and git
sudo apt install curl git -y
Install Docker
Install Docker instructions from here.
curl -fsSL https://get.docker.com -o get-docker.sh
sh get-docker.sh
sudo rm -r get-docker.sh
sudo usermod -aG docker $USER
Check installed with (if correct will output version)
docker --version
Install Docker Compose
Install Docker Compose instructions from here.
sudo curl -L "https://github.com/docker/compose/releases/download/v2.2.3/docker-compose-$(uname -s)-$(uname -m)" -o /usr/local/bin/docker-compose
sudo chmod +x /usr/local/bin/docker-compose
sudo ln -s /usr/local/bin/docker-compose /usr/bin/docker-compose
Check installed with (if correct will output version)
docker-compose --version
2. Firewall Settings
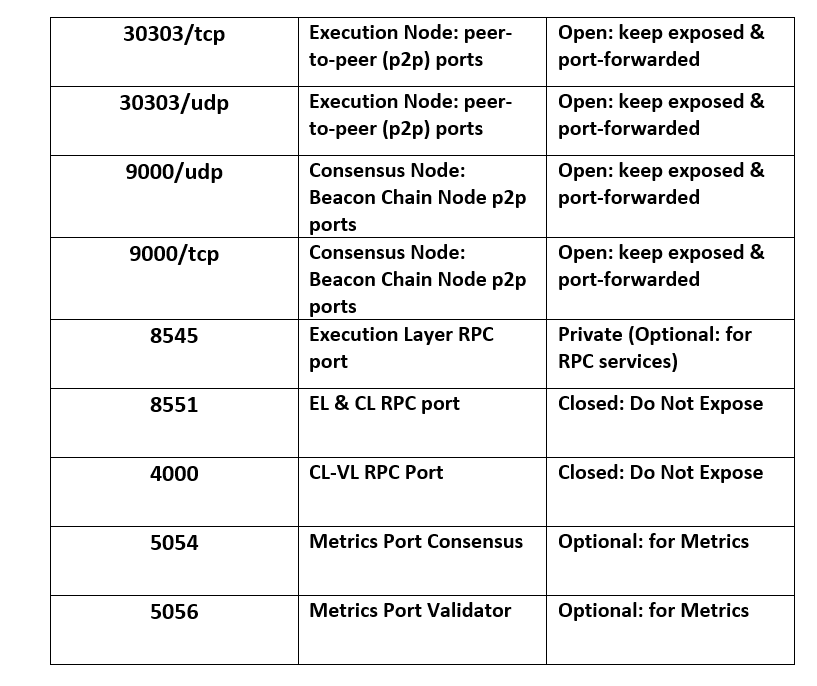
sudo ufw allow 30303
sudo ufw deny 8545
sudo ufw deny 8551
sudo ufw allow 9000
sudo ufw enable
Check your firewall rules with
sudo ufw status
Port Forwarding (if running Locally)
Login to your router and update the firewall rules, will be slightly different depending on your provider you should check your manual.
3. Execution Layer Node- Nethermind
Create a working directory for Gnosischain
cd
mkdir /home/$USER/gnosis
mkdir /home/$USER/gnosis/execution-data
mkdir /home/$USER/gnosis/consensus-data
Create JWT secret
We need to enable two-way communication between the execution layer and consensus layer, this is done via JWT secret (json web token), which is a secret key that is shared only between the two clients to authenticate one another.
mkdir /home/$USER/gnosis/jwtsecret
openssl rand -hex 32 | tr -d "\n" > "/home/$USER/gnosis/jwtsecret/jwtsecret.hex"
Create docker-compose.yml for node configuration
cd gnosis
nano docker-compose.yml
This is our docker-compose.yml for configuration of our execution and consensus layer clients, right now we will just fill in for Nethermind Execution layer.
Docker Image: nethermind/nethermind:
Find releases Here:
version: "3.9"
services:
  execution:
    stop_grace_period: 30s
    container_name: execution-client
    restart: always
    image: nethermind/nethermind:1.14.6
    networks:
    - gnosischain
    volumes:
    - /home/$USER/gnosis/execution-data:/data
    - /home/$USER/gnosis/jwtsecret:/jwtsecret
    - /etc/timezone:/etc/timezone:ro
    - /etc/localtime:/etc/localtime:ro
    ports:
    - 30303:30303/tcp
    - 30303:30303/udp
    expose:
    - 8545
    - 8551
    command:
    - --config=xdai
    - --datadir=/data
    - --log=INFO
    - --Sync.SnapSync=false
    - --JsonRpc.Enabled=true
    - --JsonRpc.Host=0.0.0.0
    - --JsonRpc.Port=8545
    - --JsonRpc.EnabledModules=[Web3,Eth,Subscribe,Net,]
    - --JsonRpc.JwtSecretFile=/jwtsecret/jwtsecret.hex
    - --JsonRpc.EngineHost=0.0.0.0
    - --JsonRpc.EnginePort=8551
    - --Network.DiscoveryPort=30303
    - --HealthChecks.Enabled=false
    - --Pruning.CacheMb=2048
    logging:
      driver: json-file
      options:
        max-size: 10m
        max-file: "10"
networks:
  gnosischain:
    name: gnosischain_network
IMPORTANT: spacing is really important here, I’ve got this to be easily copy and pasted into a .txt file with the right syntax. If you have errors it may be due to this, and characters not being copied over correctly.
Write out and save, usually ctrl + o then ctrl + x to exit the editor and return to the terminal
To Run the Execution Node
go in to the correct directory and run with the following command
cd gnosis
sudo docker-compose up -d execution

Check the Logs
List running containers with the following command you should see your container for our execution client (with Nethermind) is live.
sudo docker ps -a
sudo docker-compose logs -f <service name>

This starts the logs, The Service Name in this case should be ‘execution’ as specified in the docker-compose.yml file. The Container name is execution-client if we view logs with docker only then sudo docker logs -f execution-client
Your Execution Node can take 1–3 Days to Sync depending on your Hardware, it took me just under 24Hrs, make sure this is running in the background to sync up. You can proceed to the next steps regardless.

4. Generate Keystores
Download the Key Generator
cd
sudo docker pull ghcr.io/gnosischain/validator-data-generator:latest
Create Folder for Key Storage
In our working directory
mkdir /home/$USER/gnosis/keystores
Run the Generator to Create Keystore/s:
Note: good idea to disconnect from the Internet for extra security
This will create a new mnemonic seed phrase where your keystores are derived from, place the amount of Validators you wish to create for <# of val>, your ETH address in place of
sudo docker run -it --rm -v /home/$USER/gnosis/keystores:/keystore \
ghcr.io/gnosischain/validator-data-generator:latest new-mnemonic \
--num_validators=<# of Val> --mnemonic_language=english --chain=gnosis \
--folder=/keystore --eth1_withdrawal_address=<ETH-withdrawal-address>
You will be asked to enter a password of your choosing, this is our keystore decrypt key. Write this down as we need this later to create our password.txt
You will then have the seed phrase generated, you must WRITE THIS DOWN AND STORE SECURELY
this will now generate your keystore/s (validators keys) and place them in the directory /gnosis/keystores along with deposit_data.json
Create File for your Decrypt Key (your password for keystore/s)
nano /home/$USER/gnosis/secrets/password.txt
This is our decrypt key that we created earlier
Optional: Adding New Validators to your Node.
if we wish to add more validators at a later stage, we must replace the command new-mnemonic with existing-mnemonic
an additional flag must be added, --validator_start_index=START_NUM this number should be where you left, example if you made 10 validators keystores in 1st run, the START_NUM=10
BACK UP YOUR SEED PHRASE & PASSWORD. The seed is displayed when Generated after inputting your password (decrypt key). Your validator node can run multiple keys (from the same seed) do not use the same keys in another validator as this can result in Slashing.
5. Consensus Client - Lodestar
The consensus client is our Beacon Node and Validator Node. Lodestar will run these as two separate containers.
Docker Image: chainsafe/lodestar:<version>
Find releases Here:
Create docker-compose.yml for consensus client
with the following services consensus: the beacon node & validator: validator node
this will be added to our docker-compose.yml in /gnosis
cd gnosis
sudo nano docker-compose.yml
paste the following into your terminal, after the execution services section, and before networks:
  consensus:
    stop_grace_period: 30s
    container_name: consensus-client
    restart: unless-stopped
    image: chainsafe/lodestar:v1.2.2
    networks:
    - gnosischain
    volumes:
    - ./consensus-data:/var/lib/lodestar/consensus
    - ./jwtsecret:/tmp/jwt/jwtsecret
    ports:
    - 9000:9000/tcp
    - 9000:9000/udp
    - 5054:5054/tcp
    expose:
    - 4000
    environment:
      NODE_OPTIONS: --max_old_space_size=6144
    command:
    - beacon
    - --preset=gnosis
    - --dataDir=/var/lib/lodestar/consensus
    - --network=gnosis
    - --eth1=true
    - --eth1.providerUrls=http://execution:8545
    - --execution.urls=http://execution:8551
    - --logFile=/var/lib/lodestar/consensus/logs/beacon.log
    - --logFileLevel=info
    - --suggestedFeeRecipient=<FEE-RECIPIENT-ADDRESS>
    - --port=9000
    - --rest=true
    - --rest.address=0.0.0.0
    - --rest.port=4000
    - --rest.cors=*
    - --discv5=true
    - --targetPeers=50
    - --metrics=true
    - --metrics.port=5054
    - --jwt-secret=/tmp/jwt/jwtsecret/jwtsecret.hex
    - --checkpointSyncUrl=https://checkpoint.gnosischain.com
    logging:
      driver: json-file
      options:
        max-size: 10m
        max-file: "10"
  validator:
    container_name: validator-client
    image: chainsafe/lodestar:v1.2.2
    networks:
    - gnosischain
    ports:
    - 5056:5056
    volumes:
    - ./validator-data:/data
    - ./keystores:/keystore
    - ./secrets:/secrets
    command:
    - validator
    - --network=gnosis
    - --dataDir=/data
    - --importKeystores=/keystores
    - --importKeystoresPassword=/secrets/password.txt
    - --logFile=/data/validator/logs/validator.log
    - --logFileLevel=info
    - --server=http://consensus:4000
    - --metrics=true
    - --metrics.address=0.0.0.0
    - --metrics.port=5056
    - --suggestedFeeRecipient=<FEE-RECIPIENT-ADDRESS>
    - --graffiti=<CUSTOM-GRAFFITI>
    logging:
      driver: json-file
      options:
        max-size: 10m
        max-file: "10"
Run the Beacon chain Node and Validator Node
Go to working directory and run the Lodestar Beacon Chain Node
cd gnosis
sudo docker-compose up -d consensus
Run the Lodestar Validator Node
sudo docker-compose up -d validator
The validator node, will first import the keystores on start up
Check the Logs that everything is running okay.
sudo docker-compose logs -f validator
sudo docker-compose logs -f node
At this point we are waiting for our Execution client and Consensus clients to finish syncing. This can take a while (12-24hrs or days depending on hardware)
Our validator node on first start up should look like this, it will find local keystores which means it has been imported correctly, if the Consensus client is still syncing it will appear on the logs

Note: Currently Lodestar validator logging, Discovered new validators count=0 is normal this means that the validator is not detected on the beacon chain which is expected until you make the deposit. As long as the beginning of the logs finds X of keystores they have been successfully loaded to the validator.
6. Make Deposit
Ensure your Consensus client (beacon node) is synced and running without errors and connected to the execution node.
When ready you can make the Deposit using your deposit_data.json file in ./validator-data
Can now be done Via UI which is much easier: https://deposit.gnosischain.com/ there’s no need to convert to mGNO, as its done in the process. If you have GNO on Ethereum you will need to bridge to Gnosischain, you can Use the OmniBridge to move GNO from Ethereum.