
This guide is help you set up a Gnosis Validator, Gnosis chain recently merged with xDai network, xDai was a Layer 2/Sidechain for Ethereum Live since 2018. The New Gnosis chain is using ETH2.0 consensus with the Beacon chain to select validators, a GNO validator requires only 1 GNO to run and the hardware requirements are similar to Ethereum. Highly decentralised as it can be run locally without needing a data centre.
Gnosis chain will be important in Ethereum’s development it plans to be a “canary network” for Ethereum, similar to Kusama for Polkadot, As it plans to implement the merge 1-week prior. The Network is much more than just a Testnet, it is behind MEV resistant DEX Cowswap and Gnosis safe, an Ethereum infrastructure piece integrated with many DeFi applications across the ecosystem.
Hardware Requirements: Wired connection to a local device with at least 8GB memory (I am using 16GB with no issues), For Storage currently a synced Nethermind node is taking up 125GB and the Lighthouse Synced is 4.3GB, So 250 GB is sufficient but 500GB would last for a while. Update (3/3/22) I recently ran out of space using 250GB I would recommend starting with 500GB, as a node operator you're providing a service, so best to start with good hardware that will last and perform up to standard.
Assuming you have a fresh install of Ubuntu 20.04 LTS. Some experience with Linux will help, I’ve written this as best I can for those with minimal experience with the OS. Minimum install for security I would keep this as a dedicated device, some prefer a server but I find it easier to manage folders and files and mount USBs with the UI.
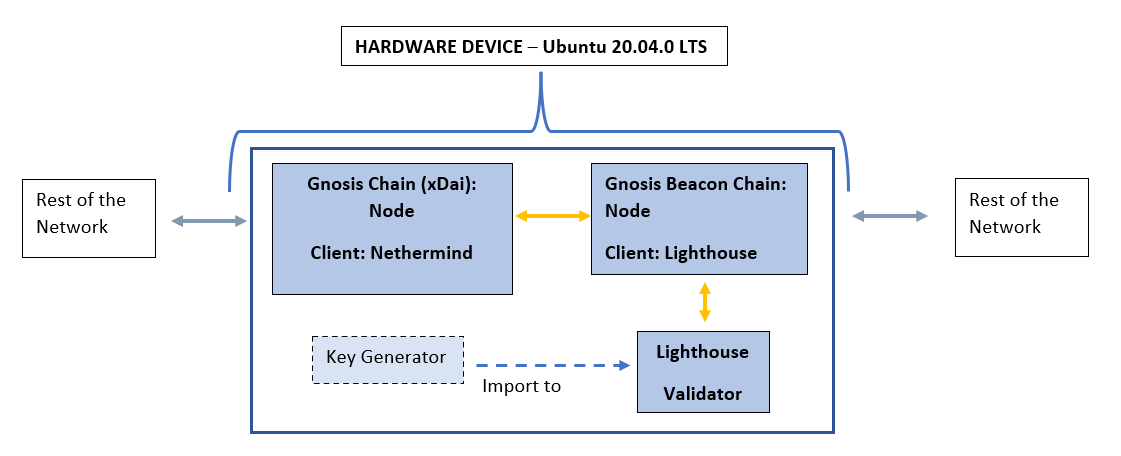
We are using Nethermind for the Gnosis (xDai) chain and Lighthouse for the Gnosis Beacon Chain & Validator. If you wish to run alternative clients, you should be able to use the same instructions, so where I have nethermind or lighthouse with another client.
Notes: Where we have < user > this means your username for your device. Anything here will be a variable that you replace with your own info.
1. Install Prerequisite Software
Update Ubuntu
sudo apt update
Update/install Docker
sudo apt-get update
sudo apt-get remove docker docker-engine docker.io
sudo apt install docker.io curl -y
sudo systemctl start docker
sudo systemctl enable docker

sudo docker --version
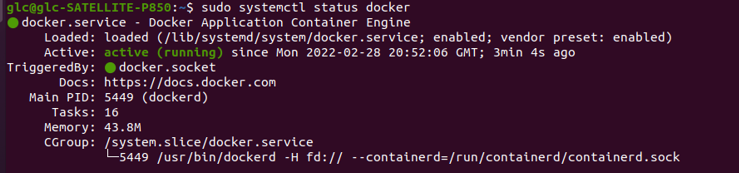
you can check this has been done correctly and is running in the background as a service always with sudo systemctl status docker
Install Docker Compose
docker-compose is a way of saving the docker run command in a file, so that you can just start/stop/modify it easily. Going to be using this for this guide.
sudo apt install docker-compose
Install GIT
sudo apt install git
git --version
2. Set up Firewall Rules
Firewall Settings from Docs
Gnosis (xDai) Node peer-to-peer (p2p) ports: (keep these exposed and port-forwarded)
30303/tcp
30303/udp
Gnosis Beacon Chain Node p2p ports: (keep these exposed and port-forwarded)
12000/udp
13000/tcp
Gnosis Beacon Chain Node RPC ports: (keep private, don’t expose)
8545
sudo ufw allow 30303
sudo ufw deny 8545
sudo ufw allow 12000/udp
sudo ufw allow 13000/tcp
sudo ufw enable
Check your firewall rules with
sudo ufw status
Port Forwarding (if running Locally)
Login to your router and update the firewall rules, will be slightly different depending on your provider you should check your manual.
3. Gnosis Chain (xDai) Node - with Nethermind
Create Directories in your local device (for your Nethermind data)
remember where we have this is your username on your device.
cd
mkdir /home/<user>/nethermind
mkdir /home/<user>/nethermind/nethermind_db
mkdir /home/<user>/nethermind/keystore
mkdir /home/<user>/nethermind/logs
can also be done from the UI, confirm the folders are there after this is done.
Create a run file (config) for Docker compose
nano /home/<user>/nethermind/docker-compose.yml
Paste this into the terminal window:
version: “3.7”
services:

  nethermind:
    hostname: nethermind
    container_name: nethermind
    image: nethermind/nethermind:latest
    restart: always
    stop_grace_period: 1m
    networks:
      net:
        ipv4_address: 192.168.32.100
    ports:
      — “30303:30303/tcp” # p2p
      — “30303:30303/udp” # p2p
    volumes:
-/home/<user>/nethermind/nethermind_db:/nethermind/nethermind_db
      — /home/<user>/nethermind/keystore:/nethermind/keystore
      — /home/<user>/nethermind/logs:/nethermind/logs
      — /etc/timezone:/etc/timezone:ro
      — /etc/localtime:/etc/localtime:ro
    environment:
      — NETHERMIND_CONFIG=xdai
    logging:
      driver: “local”

networks:
  net:
    ipam:
      driver: default
      config:
        — subnet: “192.168.32.0/24”
IMPORTANT: spacing is really important here, I’ve got this to be easily copy and pasted into a txt file with the right syntax. with the exception of line 17: -/home//nethermind/nethermind_db:/nethermind/nethermind_db this needs to be at the same spacing to line 18.
Write out and save, you will see buttons to key in usually hold ctrl for ^
To Run the Node
go in to the correct directory and run with the following command
cd nethermind
sudo docker-compose up
Check the Logs
List running containers with the following command you should see your nethermind container is live.
sudo docker ps -a
sudo docker-compose logs <container name> -f
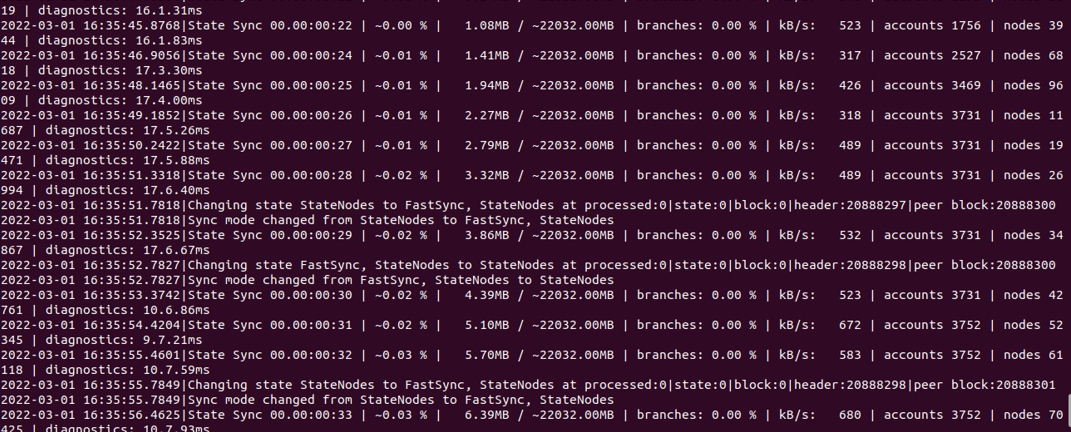
This starts the logs, Container Name in this case should be ‘nethermind’ as specified in the docker-compose.yml file.
Your Nethermind Node can take 1–3 Days to Sync depending on your Hardware, it took me just under 24Hrs, make sure this is running in the background to sync up. You can proceed to the next steps regardless.
4. Generate your Keystores
Download the Key Generator
cd
sudo docker pull ghcr.io/gnosischain/validator-data-generator:latest
Create Folder for Key Storage
mkdir home/<user>/vkeys
Run the Generator to Create Keystores:
Note: good idea to disconnect from the Internet for extra security
This will create a new mnemonic seed phrase where your keystores are derived from, place the amount of Validators you wish to create for <# of val>, your ETH address in
sudo docker run -it --rm -v /home/<user>/vkeys/validator_keys:/app/validator_keys \
ghcr.io/gnosischain/validator-data-generator:latest new-mnemonic \
--num_validators=<# of Val> — mnemonic_language=english — chain=gnosis \
--folder=/app/validator_keys — eth1_withdrawal_address=<your withdrawal address here>
Important: if run for 2nd time its a different command, check docs and see the end of this guide for Adding New Validators to your Node.
BACK UP YOUR SEED PHRASE & PASSWORD. The seed is displayed when Generated after inputting your password (decrypt key). Your validator node can run multiple keys (from the same seed) do not use the same keys in another validator as this can result in Slashing.
5. Gnosis Beacon Chain & Validator Node (Using Lighthouse)
Change Directory
No need for creating folders, use the home folder cd ~ and go from there. It will clone the repo into ~/gbc
Download the GBC client
git clone https://github.com/gnosischain/lighthouse-launch.git gbc

Move Keystores
Copy your Keystores generated in step 4. to your gbc folder. Good Idea to also backup your keystores somewhere else.
sudo cp -r /home/<user>/vkeys/validator_keys/validator_keys /home/<user>/gbc/keys/
You may have issues moving files if the user is under root, To make it easier to copy your deposit.json file/s so you can deposit on another device using the UI (The final step/ Step 6)
To change permissions for files (can do the same for the keystores, so you can back up externally)
sudo chown <user>:<user> /home/<user>/<path/to/file>
Create File for your Decrypt Key (your password for keystore/s)
sudo nano /home/<user>/gbc/keys/keystore_password.txt
Write your password here, double check it is correct. To display
cat /home/<user>/gbc/keys/keystore_password.txt
Create Environment File & Edit some Variables
ls -la /home/<user>/gbc
this lists all files, you should find the .env.example file. Copy this example file to edit your own variables into it.
sudo cp /home/<user>/gbc/.env.example /home/<user>/gbc/.env
Open the env example
sudo nano /home/<user>/gbc/.env
Edit your RPC URL: you can use the following (confirm the address with the community/docs if it’s still up to date) if you are still waiting for your Gnosis Chain (xDai) Node to sync.
XDAI_RPC_URL=https://rpc.gnosischain.com/
Once your nethermind node is synced you should use this, see the section near the end Changing RPC to your Local Node. There are a number of changes to make to get working with your own node.
Edit your IP: you can use the following to check
curl ifconfig.me ; echo ``
will output your IP to the terminal, copy and paste this to your .env file
Import the Keystores to your Validator
You need to import your keystores from the folder you copied them to earlier /home/<user>/gbc/keys/ to your validator. From the right directory
cd /home/<user>/gbc
sudo docker-compose up validator-import; sudo docker-compose down

If you have errors check if your decrypt key in the earlier steps is correct (will be case sensitive, unnecessary spaces will result in error). Another error you might get could be the result of the incompatible docker-compose version see the next part to clear this.
what this does is imports them from the folder /home/<user>/gbc/keys/validator_keys to the folder /home/<user>/gbc/validators
You should now Archive the keystores from the folder /home/<user>/gbc/keys/validator_keys to have a back-up
Now in the folder they were originally created /home/<user>/vkeys if you are to add more keystores later (additional Validators) you need to remove the older keystores that have already been imported, so delete these (only once backed up) to avoid confusion later.
Edit the docker-compose files, for Restart
we want all your nodes to restart (always run) should your device restart or shut down, you want to get back up and running quickly. You can simply open with the text editor using the UI after finding the file in the folder, add the following line
restart: always
placed under the services of any container you want to always running. Services you want running are node & validator. Like so
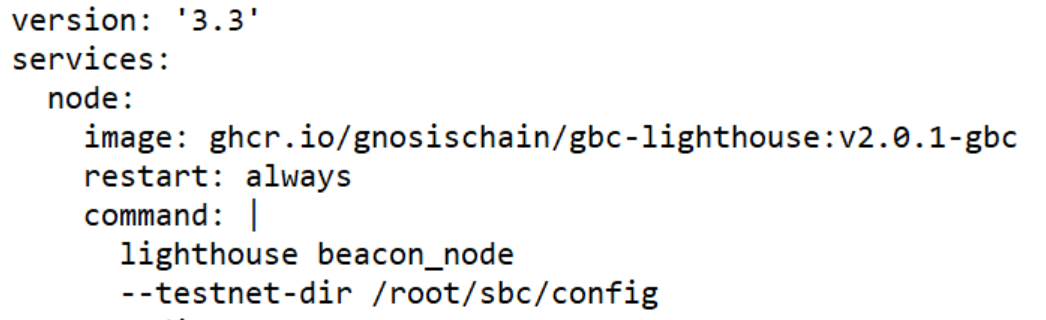
Another change you might need is the Version: ‘3.3’ I had an docker-compose compatibility error running mine, solved by changing the version to 3.3 (default was 3.7).
To run the Gnosis Beacon chain Node and Validator Node
Go to the right directory and run the Lighthouse Beacon Chain Node
cd gbc
sudo docker-compose up -d node
run the Lighthouse Validator Node
sudo docker-compose up -d validator
Check the Logs that everything is running okay.
sudo docker-compose logs -f validator
sudo docker-compose logs -f node
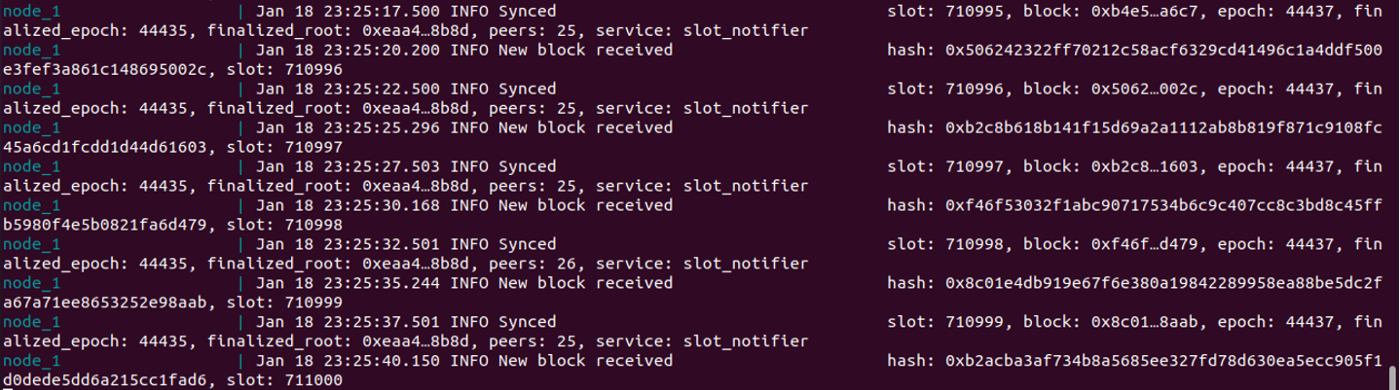
if done correctly you shouldn’t getting error messages, allow your beacon node to Sync takes a number of hours and will display progress.
Validator node should look like this, once beacon node is Synced. At this point you are ready to make your Deposit.

6. Deposit GNO to your Validator/s
Ensure your Gnosis chain node is synced and running without errors, the same to your gbc node, synced and ready
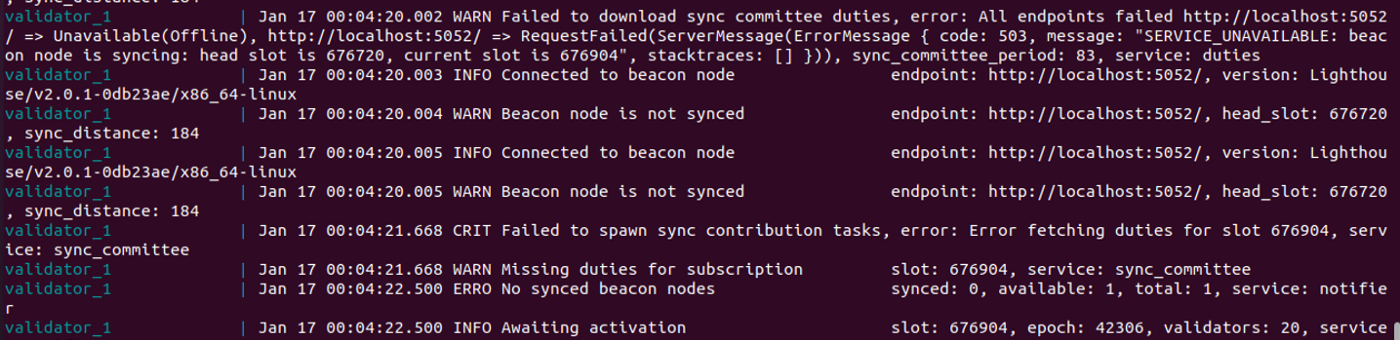
Your Validator node should say beacon node synced, awaiting deposits. When ready you can make the Deposit using your deposit.json file
Can now be done Via UI which is much easier: https://deposit.gnosischain.com/ there’s no need to convert to mGNO now, as its done in the process. If you have GNO on Ethereum you will need to bridge to Gnosis chain, you can Use the OmniBridge to move GNO from Ethereum to GNO on GC.
This will take a few hours (about 5 for me) before the chain registers your deposit and your validator/s activates, make sure everything is running smoothly before then. It can be a good Idea to restart your nodes and system to see if it handles restarting automatically.
Go to https://beacon.gnosischain.com to track your deposit as it gets accepted on chain.
Big thanks to @CVJoint_eth who helped me set up this validator, without there’s no way I got this up and running. My hope is this guide helps to onboard more users to become part of the validator set, participate in securing the network and earn GNO.
Restart Procedure
here’s an extra guide for steps to restart your device safely, should you need to update software or make changes to the configuration.
Stop all running containers
sudo docker stop gbc_validator && sudo docker rm gbc_validator sudo docker stop gbc_node && sudo docker rm gbc_node
sudo docker stop nethermind && sudo docker rm nethermind
sudo docker ps -a
Check that no containers are running
Make Changes
Make changes here, or updates. for example adding new validators, changing ports or configuration settings.
Restart the containers
cd nethermind
sudo docker-compose up
cd gbc
sudo docker-compose up -d node
sudo docker-compose up -d validator
Check the Logs
sudo docker ps -a
sudo docker-compose logs -f <container name>
check containers intended to be running are doing so and open the logs to check for errors.
Changing RPC to your Local Node
Once our Nethermind node is fully synced, should we wish to use our own node for our gnosis beacon node, which there’s no reason why not if we are already running one. A number of changes need to be made in order to get this to work, see the Restart procedure before making these changes.
Network additions and edits to docker-compose.yml
we have to make some changes and add some things to our /home/<user>/gbc/docker-compose.yml
We need to comment out where we see network_mode: host simply place an # at the start of the line like so, do this everywhere this appears in the file
Check the network name for our nethermind container, with sudo docker network ls If Nethermind isn’t running start that container.

We can see our network is called nethermind_net
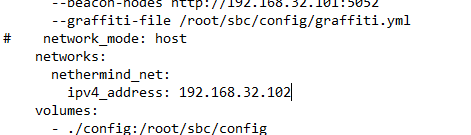
Now we want to add, the following to our services that we will run (validator & node) in the same docker-compose.yml. Under the commented out line.
Under node
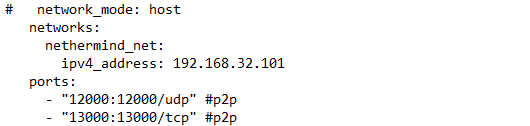
Under validator

This is an arbitrary numbering scheme, the idea that our nethermind node is 100, gnosis beacon node is 101 and our validator node is 102.
we need to add this addition to the end of the file, this allows your container to talk to your nethermind container on the local docker network.
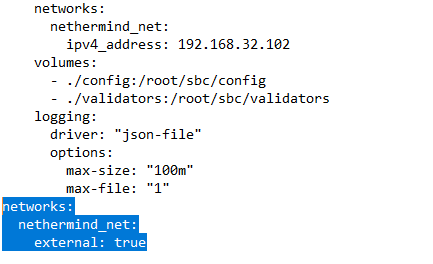
Be extra careful with spacing and accuracy here, as I had issues with getting it working due to simple errors such as a spelling mistake or extra/not enough spaces.
It goes at the end of the file like in the image above, net: has 2 spaces before it, external: has 4. networks: has none.
Edit the .env file to your own RPC
we see --eth1-endpoints $XDAI_RPC_URL in our .yml, this is referencing a variable that we set in our environment file. We now need to change this to our own RPC
cd gbc
sudo nano /home/<user>/gbc/.env

Add our ipv4 address that's stated in the .yml for nethermind with the port at the end.
Optional: you can include the public RPC as a backup, by placing ,https://rpc.gnosischain.com/ immediately after with no spaces, in theory this should work as a backup should your first local option stop working, but I’ve yet to test this out.
Troubleshooting
When making changes make sure to stop your running containers and remove them, make changes then restart those containers.
sudo docker stop <container_name>
sudo docker rm <container_name>
If you see an error such as this, while trying to run, you need to go back and check your .yml file for syntax errors

This is an error on the gbc_node unable to connect to the nethermind node, check the network name is correct, and the RPC address in your .env is the same as the ipv4 address in the nethermind/docker-compose.yml
