
Freeper is a brand-new socialfi platform, which not only integrates entitlement NFTs and fan tokens into social activities, but also includes the live-to-earn Bounty Live mode. Everyone can issue NFTs of S&G Circles in Freeper, with the upper limit of 150 or 1000. Users can join the issuer’s circles after mint the NFTs. This is determined by Freeper team based on “Dunbar's Number” and Kevin Kelly's “1000 True Fan" theory.
Twitter:https://twitter.com/web3_freeper
DC:https://discord.gg/uu7ehQz5mr
You can consult the administrator in the community for any usage questions, and the following is the novice tutorial.
Step 1: Download the APP
Apple:https://testflight.apple.com/join/iKHBNcx4
Google::https://play.google.com/store/apps/details?id=com.web3.chat.freeper
APK:https://download.freeper.io/freeper_stable.apk
Freeper can be directly downloaded from Google Play. Here’s the steps downloading from App Store:

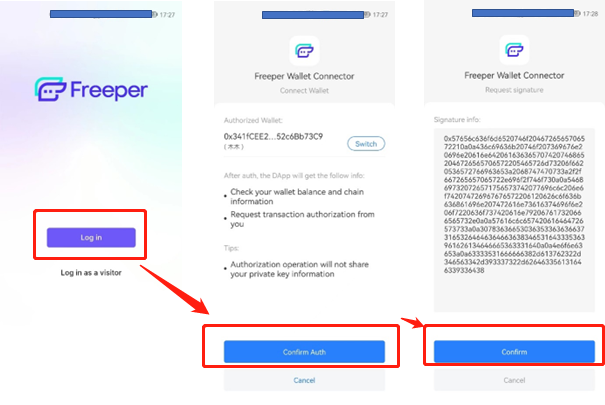
Step 2: Authorize login to Freeper APP
Open the APP, click Login, and connect to the wallet authorization (**OKX Web3 wallet is recommended:**www.okx.com/web3). Note: After connecting, you will wait one second for the authorization window to pop up. Don't switch back to the APP interface directly. If it doesn't pop up, you can click on the APP to try again.Note:When connecting to the wallet, the wallet's network needs to be kept at BSC, otherwise the connection may fail.BSC:bscrpc.com,BUSD Contracts:0xe9e7CEA3DedcA5984780Bafc599bD69ADd087D56 ,
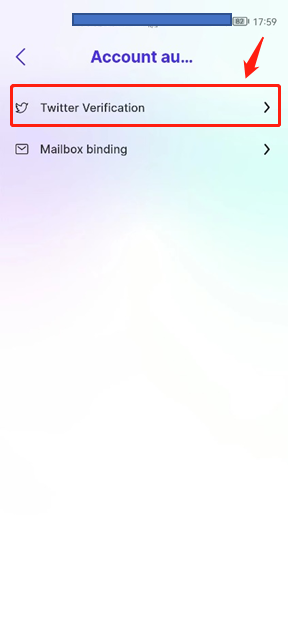
Step 3: Twitter verification
Find "Account Binding" in "My"-settings in the upper right corner, and click "twitter Verification" to open Twitter for user verification, which is mainly to determine the authenticity of users. Note: The verification on iphones can only be completed in browers.
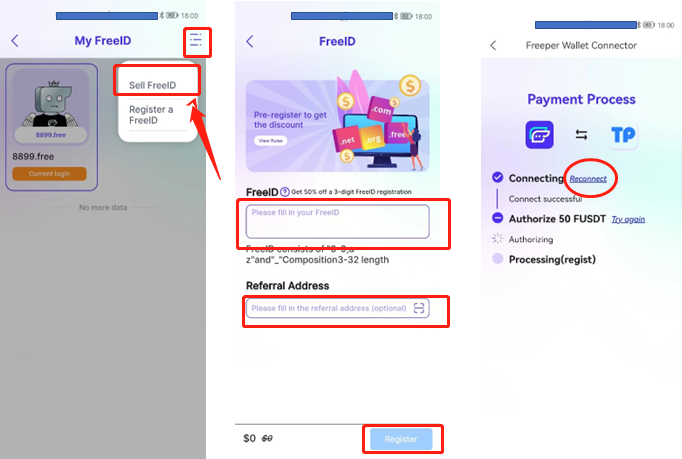
Step 4: Register for Free ID
Free ID is the web3 name card, containing various web2 social accounts information and web3 identity information. Users themselves decide whether it’s public or not.
In "My"-select "My FreeID", click the menu in the upper right corner-click "Register FreeID", and register according to the prompts. If it is the first time to register, you can fill in inviter’s address and he will get an invitation rebate. After submission, the wallet will be connected for authorization and payment. Just follow the process. If the authorization box does not pop up, click on Freeper APP to try again. The payment will be on the chain after about 10-15 seconds,and it can be viewed in "My FreeID".
Note: Freeper APP uses BUSD as trading currency and BNB as gas. Please prepare in advance!
PS: After completing the step 4, you will have the user identity , and have access to functions of NFT trading, domain name trading, watching live, etc.
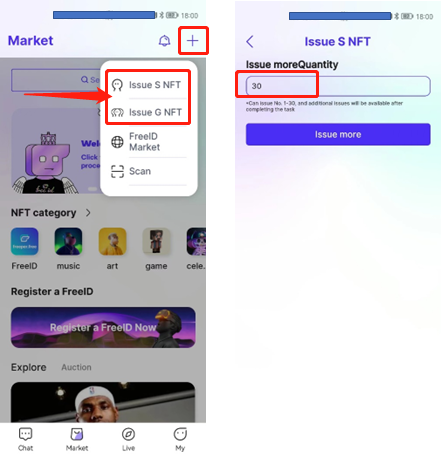
Step 5: Issue NFT
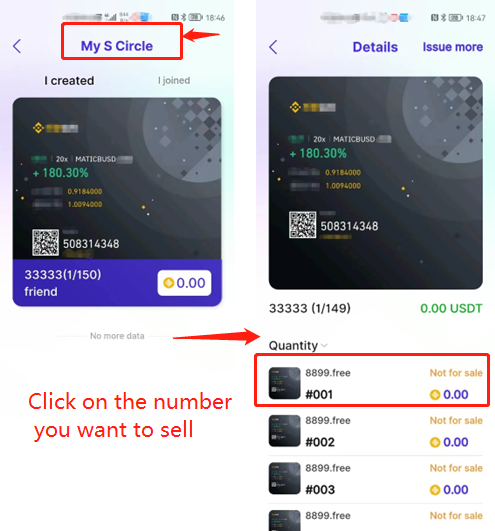
Select "Market", click "+"in the upper right corner, click "Issue NFT"-select the domain name-fill in NFT information-upload NFT pictures-submit and interact with your wallet. Note: Once NFT issued under the domain name, the name cannot be traded again.
Freeper NFT is based on ERC721 protocol, and NFT with different numbers can be issued in the same picture.
PS: After completing the step 5, you will become a Freeper KOL successfully. Next, you need to let more people know you and buy your NFT. The intention of others to buy your NFT mostly depends on your popularity or the content and services you output. Therefore, when you promote your NFT, please specify what benefits the NFT holders will get after buying your NFT.
Step 6: NFT trading
You can mint a NFT by buying directly at the selling price, making an offer to a NFT not for sale and placing a bid to a NFT on auction. Within the specified time, the highest bidder wins in the auction.
You can sell a NFT by selecting‘sell’ button directly at a certain price, approving an offer made to a NFT not for sale, and placing a bid, that is, within the specified time, sell it at the highest price
Trading NFT in the market. NFT holder will automatically join the NFT issuer's circle after minting, and exit after selling it out.
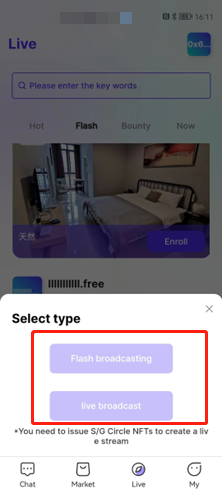
Step 7: Live broadcast
Live broadcast includes limited-time live and bounty live. You need to register a FreeID to unlock this function.
Time-limited live broadcast: As a short live broadcast, it can be used for sales, promotion, project roadshows, etc., with a time limit of 30 minutes. It takes at least 30 minutes for the appointment to start, but it can be started in advance.
Bounty live: It is a brand-new way of live broadcast. The host/creator needs to pay a bounty to start the live broadcast, and all the audiences can share the bounty after the live ends. 3 lucky audiences share 50% of the bounty and others share the rest 50% equally. Everyone earns!
This is the end of the tutorial for beginners, good luck!!!