The Votes are in and xDai Chain is officially merging with Gnosis to create Gnosis Chain. Gnosis Beacon Chain (GBC) brings vital canary network functionality to the burgeoning Ethereum 2.0 ecosystem. Applications can iterate through real-world strategies, stage important applications, or choose to run DApps in a faster, lower-stakes environment while enjoying the benefits of massive scalability. Also all xDai staking (STAKE) is now converting to a new consensus method staking mGNO on the new Gnosis Beacon-Chain Network
投票结果出来了,xDai 链正式与 Gnosis 合并,创建 Gnosis 链。灵知信标链(GBC)为蓬勃发展的以太2.0生态系统带来了重要的金丝雀网络功能。应用程序可以迭代现实世界中的策略,展示重要的应用程序,或者选择在一个更快、风险更低的环境中运行 DApps,同时享受大规模可伸缩性的好处。另外,所有的 xDai 投注(STAKE)现在正在转换为一种新的共识方法,即在新的 Gnosis 信标链网络上投注 mGNO
This is fantastic news for DAppNode Users who are looking for a lower cost way to start staking.
This is good news for users of DAppNode who are looking for a cheaper way to start investing.
This is good news for users of DAppNode who are looking for a cheaper way to start investing.
这对于正在寻找更低成本开始投资的 DAppNode 用户来说是个好消息。
本指南仍然是一个在制品(工作在进展中) ,旨在尽可能完整-包括注释和边缘案例-同时承认这可能是不可能实现这一结果。请务必在本文的评论中报告任何遗漏的东西,以帮助使指南更好!随着时间的推移,它也将变得更加简单。请注意,现在指南中甚至可能有错误,尽管我已经成功地使用了同样的步骤两次。如果您发现任何这样的错误,请在评论中也报告他们。请自行承担使用风险。
Update Jan 19, 2022It is very Important to note that this software is still in the Beta phase of testing. It might be buggy, things may not work properly, and be aware that if by knowing this you still want to use it, YOU take all risks associated with using this software.
汇报情况!2022年1月3日: 随着网络存款应用程序的发布,一切都变得更加流线型,旧的指令仍然存在,但是被隐藏起来了,只有在特殊情况下 WebApp 不能工作时才能使用。
设置过程根本不像 DAppNode 那样经验丰富,很多人已经开始了解并喜欢漂亮的 UI 和简单的设置; GBC 还处于早期阶段,目前需要使用命令行和 docker,尽管我们正在为家庭绑定者开发更好的工具。与此同时,这个指南将作为正确安装的方法。
This guide is still a WIP (Work In Progress) and aims to be as complete as possible - including with notes and edge cases-, while acknowledging that it is probably impossible to achieve this result. Make sure to report anything missing in the comments of this post to help making the guide better! It is also going to be made simpler over time. Be aware that there may even be errors in the guide right now, though I did use the same steps twice successfully. If you find any such mistakes, kindly report them in the comments too. Please use at your own risk.
The setup process is not at all the DAppNode experience that so many have come to know and love with beautiful UIs and simple setups; GBC is in the early stages and currently requires using command line and docker though we are working on better tooling for the home staker. In the meantime this guide will serve as the way to get setup properly.
Update! Jan 3 2022: With the release of the web deposit app everything is far more streamlined, the old instructions are still up but hidden and should only be used if needed for special circumstances where the WebApp won’t work.
Prerequisites
-
A DAppNode 一个 DAppNode
-
A computer with a UNIX Terminal (Linux/Mac) with Docker Installed (Your DAppNode can be used but it’s not at all recommended for best security practices)
-
A Web3 wallet (i.e. MetaMask) funded with:
Web3钱包(即 MetaMask)的资金来源如下:
-
-
At least 1 GNO on the Ethereum Mainnet (Each Validator on GBC requires 1 GNO)
以太网上至少1个 GNO (GBC 上的每个验证器需要1个 GNO)
-
-
-
Some ETH to cover fees on the Ethereum Mainnet, and bridging GNO and/or Dai to the xDai chain. Bridge fees can be very expensive so pay attention to gas prices.
一些 ETH 来支付以太网的费用,并将 GNO 和/或 Dai 连接到 xDai 链。过桥费可能非常昂贵,所以要注意油价。
-
-
-
Some xDai to cover fees on the xDai network, fees are much lower on xDai so you won’t need much 1xDai should be more than enough for all fees.
一些 xDai 用于支付 xDai 网络的费用,xDai 的费用要低得多,所以你不需要太多的1xDai 应该足够支付所有的费用。
-
-
Optional, but recommended for full decentralization: Install and Sync the Nethermind xDai Package from the DAppStore. (Currently the OpenEthereum Gnosis Chain Package is not working with GBC so Nethermind xDai is the only local option).
可选,但推荐全地方分权使用: 从 dAppstore 安装并同步“冥想 xDai”软件包。(目前 OpenEtherum Gnosis 连锁软件包不能与 GBC 一起工作,所以冥想 xDai 是唯一的本地选择)。
Step 1Installation 步骤1安装
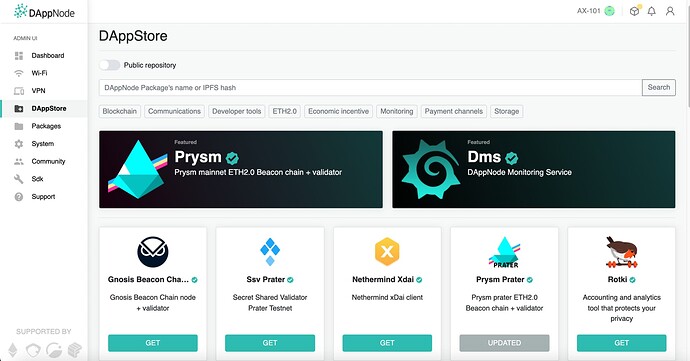
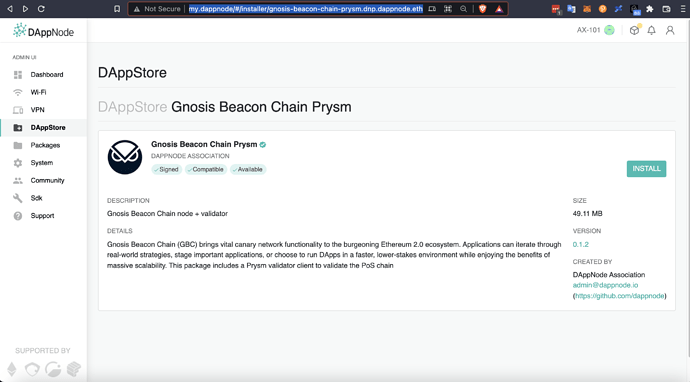
Install Gnosis Beacon Chain Prysm from the DAppStore as shown below or following this link
Click through and install the package
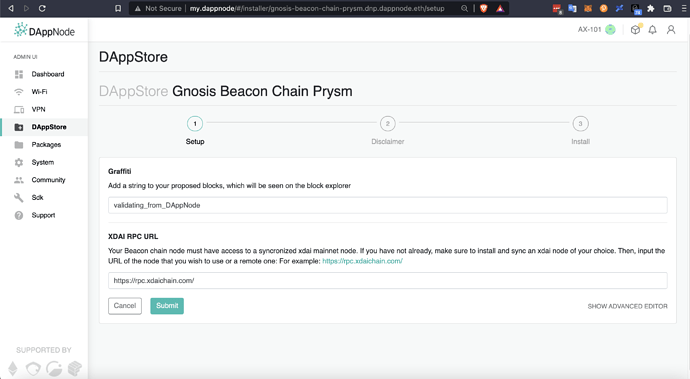
If you have not installed either Nethermind xDai or OpenEthereum Gnosis Chain, you can modify the graffiti just click through here by selecting “Submit” and skip the next step and following image.\
If you have already installed Nethermind xDai or OpenEthereum Gnosis Chain client, regardless of whether it is synced or not you can still do this and it will work immediately and change over to your local client as soon as it’s synced, while also having a fallback if your local execution client fails.
Enter the following if using Nethermind xDai enter the appropriate following link in the XDAI_RPC_URL field of the Beacon Chain section.
http://nethermind-xdai.dappnode:8545
http://openethereum-gnosis-chain.dappnode:8545
And enter the following in the EXTRA OPTS field if you use either of the local clients as is suggested if you the have the resources to run Nethermind xDai or OpenEthereum Gnosis Chain. This will ensure that if they are not synced yet or the local program stops working for any reason it will fallback to the remote node just like an ETH2 Prysm Beacon Chain client.
--fallback-web3provider=https://rpc.xdaichain.com/
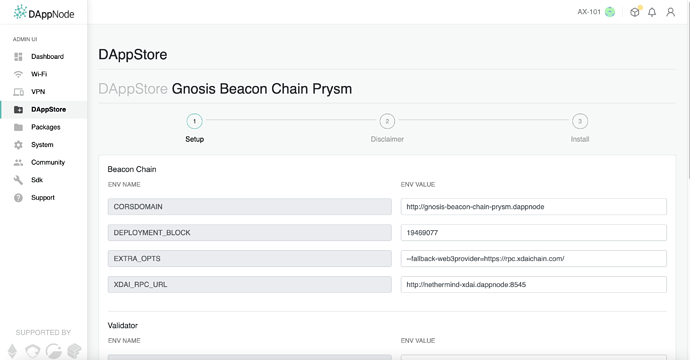
When you are done entering the information appropriate to you continue on and finish installing the package. You can now let it sync, it won’t take very long since the chain is at the the time of this post is quite small and still less than 1 gigabyte in size but will grow quickly as GBC has only just started recently.
You can now move onto the next step.
Step 2Key Generation
For this step you will need to use a terminal client on a machine with Docker installed. For best security practices you should not SSH into your DAppNode since creating the keys and making the subsequent deposit in the way it must currently be done on the same machine online that you will be validating from is highly discouraged, but you can choose your own risk profile. The best way is to have a machine you can hook up to the internet to download the docker images and then disconnect entirely from the internet to make the keys and then using a USB stick to transfer just the keystore files to your computer to upload to your DAppNode GBC Validator.
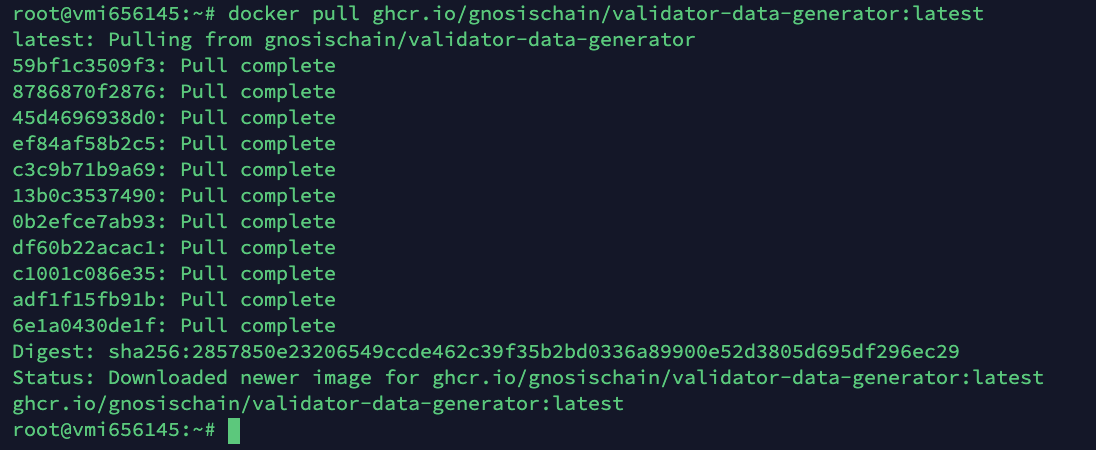
With your Terminal client on your machine with Docker installed, enter the following to download the current docker image of the Gnosis Key Generator.
docker pull ghcr.io/gnosischain/validator-data-generator:latest
This next command should preferably be done offline. So if you’re using a computer with docker turn off WiFi and or unplug ethernet.
Now you can choose whether you want to create a new mnemonic to generate keys from, or you can use an existing mnemonic form previous deposits, or even your ETH2 mnemonic since you should already have that very well secured. I’m going to list commands for both, but will be using a new mnemonic in my example.
Run the appropriate command for your choice, and follow along accordingly. I personally have chosen not to pass a lot of arguments in the initial command as suggested by Gnosis’s guide, since I find it much easier to make mistakes passing a 3-4 line command instead of a one liner that you then can respond to simply for the remaining required arguments. By passing this command without a changing anything or passing a directory, it will, by default, create a new directory in your current directory called /validator_keys/ and put all you generated keys and deposit data to this folder. Also by not passing an ETH1 withdrawal address one will be generated from the mnemonic meaning it’s safe if your mnemonic is safe.
**Note!**For anyone generating multiple keystores and intending to fund them at the same time, you must include the --eth1_withdrawal_address=WITHDRAWAL_ADDRESS flag, as the deposit script will not run properly and will fail when all the keystores do not have the same WITHDRAWAL_ADDRESS specified in the deposit-data file. Make sure to expand the hidden section below this line
Full list of arguments to customize your command OR FOR BATCH KEY GENERATION
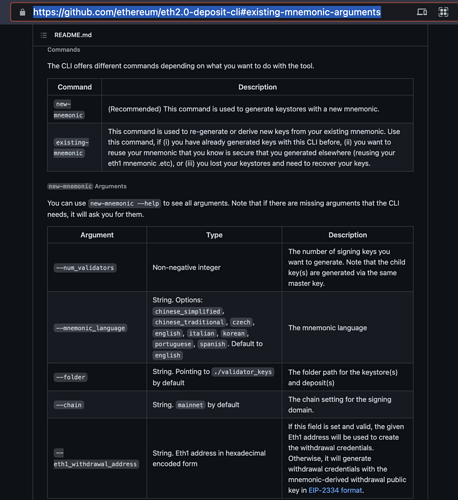
The command given by Gnosis in their guide is the following to be filled out with the applicable information, it is not necessary to do it all if you are ok with the default path and using a newly generated withdrawal address instead of a predefined one, and are only making one deposit/validator at a time, if you are making many deposits at once you must pass the --eth1_withdrawal_address=WITHDRAWAL_ADDRESS flag substituted with your withdrawal address.
docker run -it --rm -v /path/to/validator_keys:/app/validator_keys \
  ghcr.io/gnosischain/validator-data-generator:latest new-mnemonic \
  --num_validators=NUM --mnemonic_language=english --chain=gnosis \
  --folder=/app/validator_keys --eth1_withdrawal_address=WITHDRAWAL_ADDRESS
You can copy my commands below and add any particular argument you want for example if you want to use a predetermined ETH1 address not a new one generated with your mnemonic you can enter the following
docker run -it --rm -v $(pwd)/validator_keys:/app/validator_keys ghcr.io/gnosischain/validator-data-generator:latest new-mnemonic --chain=gnosis --eth1_withdrawal_address=WITHDRAWAL_ADDRESS
docker run -it --rm -v $(pwd)/validator_keys:/app/validator_keys ghcr.io/gnosischain/validator-data-generator:latest new-mnemonic --chain=gnosis --eth1_withdrawal_address=WITHDRAWAL_ADDRESS
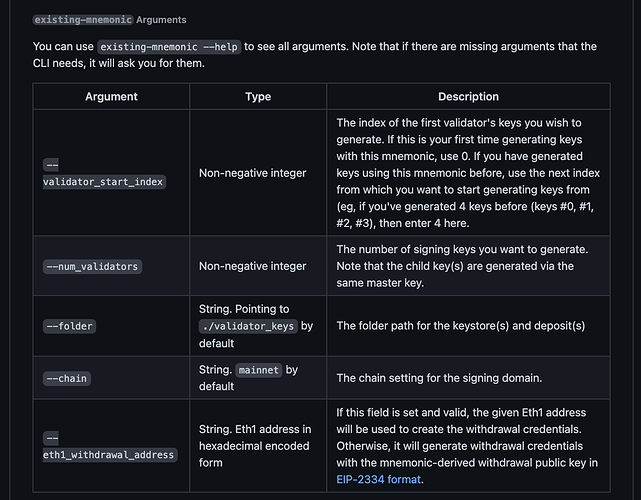
docker run -it --rm -v $(pwd)/validator_keys:/app/validator_keys ghcr.io/gnosischain/validator-data-generator:latest existing-mnemonic --chain=gnosis --eth1_withdrawal_address=WITHDRAWAL_ADDRESS
Once, you run your command it will begin a short workflow asking you some basic questions once you’ve entered your answer hit enter, choose your language (for English you can just hit enter because it’s the default), then enter the number of validators you want to make initially, you can always make more from the same mnemonic or recover lost deposit datas or keystore so long as your store you mnemonic securely and safely.
Finally it will ask for a password to secure your keystores, choose a good strong password, you will have to enter it twice and neither time will it show any typing and that’s ok.

If you used an existing mnemonic click here
If you used an existing mnemonic the steps above are similar but a little different. However they are exactly the same as the ETH2 deposit client with the way the start index works etc. More information Here
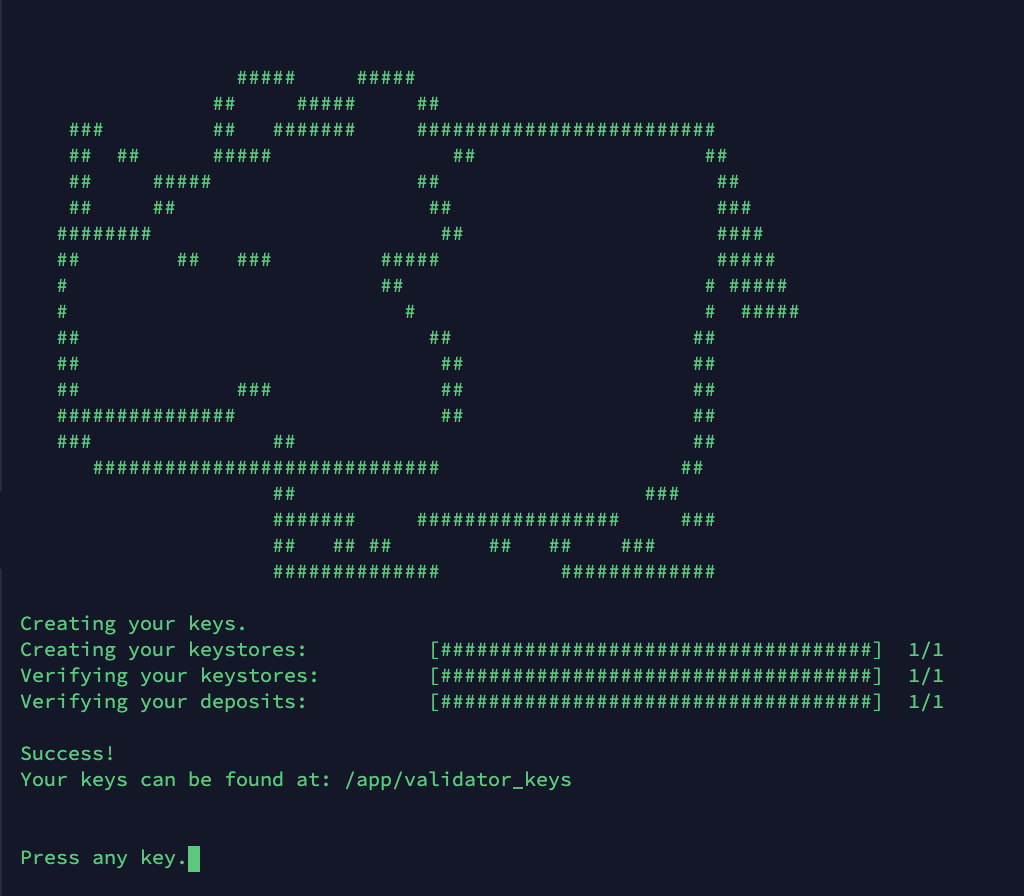
After confirming the password the program will generate your new mnemonic.

Make sure you do not share your mnemonic with anyone like I am right here. Keep it backed up in multiple safe places offline. Once you’ve copied it down click enter and you will need to enter it right back to prove you saved it.

When you’ve entered it again properly the program will run and generate your keystores and deposit data in a new folder in the current directory you ran the previous command.
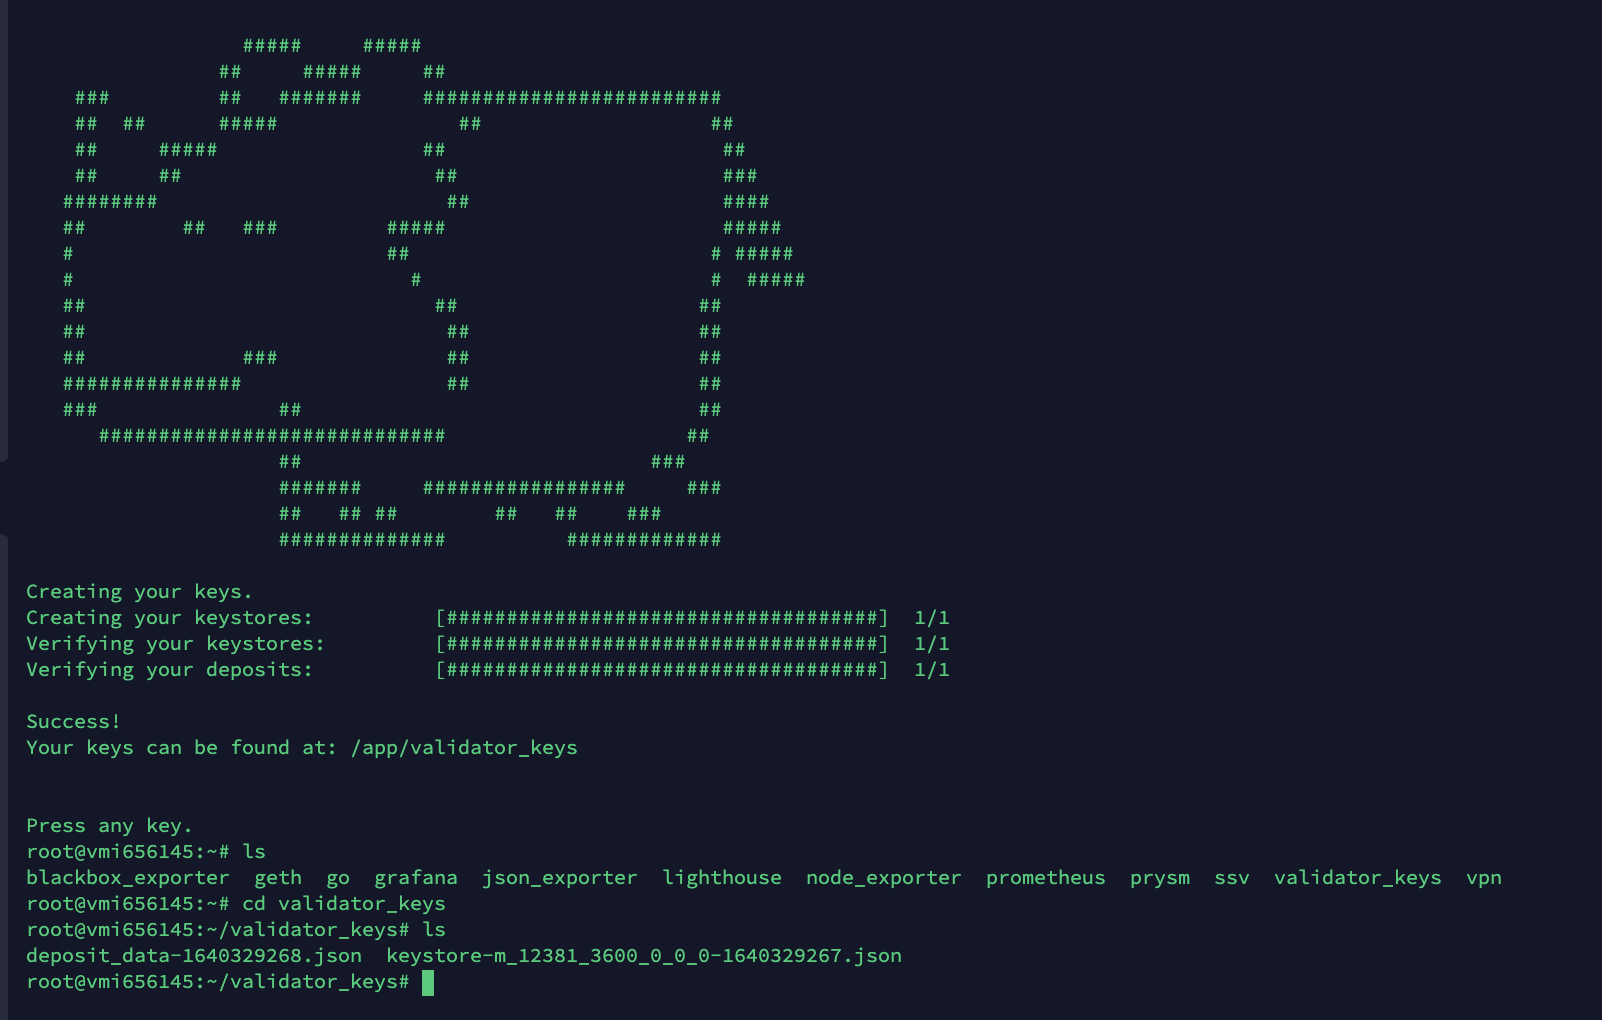
So from here you can change directory to the new one with your deposit data file and keystores by doing the following
cd validator_keys
to check your new deposit data file and keystore(s) are there by entering
ls
to list the contents of the directory, as you can see i have the deposit data file (there will only be one made each time the keystore generator is run regardless of how many keystores are generated) and also the 1 keystore I made are in this directory for use in a later step
Step 3Upload Keystores to GBC Prysm
Now that You’ve generated your deposit data and keystores go ahead and upload your keystores to your GBC Prysm Client.
Return to you DAppNode Admin UI and Navigate to the GBC Prysm package and open it to this page.
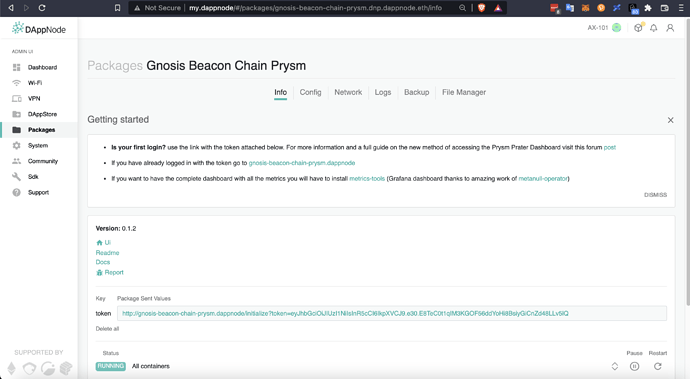
Now enter the Prysm UI, if this is your first time accessing it click the long link near the bottom of the page next to where it says token. If you have already accessed the UI with this link and need to return you can simply click the 2nd link down in the Getting started section, or the Ui link below the version next to the little house logo.
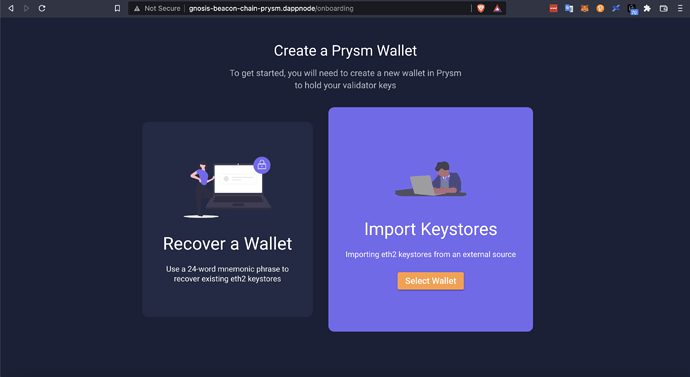
Here you click Select Wallet under Import Keystores
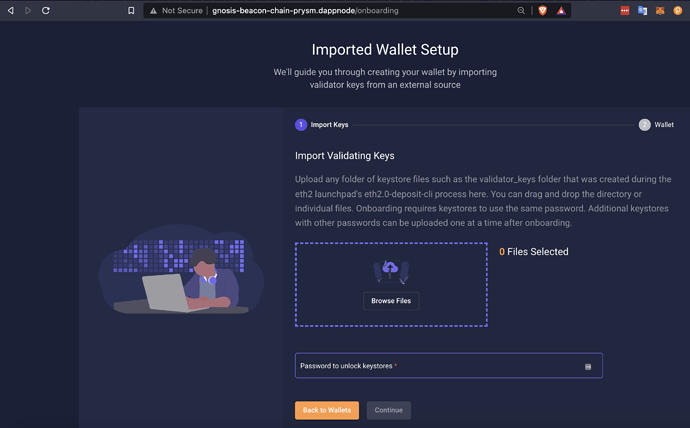
Here browse for the keystore file(s) you generated in the last step, and enter them along with the password you chose during the last step to secure your keystores.

Continue and then enter a new strong password to encrypt the wallet that holds your keystores on your DAppNode.
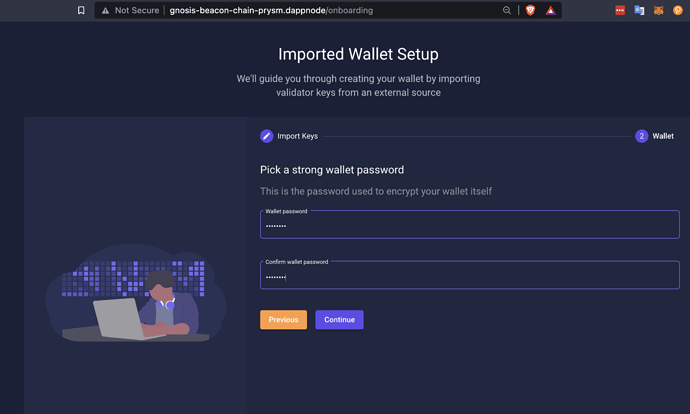
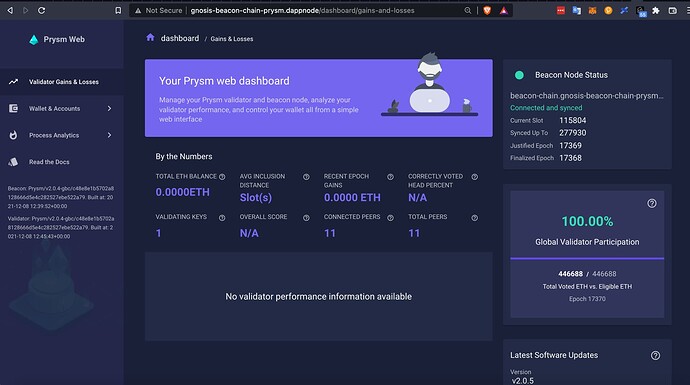
Once this is done click continue and you will be brought to the Prysm UI.l
To see details on the keystores already uploaded click Wallet & Accounts on the left nav bar and then when it expands click Account List
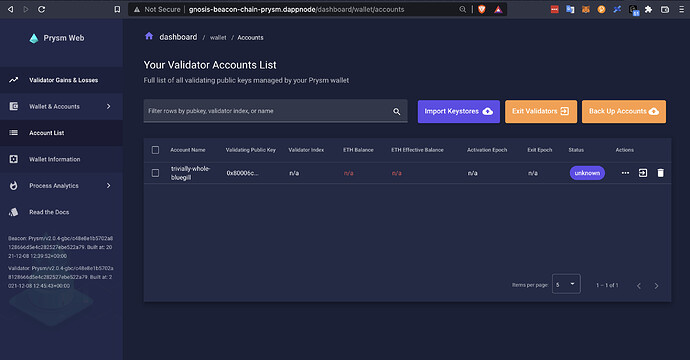
Here you can see all the keystores you’ve uploaded and some details of them on the network. As you can see in the image above all info is N/A since this keystore/validator is not active on the network yet and has not been funded with 32 mGNO via the official GBC deposit contract.
**Step 4Bridge GNO to xDaiNote: If you already have enough GNO for you validators on the xDai network you can skip this step #4 which uses Omni Bridge to bridge the GNO from ETH mainnet to the xDai network and continue on to the Funding of Gnosis deposits to validators
Update 12/25/21: If the following seems too complicated (It is for most of our userbase, so don’t feel bad if this is too much) there is a WebUI that connects directly to your Web3 wallet for the deposit being developed and designed by one of our very own amazing core devs and hopefully will be published in the coming weeks, but it won’t be released until its been tested thoroughly, this is the only way to do it currently, this will be updated with the new process for the UI when it’s released next year.
Now that you’ve got your client setup, keystore(s) and deposit_data generated, and keystores uploaded to an active GBC client it’s time to bridge your GNO to xDai and convert your GNO into 32 mGNO (1GNO=32mGNO) and 32 mGNO are needed per validator.
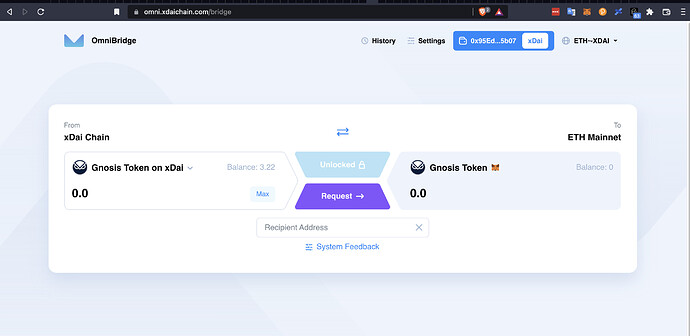
If your GNO is still on the ETH mainnet as it would be if you purchased it on a CEX like Binance or Kraken. Navigate to Omni Bridge and connect your web3 wallet and set up the page so that the transfer looks like the screen shot below From ETH Mainnet - to xDai Chain on the right. Make sure the proper Gnosis token is selected on both as well just as seen below. To add the Gnosis token address on xDai into your MetaMask, click on the little Fox logo on the right.
Note: If you are using a Gnosis Safe or other non EOA with the bridge click to expand this note
If you are using a Gnosis Safe or other non EOA with the bridge be sure to click Advanced and be sure to enter a recipient address (this should be your web3 wallet that has some xDai in it to convert to mGNO and make the deposits to the official deposit contract.
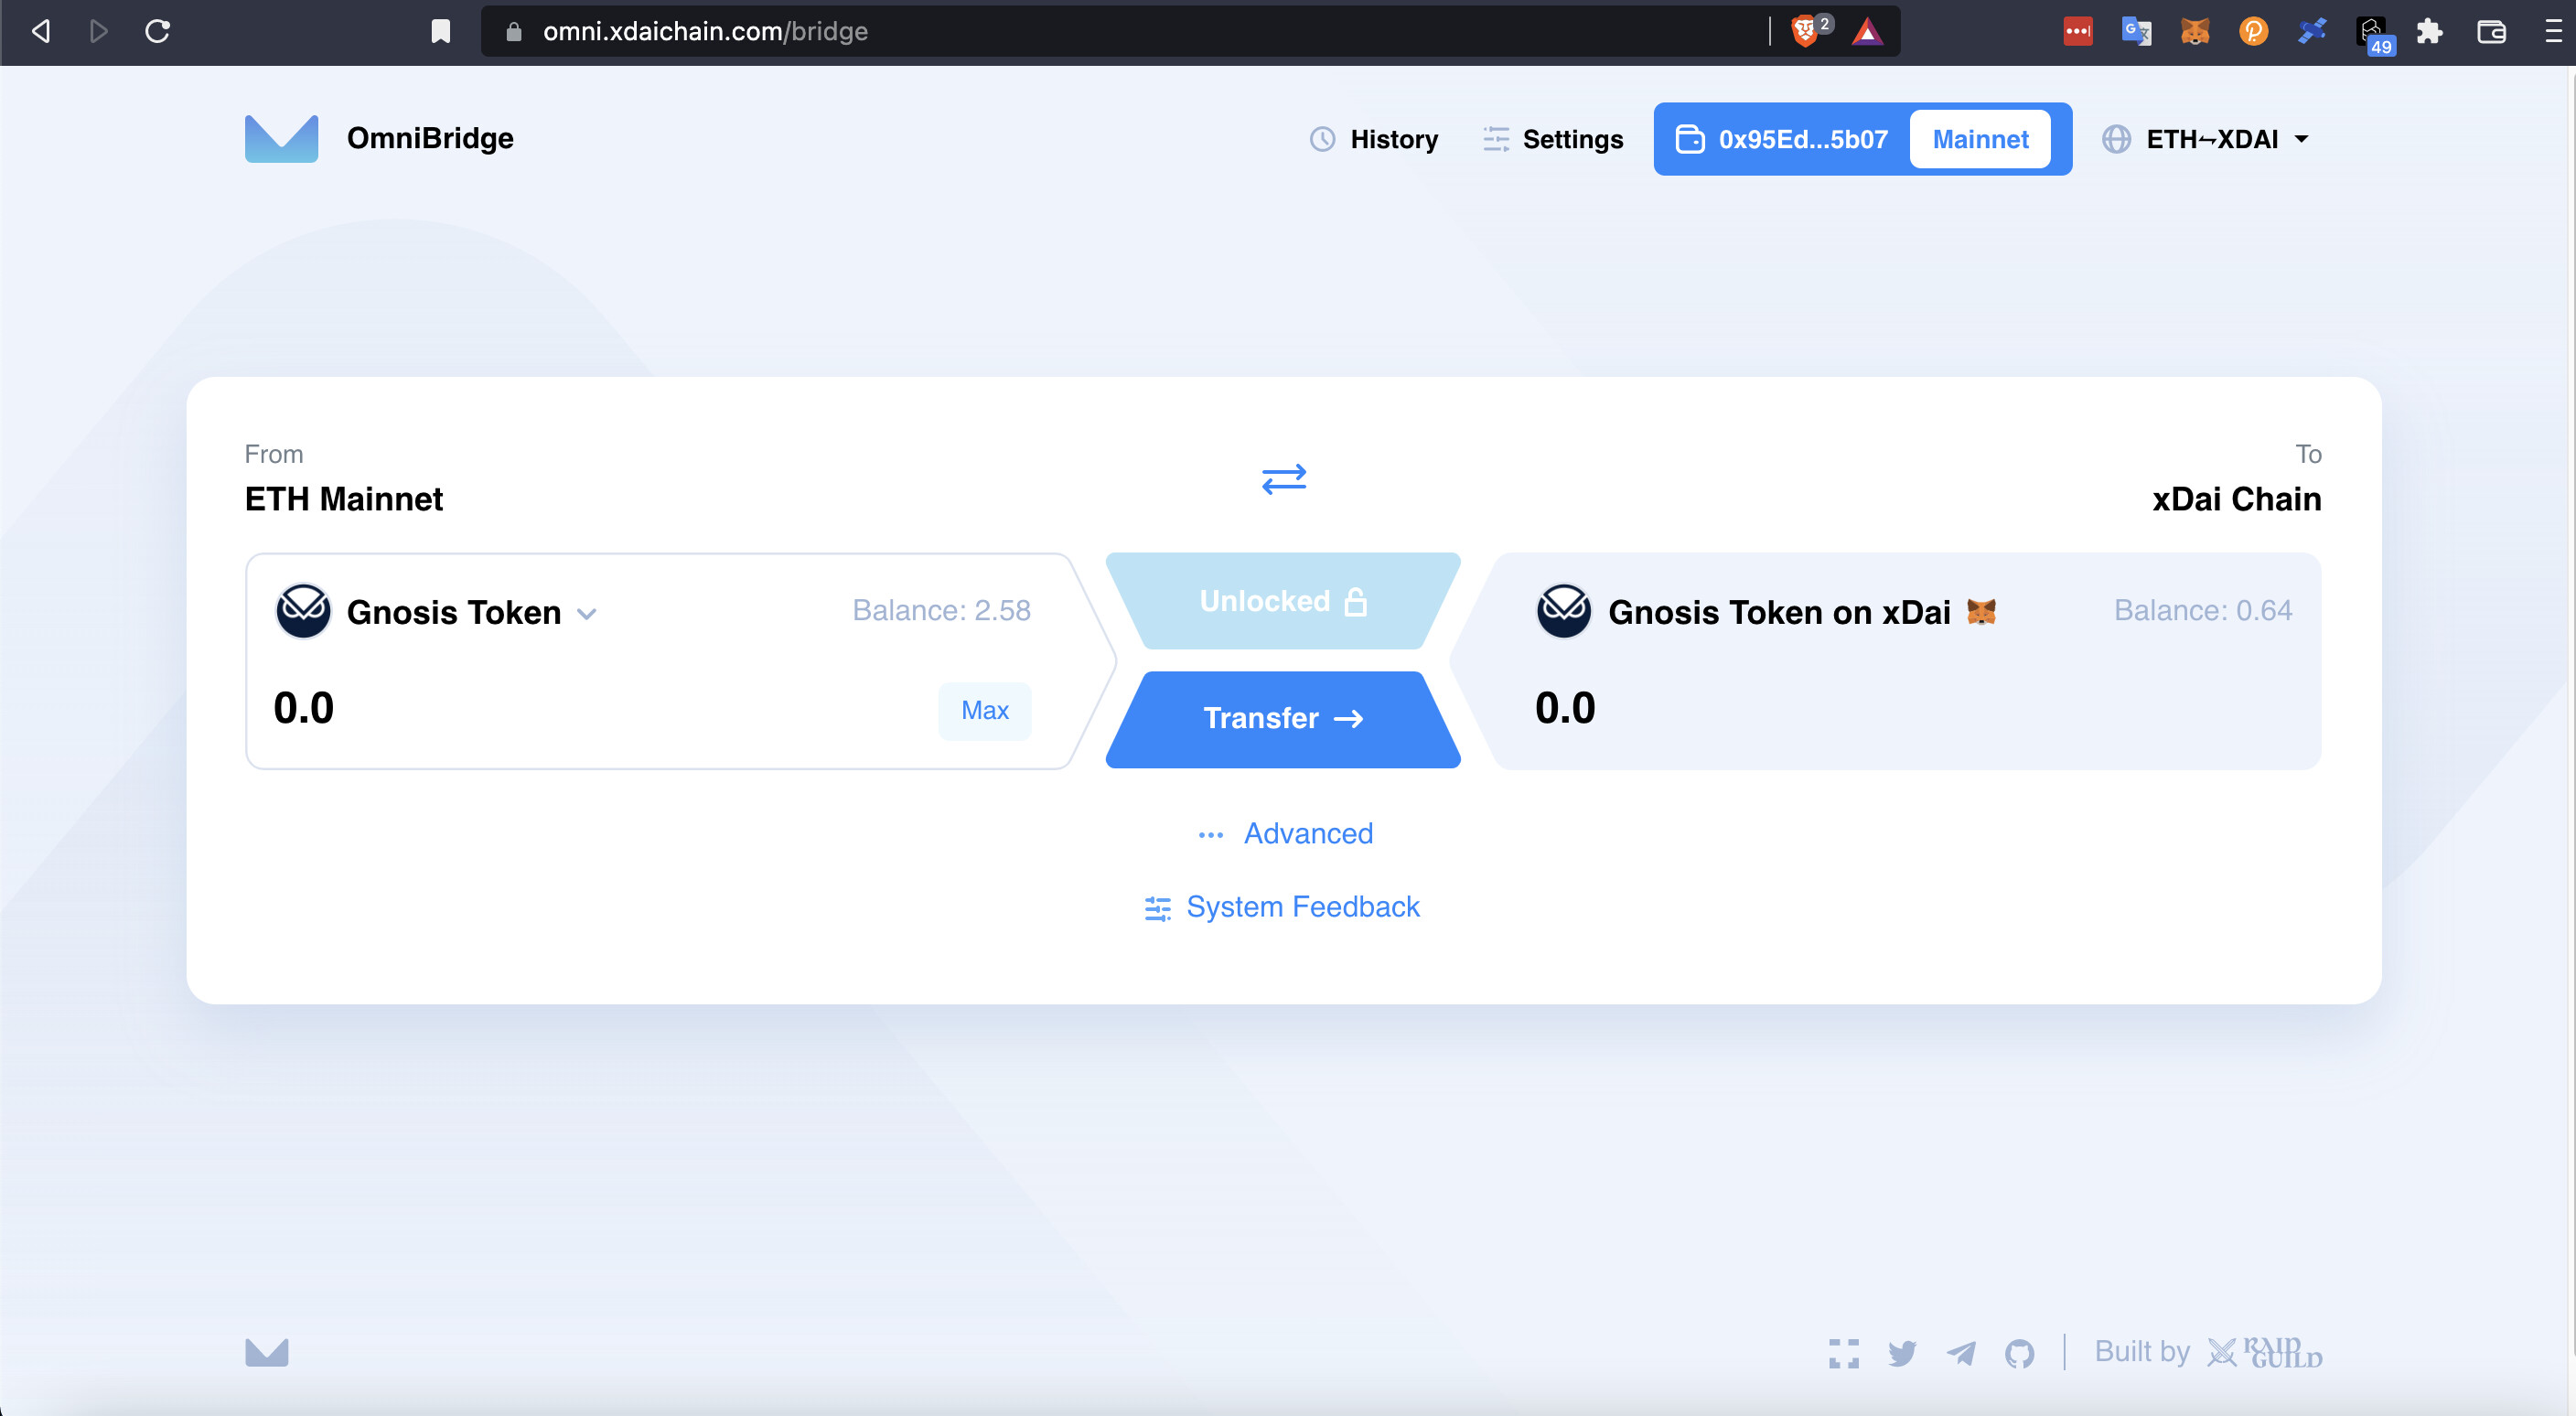
Now you can start to transfer the GNO from Ethereum to xDai by entering how much GNO you are going to transfer, in this example I’m going to be transferring it all by selecting max.
Click Unlock and it will open your wallet to start the bridge process, this is where ETH fees will start being used and can vary greatly based on the current gas prices.
When you have confirmed the first transaction to unlock now the Transfer Button should be enabled, click it.

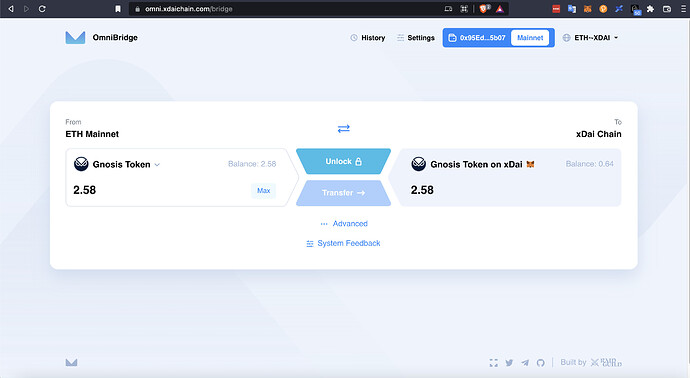
It will warn you of gas prices here, so continue if you are comfortable with the rates being higher than the recent median then click Continue
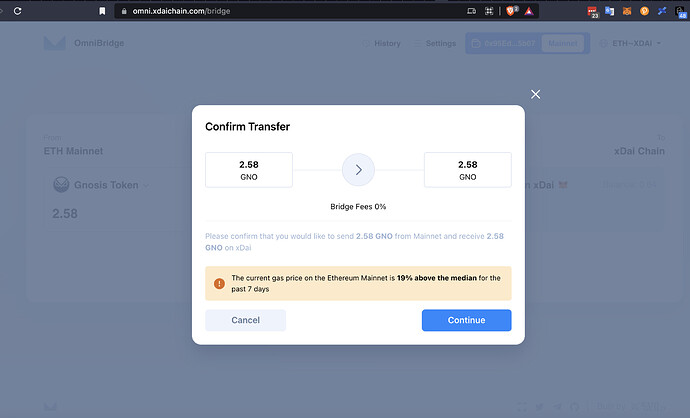
It will lead to another wallet transaction with a much higher fee than the first. Again if you’re comfortable with the fees confirm the transaction from the wallet popup.
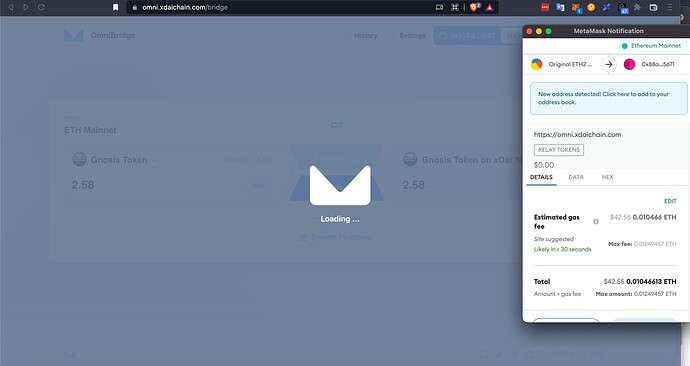
This will start a process of bridging the GNO from ETH to xDai.
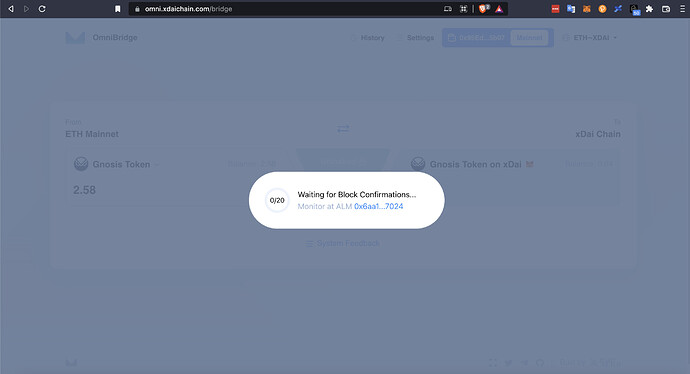
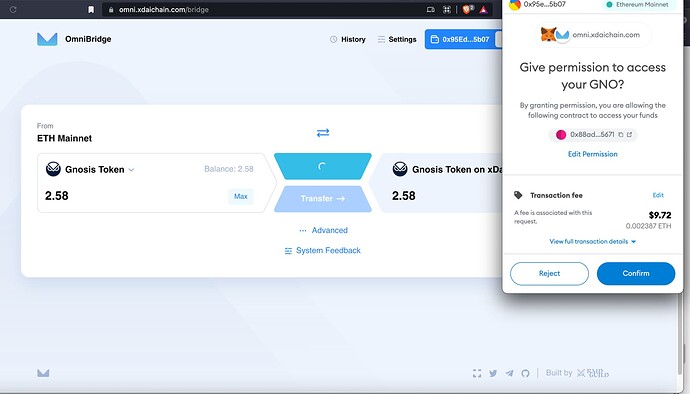
Allow some time for this to confirm and you’ll see a screen like this where you now have bridged your GNO from ETH to xDai as you can see all of the GNO is now in the xDai wallet listed under Balance on the right

New! Steps 5 & 6Gnosis Chain Deposit WebUI
Updated Jan 20, 2022The Web App For the GNO => mGNO conversion and Deposit transaction has been released! It is the recommended way to make your deposit.
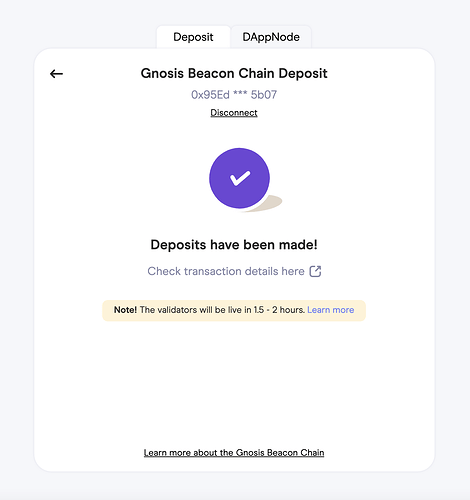
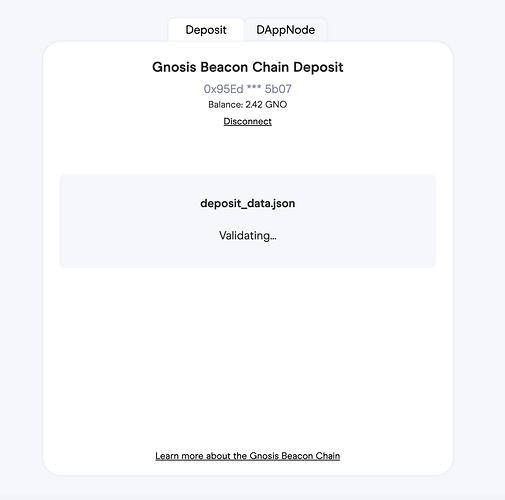
Now that you have your GNO on the Gnosis Chain (formerly xDai), you can head Here and change tab to “Deposit”.
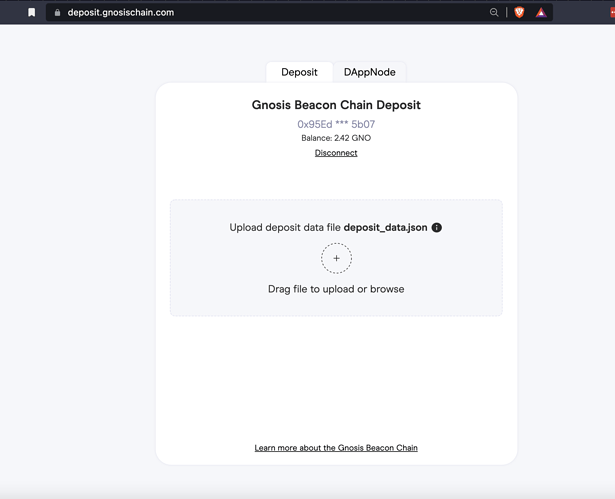
Select you deposit_data file generated earlier and it will start start running checks on the chosen file to confirm you have enough funds and the deposit_data file is valid and hasn’t already been funded.
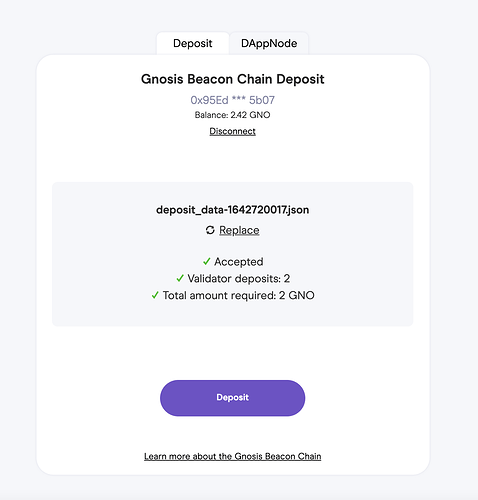
When completed it should show something like this. If everything looks good go ahead and click “Deposit”
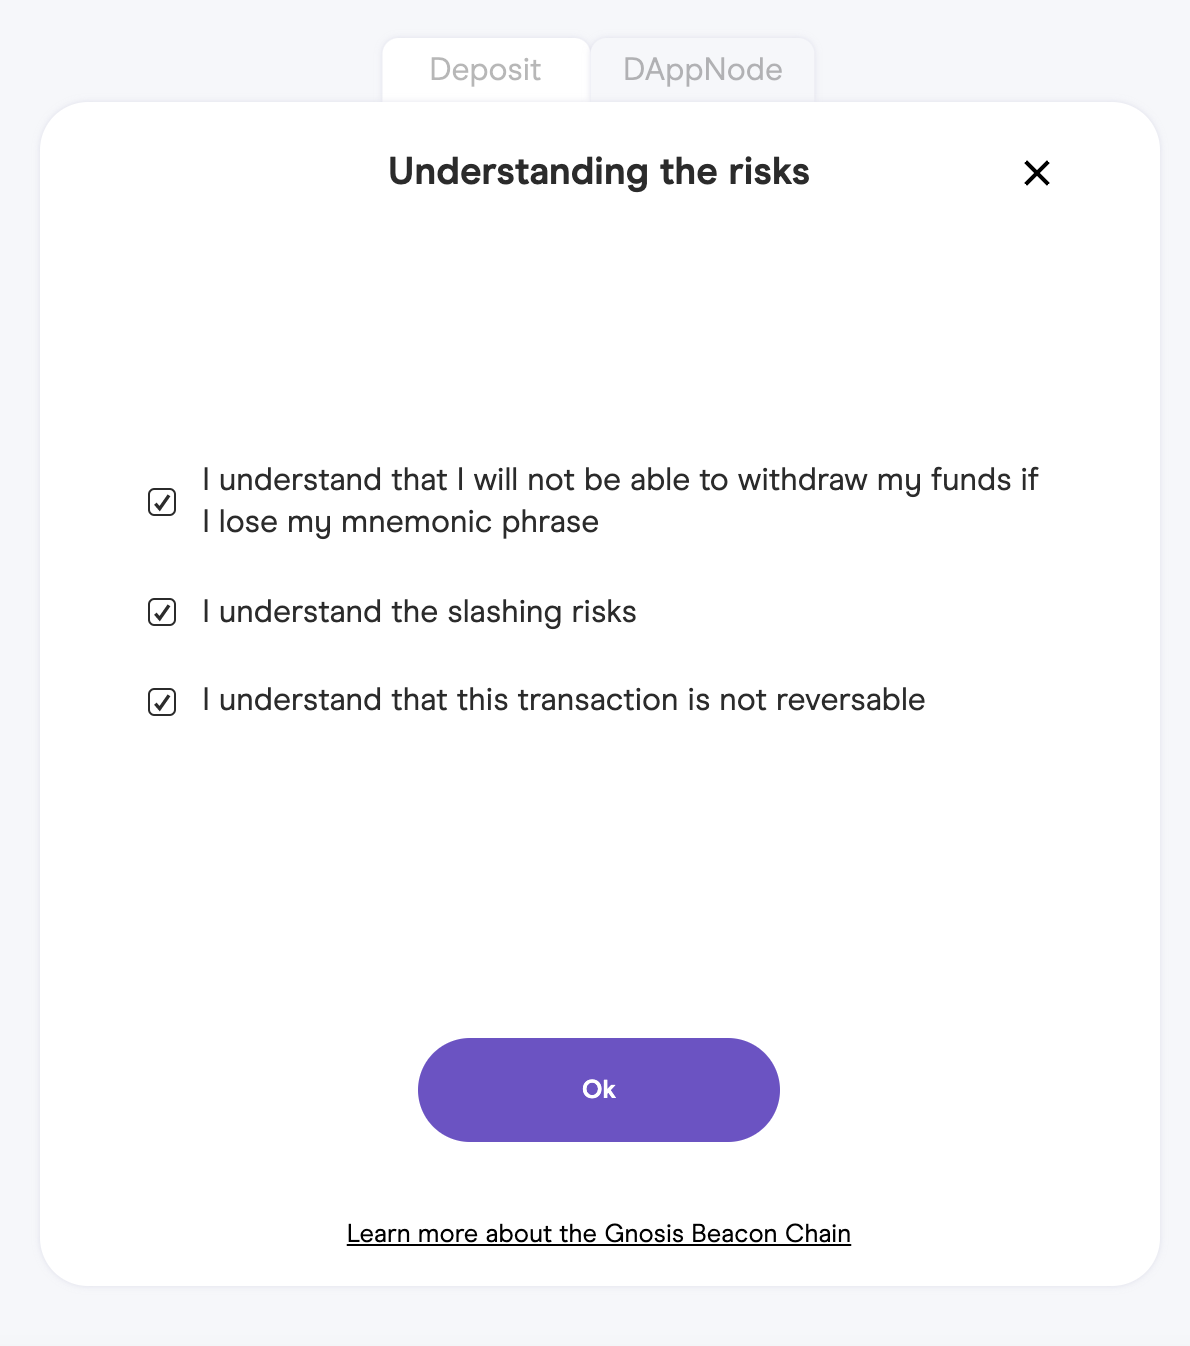
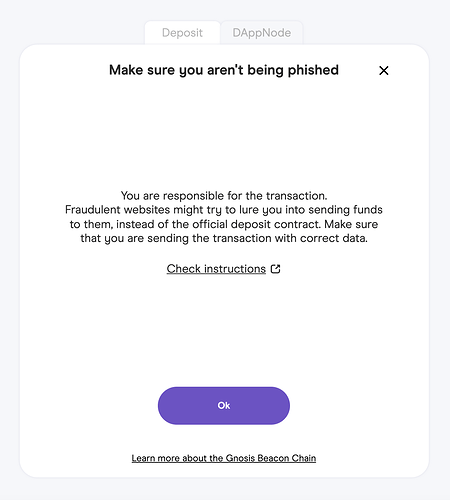
Next it will go through a series of warnings and disclaimers you must agree to and understand to continue.
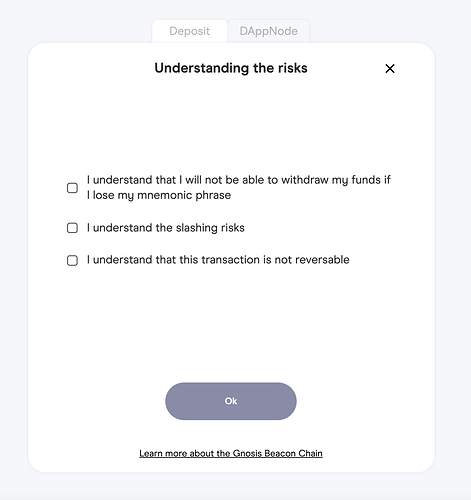
Once you’re comfortable with the warnings check them and click “Ok”
It will now prompt you to open a page for checking your deposit transaction to confirm you are not being phished.
Which looks like this\
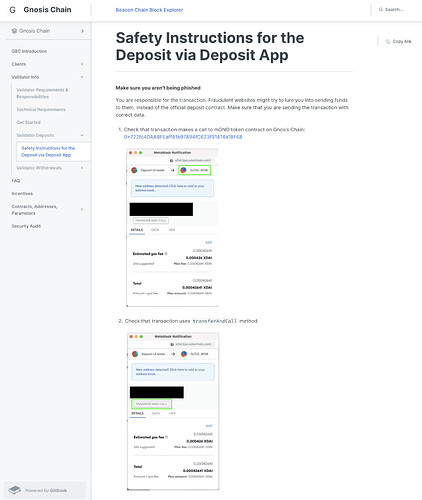
When you’re ready to start the deposit connection click “Ok” on the WebApp
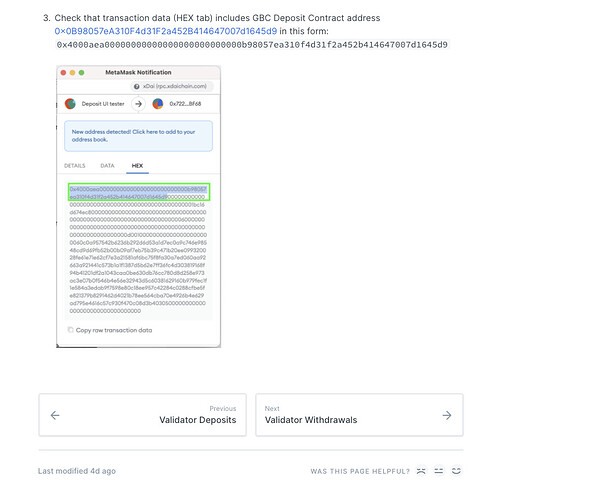
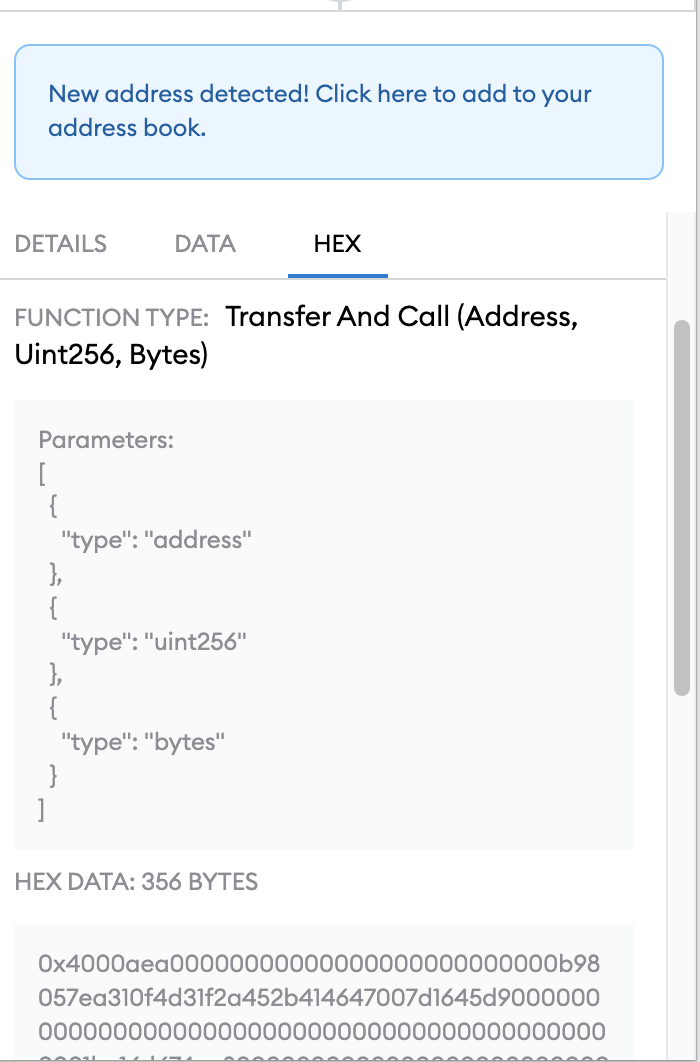
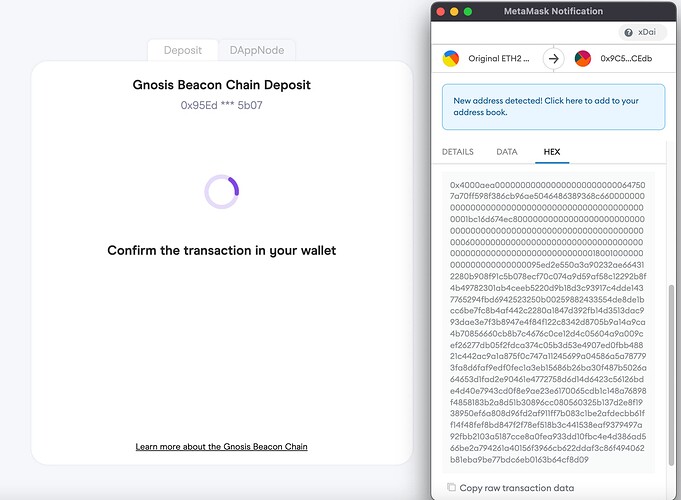
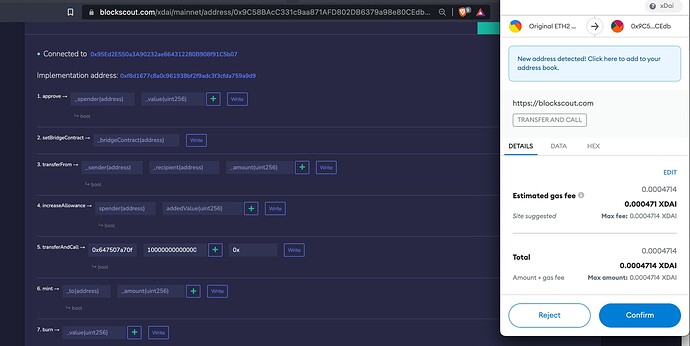
Check your transaction details by clicking on the hex tab in MetaMask and check it against the website as you can see below the deposit address is correct, and it is Transfer and Call function so continue
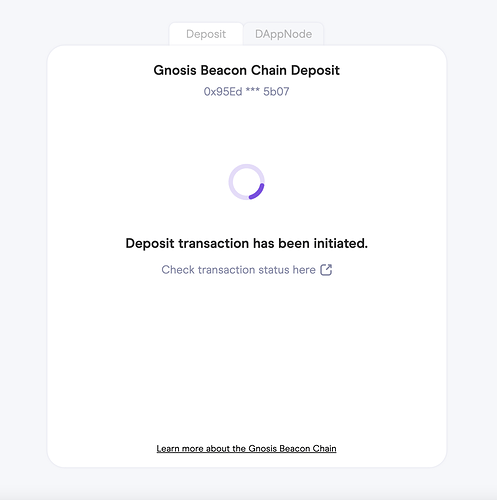
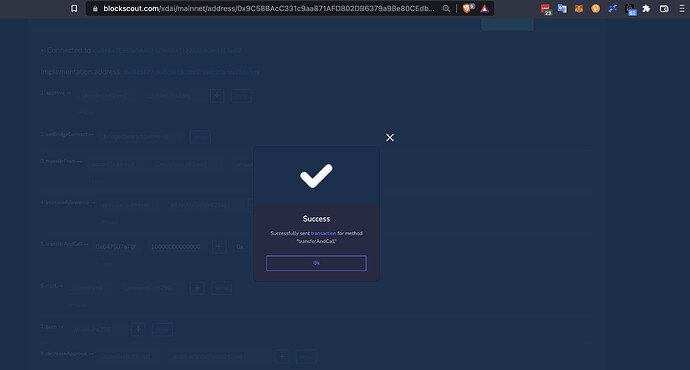
When done the page should look like this and you can check the transaction status, and the validator on the GBC Explorer.
Old Manual conversion and CLI Deposit
Step 5Converting GNO to mGNO
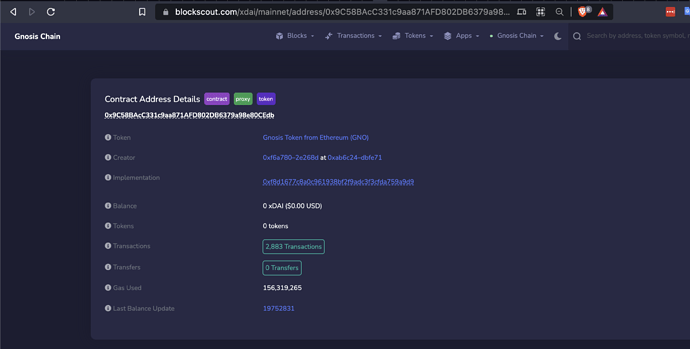
Now that you have your GNO on xDai, change your wallet’s network to xDai and navigate to this page. Which should look like the following.
Scroll down so that you can see #5 transferAndCall
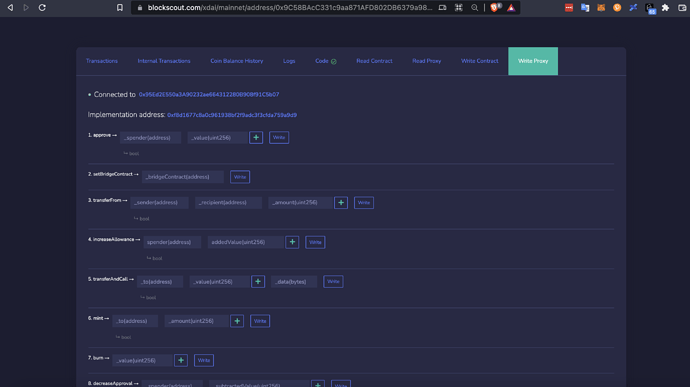
In the _to(address) field enter this contract address for mGNO
0x647507a70ff598f386cb96ae5046486389368c66
In the _value(unit256) field enter the amount of GNO (1 GNO per validator) you want to convert to mGNO. This field wants the number in gwei but it is much simpler to just enter the number of validators you are setting up in this case I’m going to enter the following for now (this number should be equal to the number of keystores you are setting up at once)
1
In the final _data(bytes) field enter the following
0x
You should see this now. From here click the + sign next to the center field.

Now do the gewi conversion by selecting 10^18 as shown in this picture

When finished it should look like this, now you can click write next to the fields you just filled out.

Which will have you sign the contract to convert the GNO to mGNO, click confirm in your wallet.
When the transaction has finished you’ll see this screen.
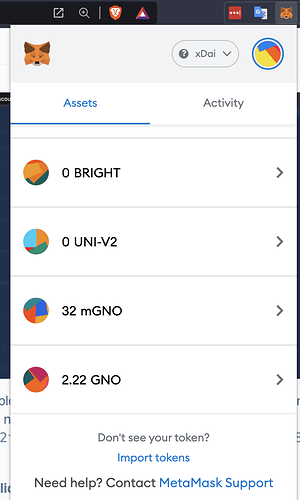
You should be able to check your xDai wallet’s assets and see you now have mGNO tokens, you may need to add the mGNO token to your Web3 wallet the mGNO token address is 0x722fc4DAABFEaff81b97894fC623f91814a1BF68
Step 6Making your validator deposits
This is now the final step and again you will need access to a computer that is online and has Docker installed.
First pull the latest validator deposit package with the following
docker pull ghcr.io/gnosischain/deposit-script:latest
To make this as easy as possible I suggest running the following deposit command and creating the .env file in the same directory that holds your deposit data.You will need to create an environment file by either copying the following data into a plain text editor on a computer with a GUI desktop
#replace the zeros after the = sign with the private key of your wallet that holds the mGNO and some xDai for fees.
STAKING_ACCOUNT_PRIVATE_KEY=0000000000000000000000000000000000000000000000000000000000000000

# You can choose your own RPC endpoint if you have one, but it's suggested to leave this section unmodified
RPC_URL=https://rpc.xdaichain.com
GAS_PRICE=2000000000

# Number of max deposits in one transaction, should be in range [1, 128]
# This number can be anywhere from 1-128 and can be left at 128, the amount of deposits made is specified by the N variable after BATCH_SIZE
BATCH_SIZE=128
# total number of deposits to read from file.
# this number should be how many deposits [NUM] you intend to make/validators you want to fund with this command
N=NUM
# index of the first deposit to read from file (remember that this index is not the total index derived from your mnemonic, rather the index of the deposit_data file you are using, so in most cases this should just be 0 unless you've already made some but not all deposits for this deposit_data file.)
OFFSET=0

# Don't modify any of the following values
# address of the mGNO token contract
TOKEN_ADDRESS=0x722fc4DAABFEaff81b97894fC623f91814a1BF68
# address of the Gnosis Chain deposit contract
DEPOSIT_CONTRACT_ADDRESS=0x0B98057eA310F4d31F2a452B414647007d1645d9
# block where the deposit contract was deployed at
START_BLOCK_NUMBER=19469077
For command line instructions open here
or by command line by running
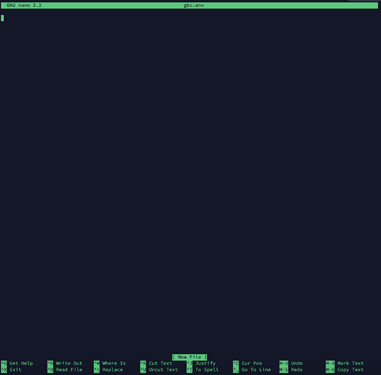
nano gbc.env

Which will open new blank .env file to fill with the info above in the current directory.
And copying all the info into this file and then saving it and modifying it to suit your needs.
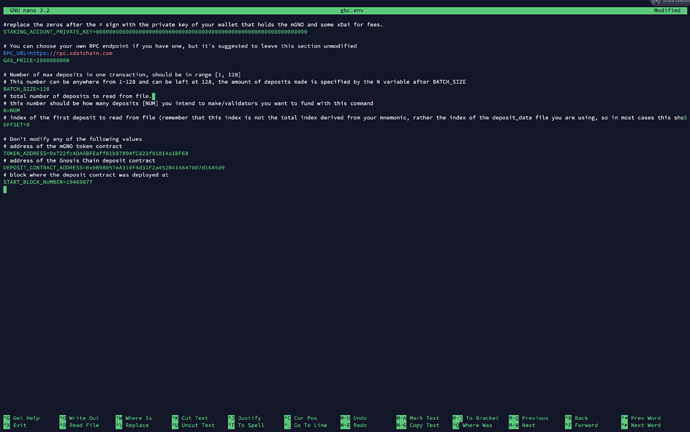
Once you’ve confirmed you have your deposit data and gbc.env file properly modified as such below (with the address that holds your mGNO and small amount of xDai you are going to fund your validators with substituted for the very long string of 0000000... in the file shown below)
I prefer to have done all of this in the same directory initially created when we generated the keys and deposit data originally which was in my example created in the root home directory /root/validator_keys/.By running
ls
In the above directory you should something like this.

To make a custom command follow this template if you did not use the same method and path I used for the key generation step.
docker run --rm --env-file /path/to/.env \
  -v $(pwd)/deposit_data-xxxxxxxxxx.json:/tmp/deposit_data.json \
  ghcr.io/gnosischain/deposit-script:latest /tmp/deposit_data.json
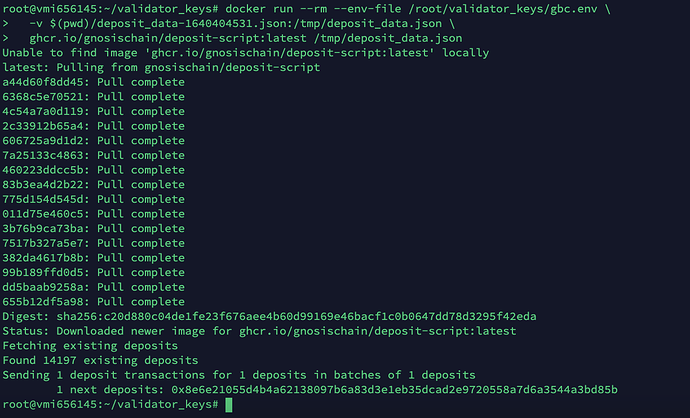
My command looks like this using
docker run --rm --env-file /root/validator_keys/gbc.env \
  -v $(pwd)/deposit_data-1640404531.json:/tmp/deposit_data.json \
  ghcr.io/gnosischain/deposit-script:latest /tmp/deposit_data.json

My command output looks a bit different here because I actually forgot to pull the docker image on this machine before running the command but this is what you should see when it’s successfully deposited.
Step 7 Check Validator*
To confirm the transaction went through you’ll want to get your validator’s public key(s) from the deposit data file, open it with a text editor to find it as such.

Now copy the public key(s), navigate to this site, which is still very much under development, many links don’t work and that’s to be expected currently but will work eventually. Now once you get to this page search for your public key you just copied.
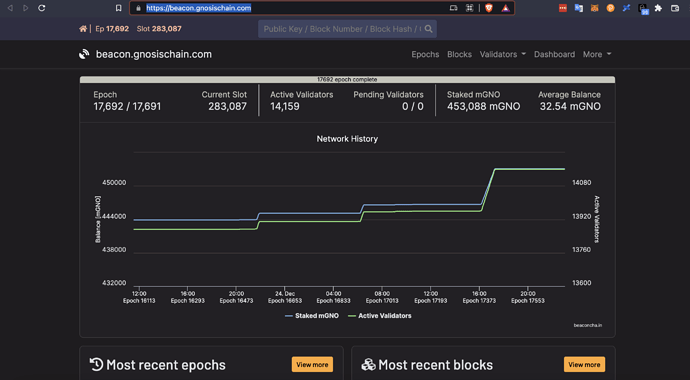
It will take up to 15 mins or more depending on the server at the time, but give it 10 mins or so and you should be able to find you newly funded validator, which you already have up ready to run as soon as it’s active.
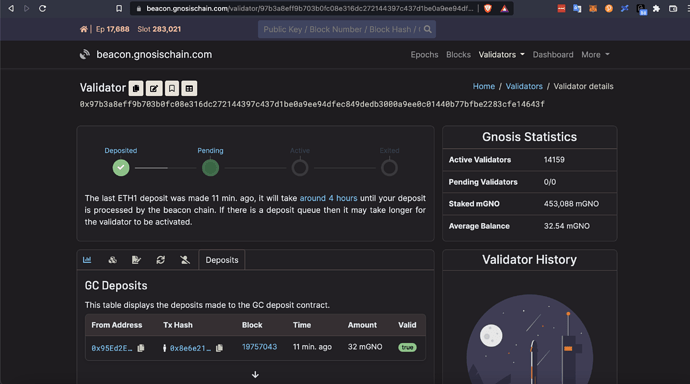
At this point you have now started a GBC client, generated new keys, bridged GNO to xDai, converted xDai GNO to mGNO, and have successfully uploaded your new keystores and funded them with the 32 mGNO deposit each needs. Congratulations !!
If this guide helped you in anyway please consider sending something my way at my ENS: vnv.eth or 0x95Ed2E550a3A90232ae664312280B908f91C5b07 Thank you for you patience!
Unfortunately this is the current end of the guide for the moment it will be continued with some more detail after the HolidaysHappy Holidays! Everyone!