Originally written May 25th, here:
In this guide, we will be walking you through the steps required to bootstrap a functioning smart-contract which stores the provenance history of an asset.
We will leverage PowerBi to allow you to visualize the contract attributes, transactional data, etc. within the context of Azure Blockchain Workbench.
We will finish the walkthrough by hosting this dashboard in a Microsoft Teams channel for easy access.
Azure Blockchain Workbench is deployed using a solution template in the Azure Marketplace. The template simplifies the deployment of components needed to create blockchain applications. Once deployed, Blockchain Workbench provides access to client apps to create and manage users and blockchain applications.
PowerBi is a data visualization tool from Microsoft that enables the creation of actionable dashboards around any data or datastream.
Microsoft Teams is a new, chat-driven collaboration tool. Teams brings together communication with real-time collaboration. Teams unifies all of the information that your organization needs to securely work together. Teams is also extensible to 3rd party apps — allowing you to develop more efficient workflow processes.
Prerequisite: Download PowerBI for Desktop

Once an instance of Azure Blockchain Workbench has been successfully deployed in Azure, our next step is to download PowerBI.
- Follow this link https://aka.ms/pbidesktopstore
I. Deploy Blockchain Workbench in Azure
The first step toward visualizing our smart-contract workflow is to deploy an instance of Azure Blockchain Workbench.
To do this, follow the official deployment instructions below:
Azure Blockchain Workbench is a tool in the** Azure Portal** that automates the generation of all of the ‘scaffolding’ around a Dapp instance (like a Kovan POA Ethereum blockchain, offchain sql storage, message routing, and sample user interface) — thus reducing the amount of time it takes to create a functioning smart-contract POC around your business logic.
II. Deploy the basic provenance sample contract to Azure Blockchain Workbench
In this walkthrough, we will deploy an example workflow which utilizes a smart-contract to enable conditional ownership of a unique Digital Asset.
Let’s grab the sample **json **and **solidity **files from Github:
To quickly clone the entire sample repo to our local machine, we can call:
$ git clone https://github.com/Azure-Samples/blockchain.git
Next, we can navigate to our deployed Azure Blockchain Workbench web service and upload contract & configuration files. The result will be an application automatically generated within the framework.
- In a web browser, navigate to the Blockchain Workbench web address. For example,
https://{workbench URL}.azurewebsites.net/The web application is created when you deploy Blockchain Workbench. For information on how to find your Blockchain Workbench web address, see Blockchain Workbench Web URL - Sign in as a Blockchain Workbench administrator. For more information on managing users, see Manage Users in Azure Blockchain Workbench.
- Select Applications > New. The New application pane is displayed.
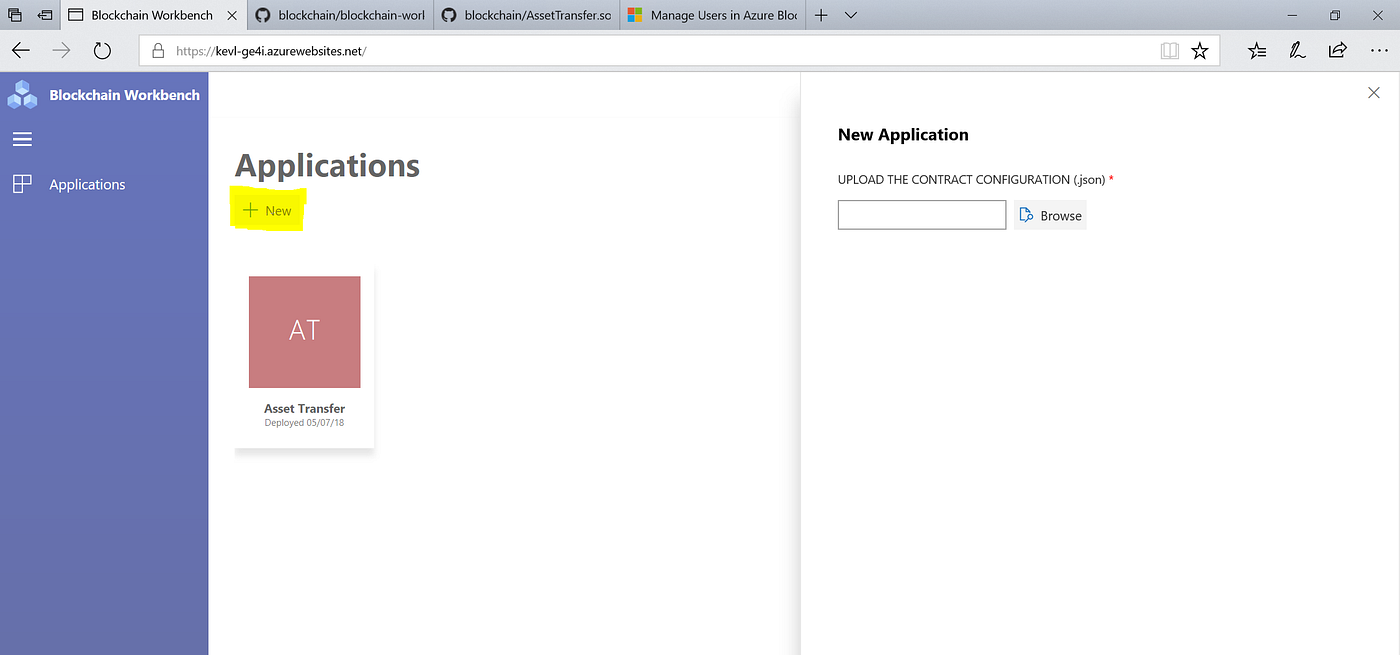
- Select Upload the contract configuration > Browse to locate the** BasicProvenance.json** configuration file you created. The configuration file is automatically validated by Azure Blockchain Workbench.
- Select Upload the contract code > Browse to locate the BasicProvenance.sol smart contract code file. The code file is automatically validated by Azure Blockchain Workbench.
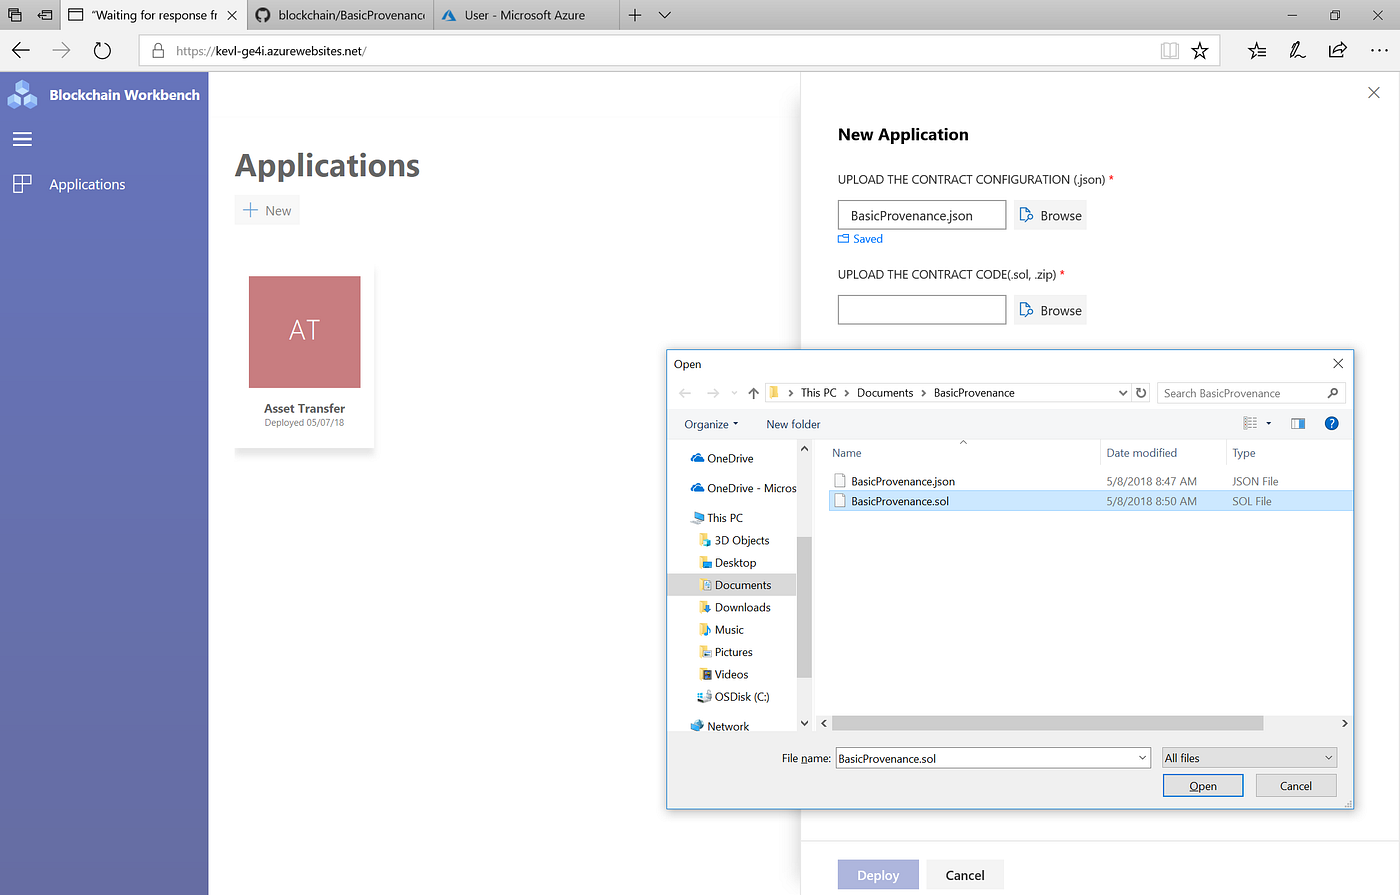
- Select Deploy to create the blockchain application based on the configuration and smart contract files.
Deployment of the blockchain application takes a few minutes. When deployment is finished, the new application is displayed in Applications.

Check to ensure that the BasicProvenance example contract deployed correctly
III. Create the BasicProvenance contract instance

- In Blockchain Workbench application section, select “+ New Contract”. Please note that only users assigned to the Owner role can create a new contract.
- The New contract pane is displayed. Specify the initial parameters values. Select Create.

The newly created contract is displayed in the list with the other active contracts.

Take Action on the Contract
- In Blockchain Workbench application section, select the application tile that contains the contract to take the action.
- Select the contract in the list.
Details about the contract are displayed through the various UI elements:

- In the Action section, select Take action.
- The details about the current state of the contract are displayed in a pane. Choose ‘TransferResponsibility’ and select the new counterparty.
- Select Execute to take the action.
To recap, we have successfully deployed an instance of a Provenance-driven smart-contract instance — where Kevin leffew *created *a digital asset, *transferred *it a counterparty, and then *completed *the contract workflow.
In this example, the contract goes through three primary state transitions: Created, InTransit, and Complete. These three states have a bound enumerated value of 1, 2, and 3.
We will use this property in our PowerBi visualization in the next step.
III. Visualize the provenance state with PowerBI
To connect PowerBI to the Workbench outputs, follow these steps:
Prerequisites:
- Grab your IP address and create a ‘Firewalls and Virtual Networks’ rule in the Azure Portal — to allow PowerBI access to the data held in the server.
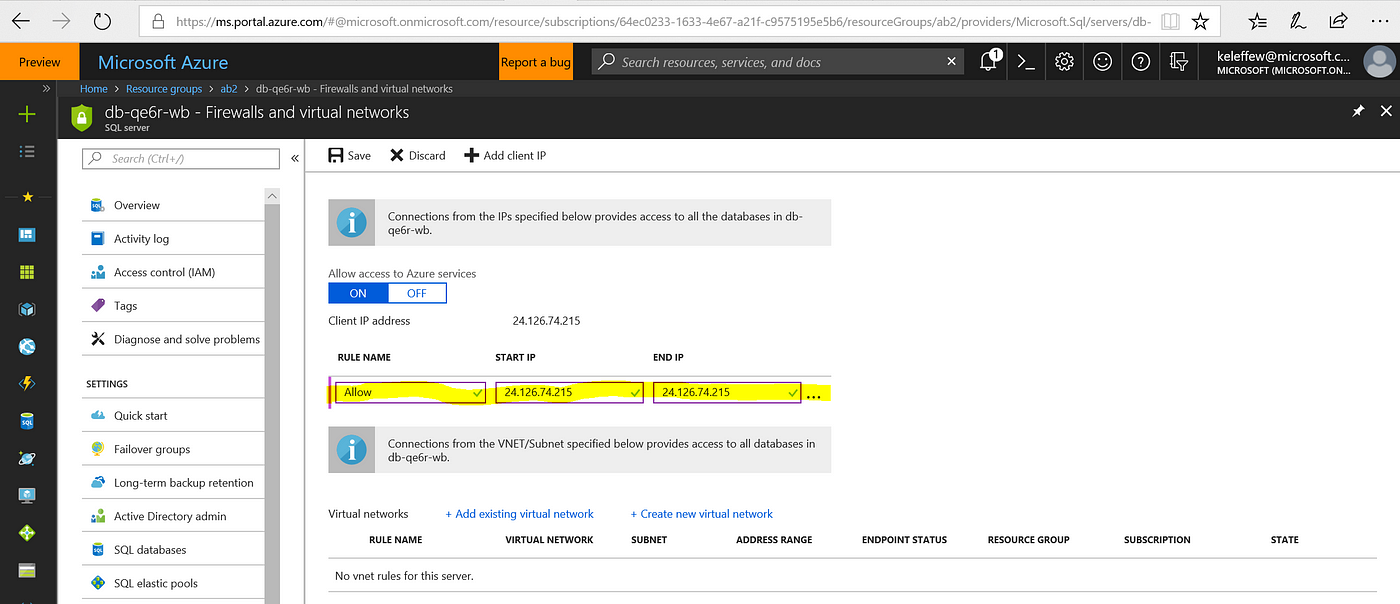
Allow access for your IP address
2. Copy the server name from your Workbench Deployment group in Azure by navigating to the SQL Server’s Properties blade (see below).
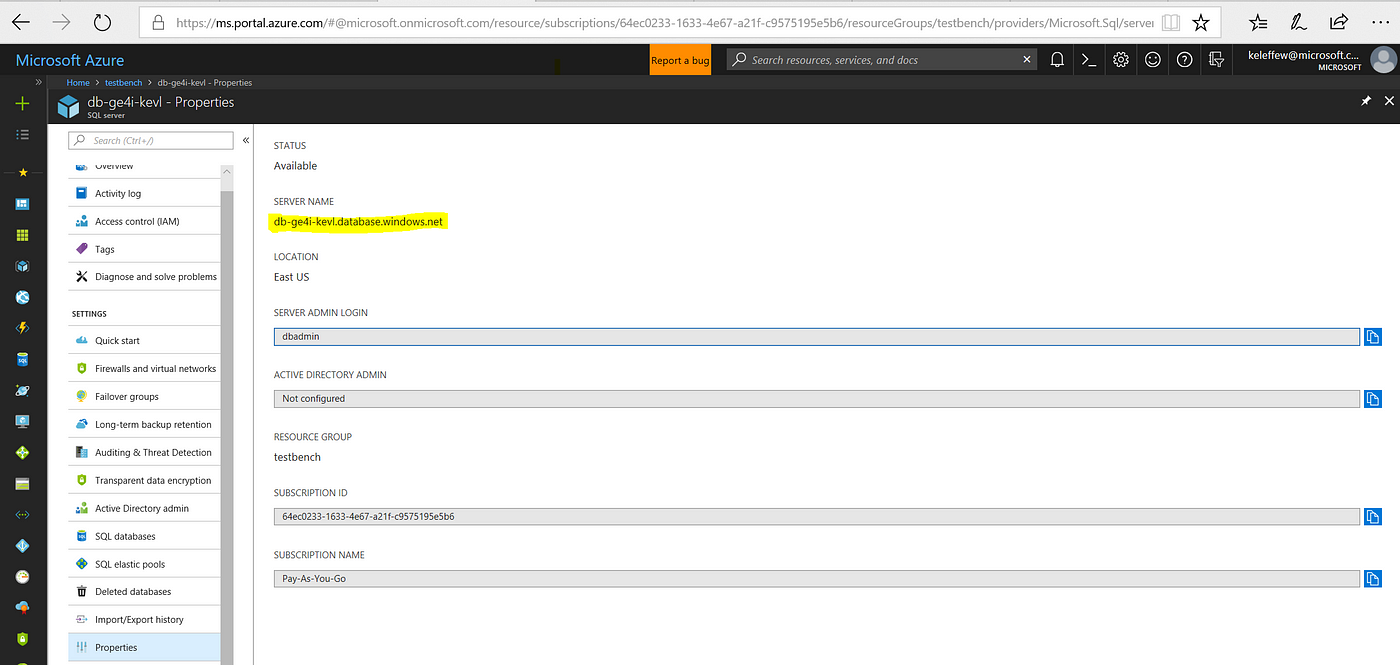
Grab the Server Name- provide this as context to PowerBI
NeXT Steps:
- Open PowerBI
- Click the ‘Get Data’ button. Specify Import.
- Provide the server name from your Workbench Deployment group in Azure by navigating to the SQL Server’s Properties blade*. *Select ‘okay’.
Once connected to the database, the Navigator dialog will display the tables and views available within the database. The views are designed for reporting and are all prefixed ‘vw’.

Data Fields for our Basic Provenance Workflow
Let’s grab the following values: {ApplicationDisplayName, ContractDeployedByUserEmailAddress, ContractLedgerIdentifier, StateName }
ApplicationDisplay name describes the name of the application. In this case. ‘Basic Provenance’
ContractDeployedByUserEmailAddress gives us the email for the user who initially deployed the transfer. In this case, keleffew@microsoft.com
ContractLedgerIdentifier gives us the address for where the smart-contract exists on chain. In this case, it will begin with 0x.
StateName tells us the current state that the asset is in. In this case, the asset is InTransit.
With these values, we can begin to visualize the smart-contract data associated with provenance — meaning we can show who the state of the contract workflow, and create a dashboard to gain insight into the party who has possession of the digital asset at a the current point in time.
This dashboard can easily be ported to mobile — for quick insight into the provenance of the asset. You can create a portrait view of your report tailored for mobile phones by selecting the View tab and clicking Phone Layout.

A Simple mobile view for the contract workflow
IV. Publish the Dashboard to Microsoft Teams
To finish this walkthrough, we will publish the dashboard to a Microsoft Teams Channel, allowing a group users to quickly view the status of the contract within the context of their wider workspace.
To do this, navigate to the PowerBi application and select File -> Publish to PowerBi -> and select the Group destination for your Teams Channel.
Once you have accomplished this, Navigate to the Teams application and select corresponding Teams channel. Add a Tab and select PowerBi
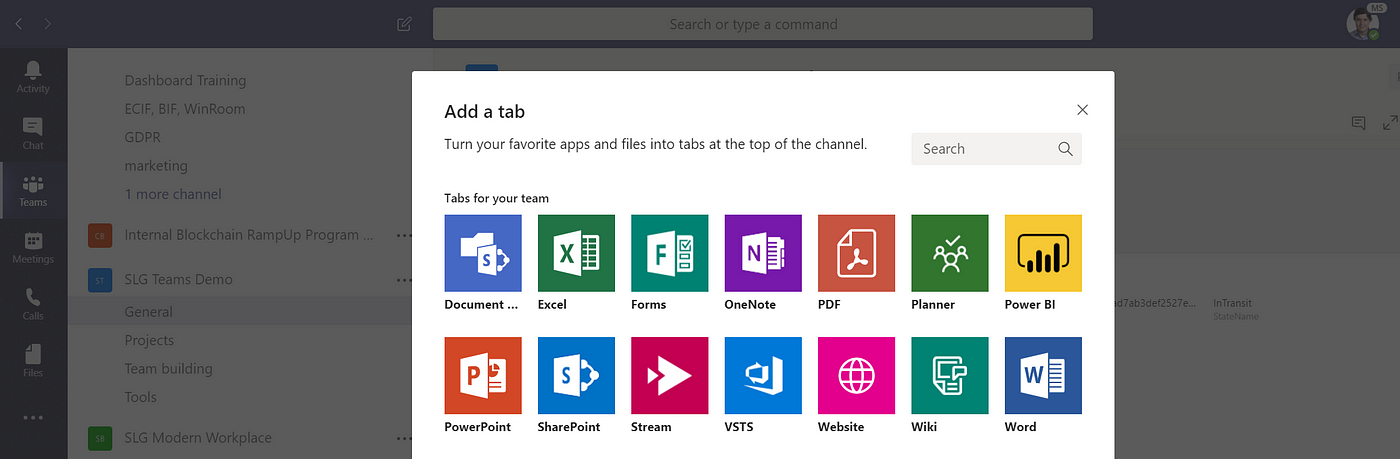
Select the yellow PowerBi icon
This will create a real-time PowerBi visualization tab in the Teams Channel, as shown below.

Congratulations! You know have real-time Teams insight into the provenance of a digital asset in Azure Blockchain Workbench.
Feel free to post in the comments or DM if you have any questions.