

Written by Fieldlnwza007, infographics by Earth
Mysticeti
In July, Sui announced a shift from using Narwhal and Bullshark as their consensus protocol to Mysticeti[1]. In this article, I will do my best to simplify the Mysticeti paper and explain how Mysticeti works and why it was chosen from my perspective, while preserving the core ideas.
Narwhal and Bullshark Recap
To understand the need for Mysticeti, let’s first review Narwhal and Bullshark. If you’re familiar with these protocols, feel free to skip ahead. For more details, see references [2], [3], and [4].
Narwhal and Bullshark are certified DAG-based consensus protocols designed to improve system throughput by separating data dissemination from consensus logic. Narwhal acts as the mempool layer, managing data flow, while Bullshark handles consensus. Validators interpret their local DAG constructed by Narwhal without additional communication, meaning the consensus has zero communication overhead, improving efficiency. At a high level, Narwhal functions as a mempool that allows each validator to broadcast messages and build a local view of the DAG. During round , each validator broadcasts its block (vertex) to other validators. The main elements within each block are as follows:
-
A list of transactions,
-
certificates from round ,
-
The validator’s signature.
Upon receiving a block from another validator, each validator verifies the block’s validity, signs it, and sends it back to the original sender. Once a validator collects signatures from distinct validators, they can create a certificate for their block and share it with others. When a validator receives a certificate, they add the corresponding block (vertex) to their local DAG. A validator moves to round after receiving certificates. The resulting structure forms a DAG because each block references blocks from the previous round, creating links that build on prior rounds.

Now that we have a DAG, we can interpret it using Bullshark. In Bullshark, a validator attempts to commit blocks every two rounds. Borrowing from the example in [4], a leader block is selected in each even round to be used for the commit process. For instance, the blocks of Validator 4 (L2) and Validator 1 (L4) are chosen as leader blocks in rounds 2 and 4, respectively.

In the following odd round, blocks cast votes for the leader in the previous round, with references serving as votes. For example, the leader block L2 from round 2 receives one vote since only one block in round 3 references it. According to the direct commit rule, if a leader receives more than votes, it and its causal history can be committed. Thus, L4 can be directly committed because it receives 2 votes, whereas L2 cannot.

Fortunately, if there is a path from a future committed leader to a past leader, the past leader can also be indirectly committed. Since a path exists between L2 and L4 (marked as a yellow line in Figure 4), L2 can be committed as well.

Thus, L2, L4, and their causal histories can be committed and totally ordered, with L4’s causal history highlighted in orange and L2’s causal history highlighted in green.

Problem with Narwhal and Bullshark
So, what issues do Narwhal and Bullshark face?
-
High Latency
-
Significant Signature Verification Overhead
High Latency
According to Bullshark's commit rule, validators attempt to commit a leader and its causal history every two rounds. However, some vertices (blocks) from the previous round may be unlucky and not get included immediately in the current round leader’s history. For instance, in Figure 6 (top), the L2 block can be committed because it receives votes. However, it does not reference the orange vertex, so the orange vertex is not committed in this round. This is particularly unfortunate for the orange block because, in the same round (round 1), other blocks are committed as soon as L2 is committed, meaning they only wait for one round. In contrast, the orange vertex has to wait for three rounds before it is included in L4's causal history and committed along with L4.
Additionally, because Narwhal is a certified DAG, a vertex can be added to the DAG after 1.5 RTTs (Round-Trip Times), or three messages. The first message occurs when a validator proposes a block and broadcasts it to other validators. The second message is when other validators respond to the proposer with their signatures. The third message happens when the proposer creates a certificate and broadcasts it back to the other validators. As a result, some fortunate blocks might only need to wait two rounds—a six-message delay—before being committed. However, blocks like the orange block in Figure 6 (top) may have to wait 3–4 rounds or even longer.

Require a Lot of Signature Verifications and Aggregations
In Narwhal, each validator performs the following steps in each round:
-
Checks each vertex to ensure it includes the correct corresponding certificates before adding it to the DAG.
-
Creates its block certificate from an aggregation of 2f+1 signatures.
-
Advances to the next round as soon as it receives 2f+1 vertices (certificates).
As a result, Narwhal requires a lot of signature verifications and aggregations, which increase with the number of validators in the system and consume a large amount of computational power.
Enter Mysticeti
Why Mysticeti
Mysticeti was designed specifically to address the issues found in Narwhal and Bullshark. Its primary goals are to:
-
Reduce Latency: Mysticeti tries to commit blocks every round rather than every two rounds and allows each round to have multiple leaders, which helps in two ways:
-
Decreases commit latency from two rounds to one.
-
Having an appropriate number of multiple leaders increases the chance of including non-leader vertices in their causal history, thereby reducing the "unfortunate case" discussed in the High Latency section.
-
-
Use an Uncertified DAG: In Mysticeti, certificates are embedded implicitly into the DAG structure and can be interpreted through DAG patterns. This approach offers several advantages:
-
Reduces the signature generation and verification process, requiring only one generation and verification per block.
-
Lowers communication latency between rounds from Narwhal’s 1.5 round trips (1 round for certificate creation and 0.5 round for certificate broadcasting) to just 0.5 round trip in Mysticeti.
-
Simplifies engineering complexity, as each validator only needs to broadcast a single message type—a block.
-
DAG structure in Mysticeti
Unlike Narwhal, Mysticeti has a much simpler DAG structure. Each vertex (block) in Mysticeti’s DAG includes:
-
The author of the block,
-
The round number of the block,
-
A list of transactions,
-
distinct hashes of blocks from the previous round (references).
The primary difference is in point 4. Instead of referencing certificates—each generated from signature aggregations—Mysticeti only requires a block to reference the hashes of previous blocks directly, without certificates. This significantly simplifies the DAG structure, engineering processes, and signature verifications.

Interpreting DAG patterns
In Mysticeti, there are two main rules used to determine the state of leader blocks: the direct decision rule and the indirect decision rule. Note that the following examples are borrowed directly from [5] and [6].
Direct Decision Rule
Since Mysticeti doesn’t use certificates like Narwhal and Bullshark, validators lack a direct method to verify whether enough validators witness the same DAG causal history and confirm that it is safe to commit leader sequences (and their causal history). Thus, an alternative approach is needed. Mysticeti addresses this by allowing a validator to indirectly cast a vote acknowledging a block from the previous round. This indirect vote occurs when a validator’s new block in the current round references a block from the previous round (i.e., by including the hash of that block in the new block). Through this design, a validator in Mysticeti only needs to observe the DAG and search for specific patterns that imply enough validators have acknowledged a block, ensuring it is safe to commit (i.e., certificates are implicitly embedded in the DAG). There are two main patterns:
-
Certificate Pattern: A block B at round is said to get one certificate if there are blocks in the next round that reference it, and a block in round references the blocks of round .
-
Blame Pattern: A block B at round r receives a blame if there is any block in round that does not reference B.
For example, Figure 8 demonstrates a certificate pattern and a blame pattern for block B11. Since three blocks (B12, B22, and B32) in round reference B11, and block B13 in round references these three blocks, this pattern is interpreted as a certificate for block B11. Meanwhile, block B42 in round does not reference B11, resulting in one blame for B11.

Let’s discuss the commit rule to determine when it is safe to commit a leader and when to skip it. The direct commit rule is quite simple:
-
If a validator observes that a leader block receives 2f+1 certificate patterns, the validator can mark the block as to-commit.
-
If a validator observes that a leader block receives 2f+1 blame patterns, the validator can mark the block as to-skip.
-
Otherwise, a validator marks the block as undecided, and the indirect decision rule will be used to decide its status.
As an example, let’s consider a DAG in Figure 9. Assume that block B34 is a leader block, and we are trying to determine its status.
![Figure 9: Example of a DAG borrowed from [5] and [6] that we will use to explain Mysticeti in this article](https://images.mirror-media.xyz/publication-images/pYzgJgxv771FDfrE7S0RS.jpg)
Since B34 receives three certificate patterns, it can be marked as to-commit (Figure 10).

Next, let’s assume B14 is a leader. We see that it has one blame pattern (B12) and one certificate (highlighted in green in Figure 11). Therefore, we cannot determine its status yet, and it can only be labeled as undecided.

For an example of a skip pattern, let B24 be a leader. We observe that there are three blames, as three blocks in the next round do not reference B24. Thus, B24 can be marked as to-skip.

Indirect Decision Rule
Using the direct decision rule, we can determine the status of a leader vertex at round within two rounds. Specifically, we can decide to commit a leader block at round or skip it at round (if it receives three blames). However, if a block remains undecided under the direct rule, we must rely on the indirect rule, which introduces additional latency. The indirect decision rule operates as follows:
-
Finding an Anchor: If a leader block L at round cannot be decided using the direct decision rule, we search for the first leader at round > that is marked as to-commit or undecided and assign this leader as an anchor for L.
-
Undecided State: If the anchor is marked as undecided, we can do nothing and must label L as undecided.
-
To-Commit: If the anchor is marked as to-commit, we check the DAG for the following:
(a) Whether vertex L has a certificate pattern.
(b) Whether this certificate pattern has a path to the anchor.
(c) If both conditions (a and b) are met, we can mark L as to-commit.
Simply put, if there is a certificate pattern linking L to its anchor, then L can be marked as to-commit.
-
To-Skip: Otherwise, if conditions (3a and 3b) are not satisfied, the vertex can be marked as to-skip. This means that if there is no certificate pattern linking L to its anchor, it can be marked as to-skip.
Explaining this rule in text may be confusing, so illustrations are provided below to clarify the indirect decision rules. Beginning with the to-commit indirect rule, and following an example from the previous section, let’s assume that B14 is the leader of round 1 and B34 is the leader of round 4. From Figure 11, we know that B14 is in the undecided state, so we apply the indirect decision rule.
First, we identify an anchor. Since B14 is a round 1 block, an anchor for B14 must be a block in round >3 that is in an undecided or to-commit state. From Figure 10, we see that B34 can serve as an anchor because it resides in round 4 and is marked as to-commit. B14 has a certificate pattern (highlighted in green) that ends at B43, and there exists a path to B43 (highlighted in orange). Thus, we can mark B14 as to-commit.

Next is the indirect decision rule for to-skip. Assume that B21 is now the leader of round 1, and let B34 be the leader of round 4, as in the previous example; hence, B34 also serves as an anchor for B21. Initially, B21’s status cannot be decided by rounds 2 and 3, so it is first labeled as undecided. Then, at round 4, we observe an anchor for B21. We look back at rounds 2 and 3 to check if there are any to-commit patterns. Unfortunately, there are none, so conditions 3a, 3b, and 3c cannot be applied. As a result, we can mark B21 as to-skip.

Pipelining
The direct decision rule can determine the status of a leader and commit it along with its causal history every 3 rounds (1 wave). If we commit a leader on a wave basis (every 3 rounds), the protocol still has high latency. For example, in Figure 15, we see that wave 1 begins at round 1 and ends at round 3, meaning that the leader of round 1 can only be committed at the earliest by round 3 (at the end of the wave). The second leader can be committed at round 6, and so on.

However, what we actually need within each wave is just the direct commit rule. This means we only need the first round to introduce a leader and the next two rounds to determine its status (to-commit, to-skip, or undecided). Therefore, rounds 2 to 4 can also be viewed as a wave, as can rounds 3 to 5, 5 to 7, 6 to 8, and so on. This approach allows us to introduce a leader in every round and pipeline these waves.
Figure 16 illustrates the concept of wave pipelining in Mysticeti, where each wave progresses across multiple rounds. The leader of each wave is highlighted by a color corresponding to the wave number, indicated above the timeline. For instance, wave 1 (yellow) spans rounds 1 to 3, with its leader (B41) colored yellow. Similarly, wave 2 (blue) spans rounds 2 to 4, and its leader (B22) is colored blue, and so on.

Multi-Leader
As discussed in the "Problem with Narwhal and Bullshark" section, certain vertices may, unfortunately, be excluded from a leader's causal history in the next round. This delay means those vertices must wait for a future leader to include them in its causal history before they can be committed, resulting in additional latency. In contrast, Mysticeti allows for more than one leader per round, increasing the chance of capturing more vertices into leaders' causal histories, thereby reducing latency.
Mysticeti enforces a well-defined sequence or priority among leaders within the same round to maintain the consistency of total ordering. The number of leaders can range from one to the total number of validators. It’s important to note, though, that increasing the number of leaders can also introduce commitment latency, as discussed in the following section, since the ordering stops as soon as a leader with an undecided status is encountered.
Putting It All Together
We use the same DAG as an example, but now each round has two leaders, as shown in Figure 17. In the first round, the leaders are L1a and L1b (B21 and B41). The “a” and “b” after L1 indicate the priority of the leaders. This means that when we commit L1a and L1b simultaneously, we place L1a before L1b in the total order. The missing leader in the third round (L3a or B33) can occur if a validator experiences an asynchronous period and is unable to broadcast its block to other validators in time, while other validators have already moved to the next round.

Now, let’s walk through the example starting from the highest round. Currently, wave 5 and wave 6 consist of only 2 and 1 rounds, respectively, so their leaders’ statuses cannot yet be decided. As a result, we label them as undecided (colored gray in Figure 18).

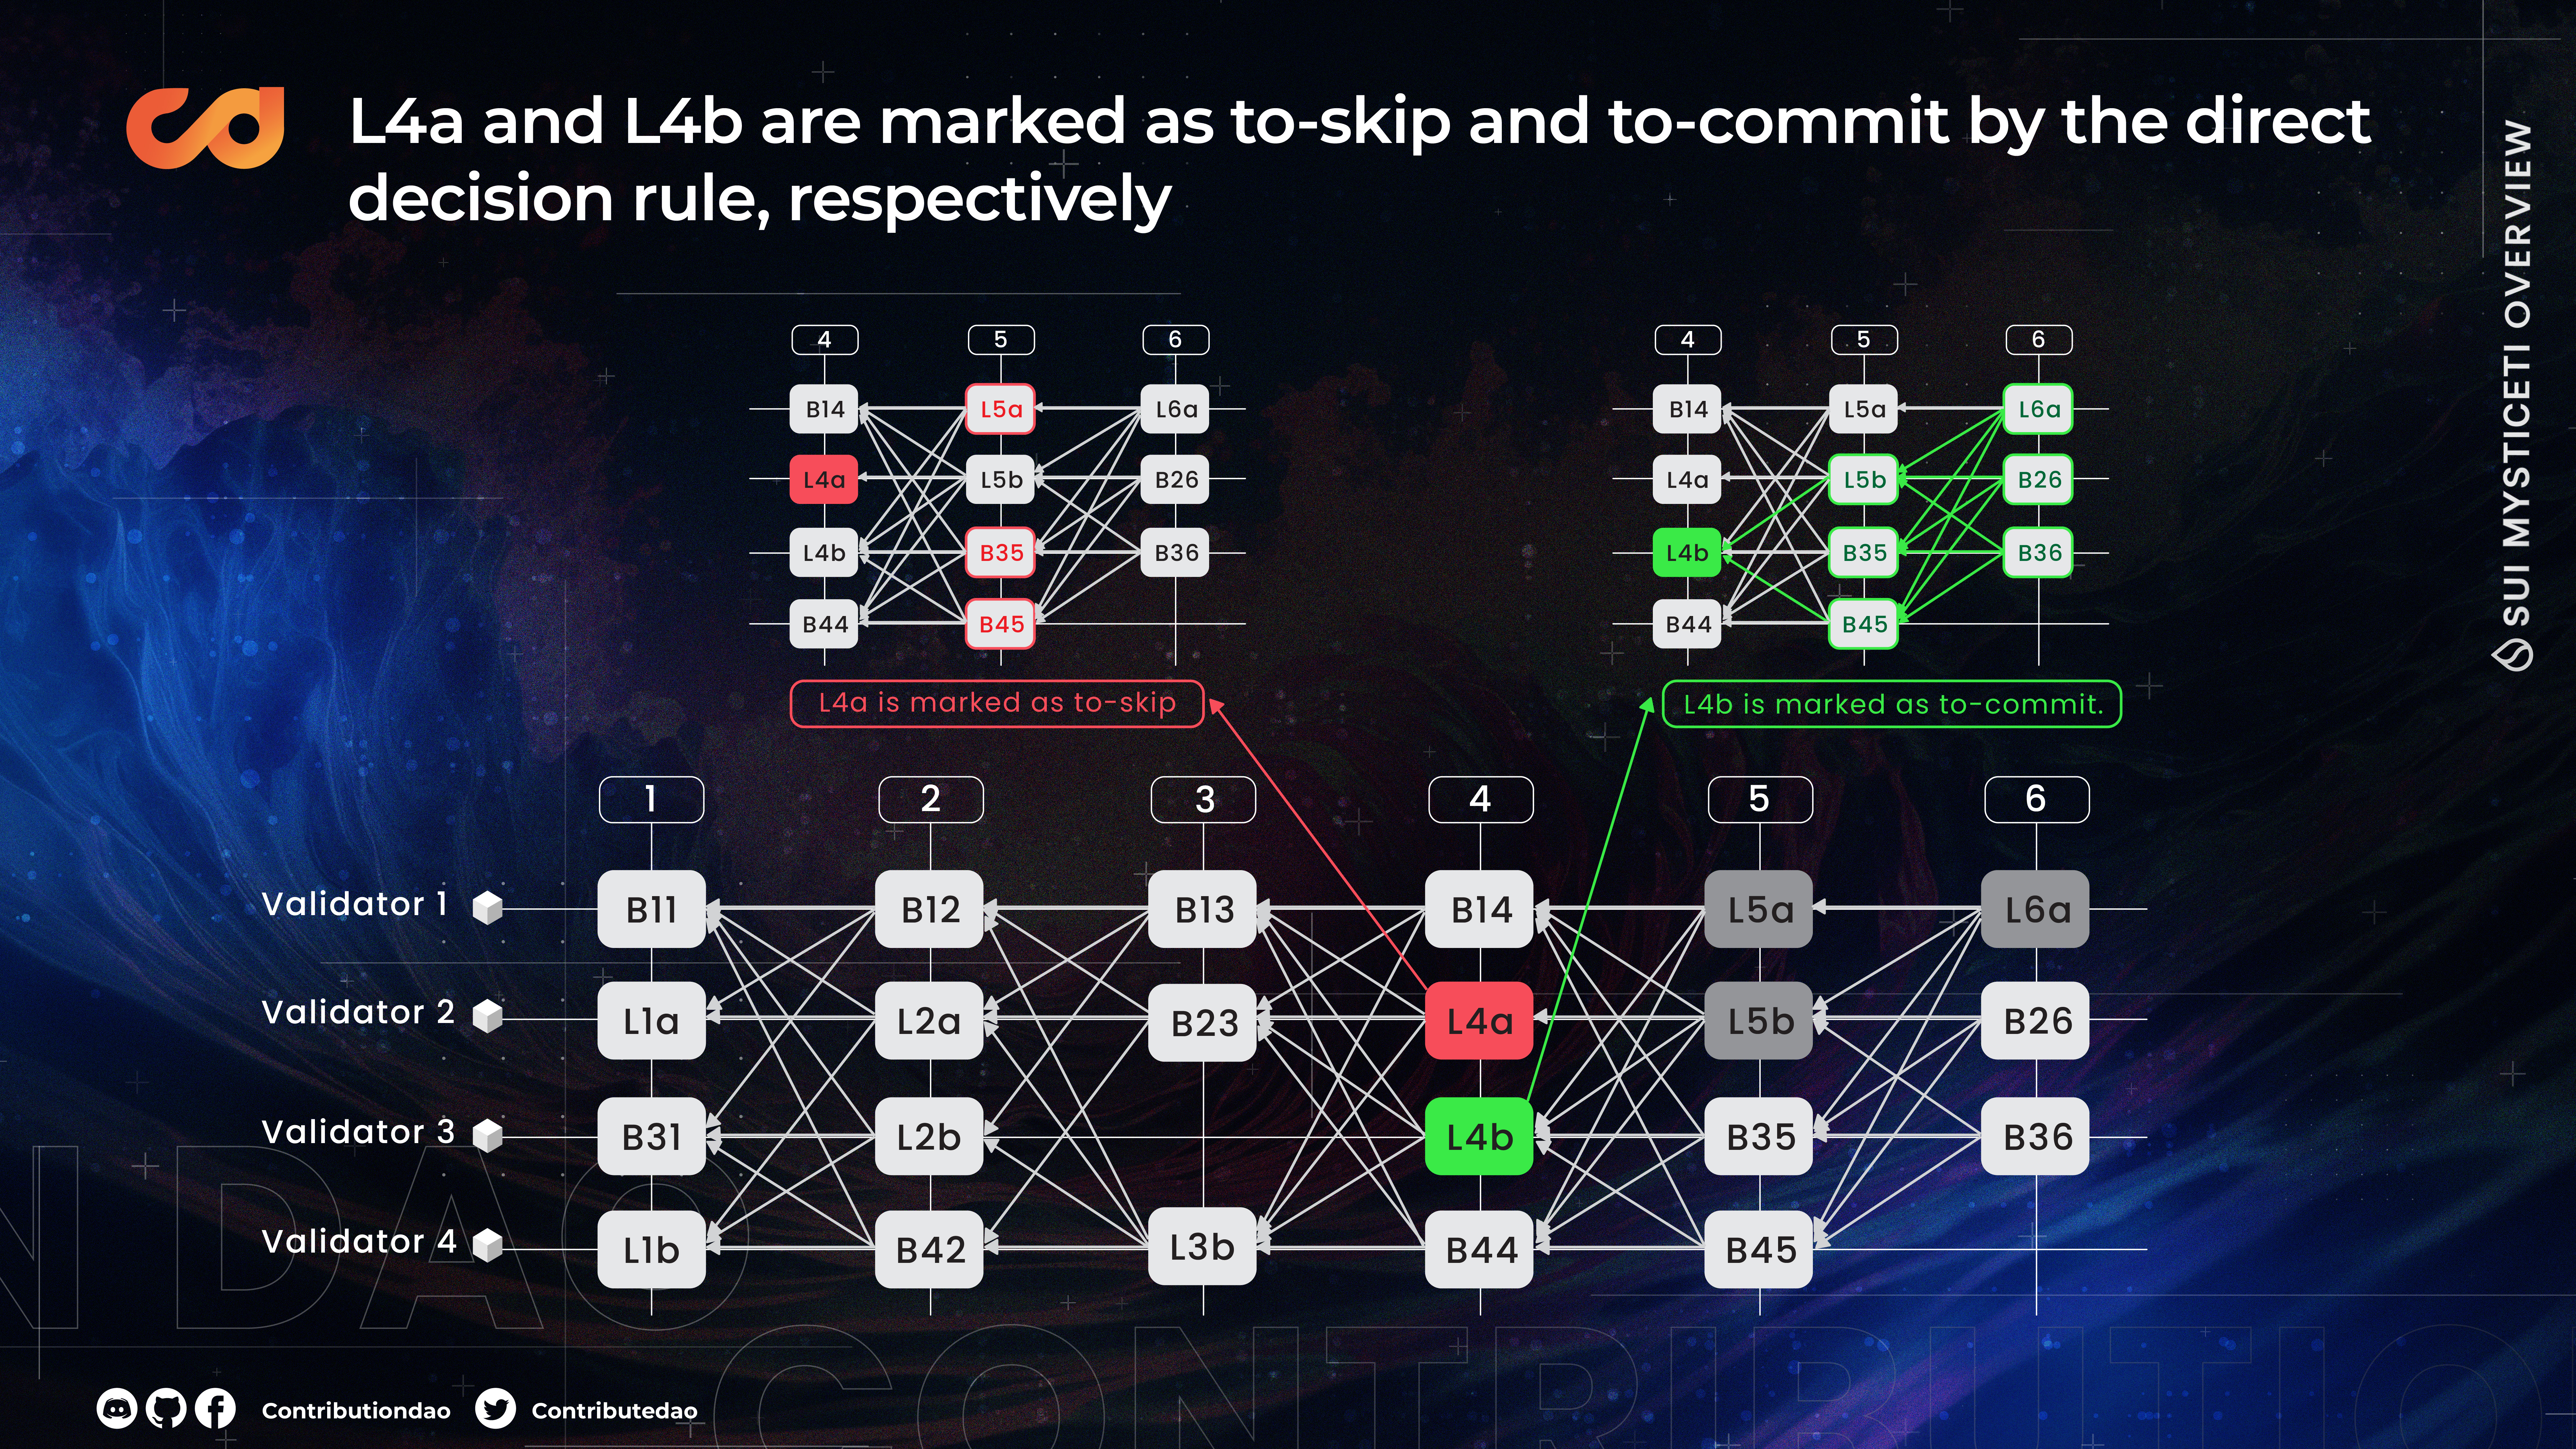
We have already worked on L4a and L4b (B24 and B34 in Figures 12 and 10) and determined that they can be marked as to-skip and to-commit, respectively.
Next is L3b. L3b has 4 certificate patterns and can be marked as to-commit, as shown in Figure 20.

L2a is straightforward and can be marked as to-commit. L2b, however, receives one blame, while no certificate pattern can be found from rounds 2 to 4. Thus, we rely on the indirect decision rule. First, we search for an anchor for L2b, which is a leader vertex after the second wave (a leader vertex from round 5 or higher) with undecided or to-commit status. We find L5a and L5b, selecting L5a first because it has higher priority than L5b. Unfortunately, L5a is in an undecided state, so L2b can only be marked as undecided (see Figure 21).

As for round 1, we already worked on them in Figures 13 and 14. The status of both L1a and L1b cannot be determined using the direct decision rule, requiring the indirect rule, which marks L1a and L1b as to-skip and to-commit, respectively.

We have just finished deciding the status of each leader block. We can now proceed to totally order them, as we do in Narwhal and Bullshark. We start by ordering the leaders from the first round, giving higher priority to “a” than “b” within the same round. We then iteratively examine the leader sequence, skipping all leaders marked as to-skip, committing all leaders marked as to-commit, and stopping immediately when we encounter a leader marked as undecided. Figure 23 shows that we can only commit L1b and L2a and must stop at L2b because it has an undecided state.

Once the order of committed leaders is determined, we can then order their respective causal histories. A leader's causal history includes all vertices that have a path from the leader to those vertices, where these vertices exist in rounds earlier than the leader's current round. Since our example starts at round 1, L1b has no causal history. As for L2a, its causal history contains B11, L1a, and L1b (where the paths are highlighted in blue in Figure 24). However, since we already committed L1b, there is no need to order this vertex again, as we already know it should be placed before L2a (and L2a’s causal history). What remains is to order L2a’s history (B11 and L1a) between L1b and L2a, where we can use any deterministic rule, such as ordering L2a’s causal history by gas fee. Note that even though L1a isn’t committed as a leader (since it is marked as to-skip), we still need to order it because:
-
It is included in L2a’s history.
-
L2a is committed, and other honest validators will eventually see L2a, observe the same causal history, and commit L2a along with its causal history.

Can we set the number of leaders per round equal to the number of validators?
The answer is yes. However, as discussed in the previous section, we have learned that a validator must immediately stop committing once it encounters an undecided vertex. Therefore, increasing the number of leaders also raises the chance of encountering undecided leaders, which delays the committing process and results in higher latency. The paper suggests that two leaders is an appropriate size based on testing. Nevertheless, one is free to choose any number of leaders they find suitable when deploying Mysticeti as their blockchain consensus protocol.
Intuition on the Mysticeti Commit Rule
I’ll give you some intuition about the safety of the Mysticeti commit rule here. You can refer to the paper if you want a more formal proof.
In partially synchronous linear chain consensus protocols, like Hotstuff and Tendermint, two rounds of voting are required to ensure that honest validators commit to the same chain of blocks. Similarly, in Mysticeti, each leader block is committed by the direct decision rule after passing two rounds of voting, where validators are required to vote in each round.
If this isn’t yet clear, let me explain further. At round , a validator V broadcasts its block B. Other validators vote for B implicitly at round by including the hash of B in their blocks (with votes represented as paths or references in the DAG). The second round of voting occurs when validators at round include the hashes of the blocks that voted for B in their own blocks. Similar to the pipelining process in Hotstuff, this action at round is equivalent to validators acknowledging the first phase votes for B from round , thereby casting their intent to commit B implicitly.
Once round concludes, if B is a leader and there are certificate patterns for B, an honest validator will conclude that B is safe to commit. This is because the presence of certificate patterns for block B can occur only if there were votes in round (the first voting phase) and votes in round (the second voting phase).
Results
From a theoretical perspective, Mysticeti shows a significant latency improvement over Narwhal and Bullshark. This improvement is due to the introduction of pipelining and the multi-leader approach, which allows validators the opportunity to commit in every round. Additionally, Mysticeti’s uncertified DAG reduces the need for signature aggregation and verification, processes that typically demand high computational overhead. By eliminating certificates (signature aggregations), Mysticeti also reduces the communication required between rounds and simplifies engineering complexity.

The chart above, from the Mysticeti paper, illustrates these results. As shown, with a throughput of less than 300,000 tx/s, Mysticeti achieves a latency of under 1 second. In contrast, Narwhal and Bullshark reach their maximum throughput limit at around 140,000 tx/s with a latency of approximately 2 seconds.
References
[1] https://x.com/SuiNetwork/status/1816186223653970086
[2] https://mirror.xyz/contributiondaoblog.eth/k3oqzOxwRXXDWLmzLYNxEoLKpoPA25ke1EOBLvqOzYg
[3] https://decentralizedthoughts.github.io/2022-06-28-DAG-meets-BFT/
[4] https://www.youtube.com/watch?v=xKDDuPrYUag