If you are building on Ethereum then you know that events are a critical part of your smart contract and are super important to help communicate changes to your front end and at the same time keep historical data about the dapp and its users. However dapps with large amounts of events being rendered in the frontend can exhibit major performance issues. This is where The Graph saves the day.
The Graph
The Graph is a decentralized protocol for indexing and querying data from blockchains, starting with Ethereum. It makes it possible to query data that is difficult to query directly.
The Graph learns what and how to index Ethereum data based on subgraph descriptions, known as the subgraph manifest. The subgraph description defines the smart contracts of interest for a subgraph, the events in those contracts to pay attention to, and how to map event data to data that The Graph will store in its database.
If you want to learn more about The Graph you can visit their docs here.
OK, so you want to build a dapp quickly and you want to also dabble with The Graph, where do you start? Setting up a development environment for building on Ethereum can be difficult to do and if you are just starting out in web3 development it can really slow you down. This is where Scaffold-ETH really makes it easy. Scaffold-ETH has everything you need to start building on Ethereum and support for subgraphs out of the box. Scaffold-ETH is Open source and can be found on github.
Setup Scaffold-ETH
Lets walkthrough the process of getting setup with Scaffold-ETH and The Graph. Some prerequisites: Node (v16 LTS) plus Yarn and Git
- Checkout Scaffold-ETH and install requirements
git clone https://github.com/scaffold-eth/scaffold-eth.git scaffold-eth-graph-demo
cd scaffold-eth-graph-demo
yarn install
2. Start up Hardhat
yarn chain
3. Open a second terminal and start React
yarn start
4. Deploy the default smart contract in a third terminal
yarn deploy
Quickly and easily, you now have your own local Ethereum development environment up and running. If you navigate to http://localhost:3000 you should see the following React application. Explore the menus and features of Scaffold-ETH.

Setup The Graph
In this process we will install The Graph locally, deploy a subgraph and test our setup. In order to run The Graph in Scaffold-ETH you will need to have docker installed since the solution uses containers.
Here is a high level look at how The Graph is deployed in Scaffold-ETH.

- Clean up any old data
yarn clean-graph-node
2. Spin up The Graph, Postgres and IPFS in Docker
yarn run-graph-node
3. Create the subgraph (Only need to do this step once)
yarn graph-create-local
4. Deploy your subgraph (Be sure to enter a version label)
yarn graph-ship-local
Then anytime you want to update your smart contract and deploy both you can simply run the following command.
yarn deploy-and-graph
That is it! You are now up and running with The Graph on top of a local Ethereum development environment packed with features and functionality. Once you start sending some contract interactions with the contract the events will be ingested into The Graph. You navigate to the Subgraph tab in Scaffold-ETH and you should see your events show up using the pre-configured Subgraph along with a GraphiQL explorer. Let’s take a look at a sample query.
{
    purposes(first: 1, orderBy: createdAt, orderDirection: desc) {
      id
      sender {
        id
      }
    }
  }
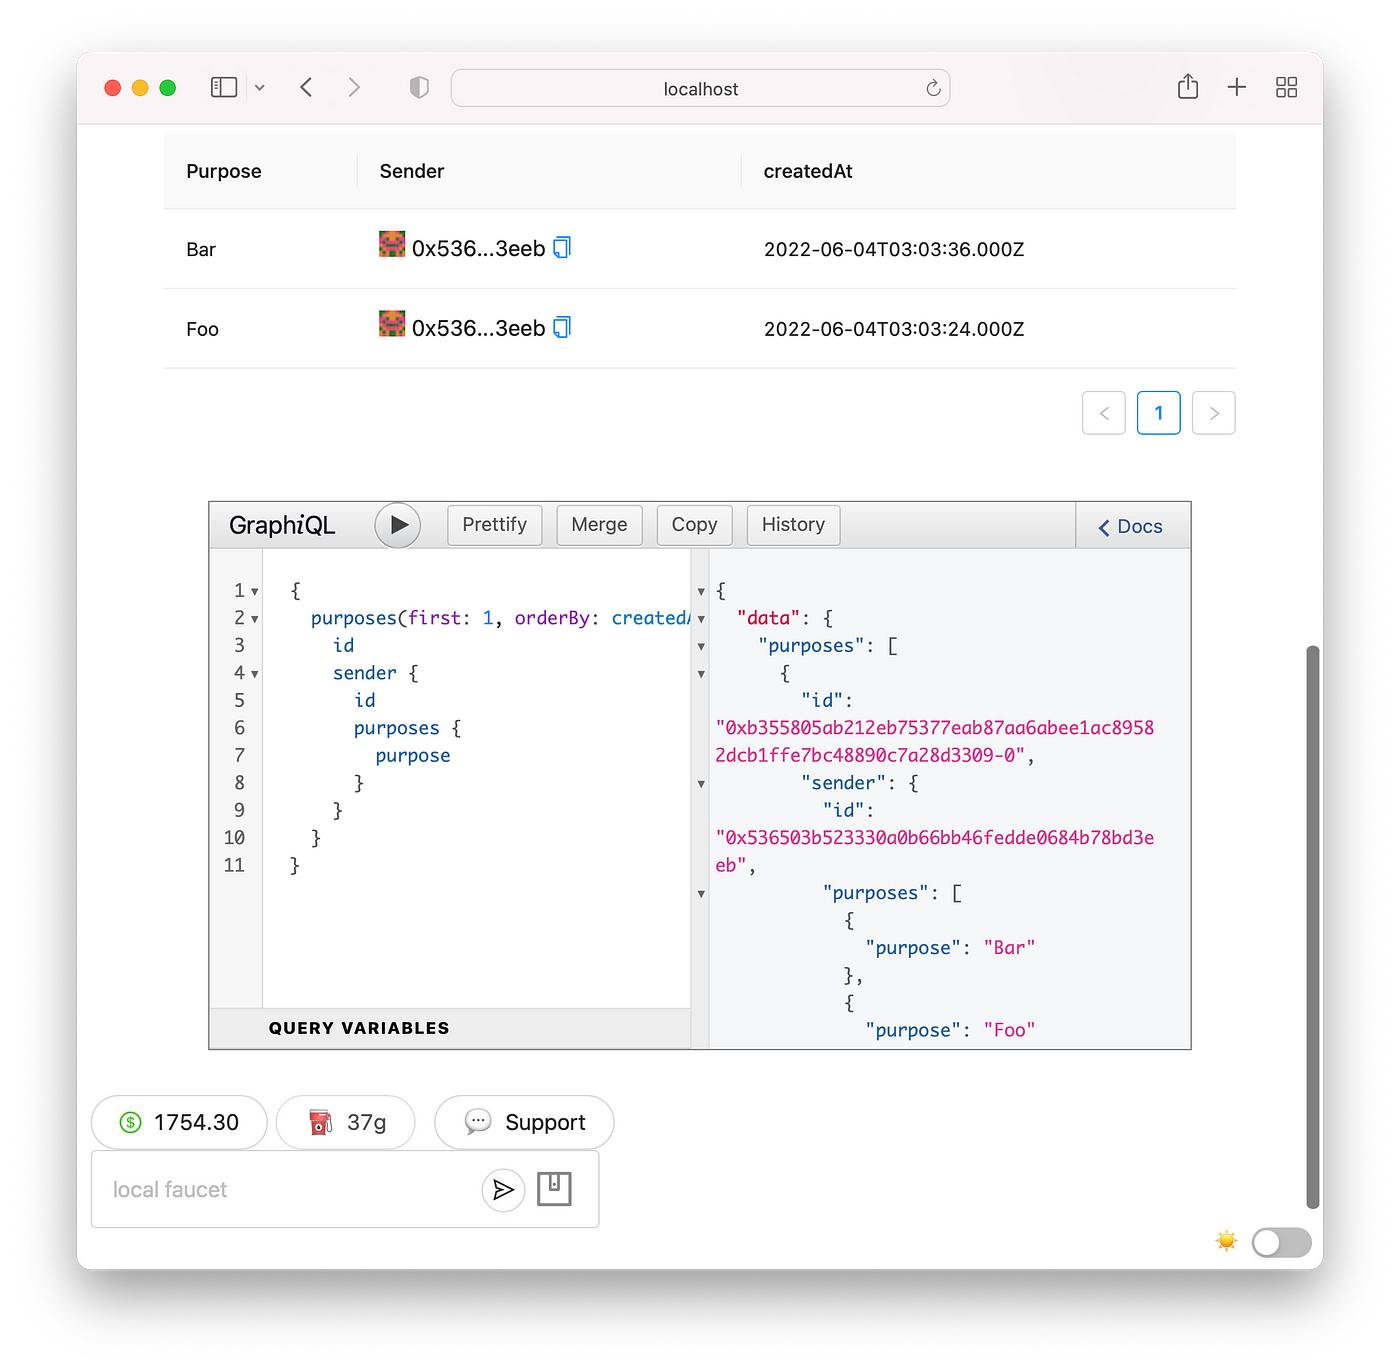
You can see that as the events are emitted they are stored and available for searching within The Graph! Now let’s take this a step further, let’s build out a new function in our smart contract and also build the needed changes to get those into The Graph.
Adding New Events
First we will update our smart contract located in packages/hardhat/contracts/YourContract.sol to include a simple function that will allow users to send messages between addresses. We will also add the needed event and emit configuration.
event SendMessage(address _from, address _to, string message);

function sendMessage(address _to, string calldata message) external {
    emit SendMessage(msg.sender, _to, message);
}
Next we will create the needed schema for this event. The schema file is located in packages/subgraph/src/schema.graphql
In order to get your data indexed into The Graph properly, you need to define the entities. You can read more about entities here.
We will add the following entities.
type Message @entity {
  id: ID!
  _from: Messenger!
  _to: Receiver!
  message: String!
  createdAt: BigInt!
  transactionHash: String!
}

type Messenger @entity {
  id: ID!
  address: Bytes!
  messages: [Message!] @derivedFrom(field: "_from")
  createdAt: BigInt!
  messageCount: BigInt!
}

type Receiver @entity {
  id: ID!
  address: Bytes!
  createdAt: BigInt!
  messageCount: BigInt!
}
Next we will update the Subgraph YAML configuration. This file is located in packages/subgraph/subgraph.yaml
Add the entities we previously configured in the schema here. They should look like this when you are done.
entities:
        - Purpose
        - Sender
        - Message
        - Messenger
        - Receiver
You will also need to add the additional eventHandler for the SendMessage event that will trigger the handleMessage handler.
eventHandlers:
        - event: SendMessage(address,address,string)
          handler: handleMessage
Next we need to update the mapping under packages/subgraph/src/mapping.ts
We will import the additional event.
import {
  YourContract,
  SetPurpose,
  SendMessage,
} from "../generated/YourContract/YourContract";
As well as the generated schema from our deployment.
import {
  Purpose,
  Sender,
  Messenger,
  Receiver,
  Message,
} from "../generated/schema";
Lastly we will add the handler function to the mapping.ts file so that we can handle the events.
export function handleMessage(event: SendMessage): void {
  let messengerString = event.params._from.toHexString();
  let receiverString = event.params._to.toHexString();

  let messenger = Messenger.load(messengerString);

  if (messenger === null) {
    messenger = new Messenger(messengerString);
    messenger.address = event.params._from;
    messenger.createdAt = event.block.timestamp;
    messenger.messageCount = BigInt.fromI32(1);
  } else {
    messenger.messageCount = messenger.messageCount.plus(BigInt.fromI32(1));
  }

  let receiver = Receiver.load(receiverString);

  if (receiver === null) {
    receiver = new Receiver(receiverString);
    receiver.address = event.params._from;
    receiver.createdAt = event.block.timestamp;
    receiver.messageCount = BigInt.fromI32(1);
  } else {
    receiver.messageCount = receiver.messageCount.plus(BigInt.fromI32(1));
  }

  let message = new Message(
    event.transaction.hash.toHex() + "-" + event.logIndex.toString()
  );

  message.message = event.params.message;
  message._from = messengerString;
  message._to = receiverString;
  message.createdAt = event.block.timestamp;
  message.transactionHash = event.transaction.hash.toHex();

  receiver.save();
  messenger.save();
  message.save();
}
After we have made all the needed changes, let’s do a fresh deploy.
yarn deploy-and-graph
After the deployment is finished, navigate over to the Debug Contracts tab and send some messages between your wallet and other addresses using the function we created earlier. This will then trigger events to get pushed into The Graph.
After you send a few messages, try out a search query.
{
    messages(first: 1, orderBy: createdAt, orderDirection: asc) {
      id
      _from {
        messages {
          message
        }
      }
    }
  }
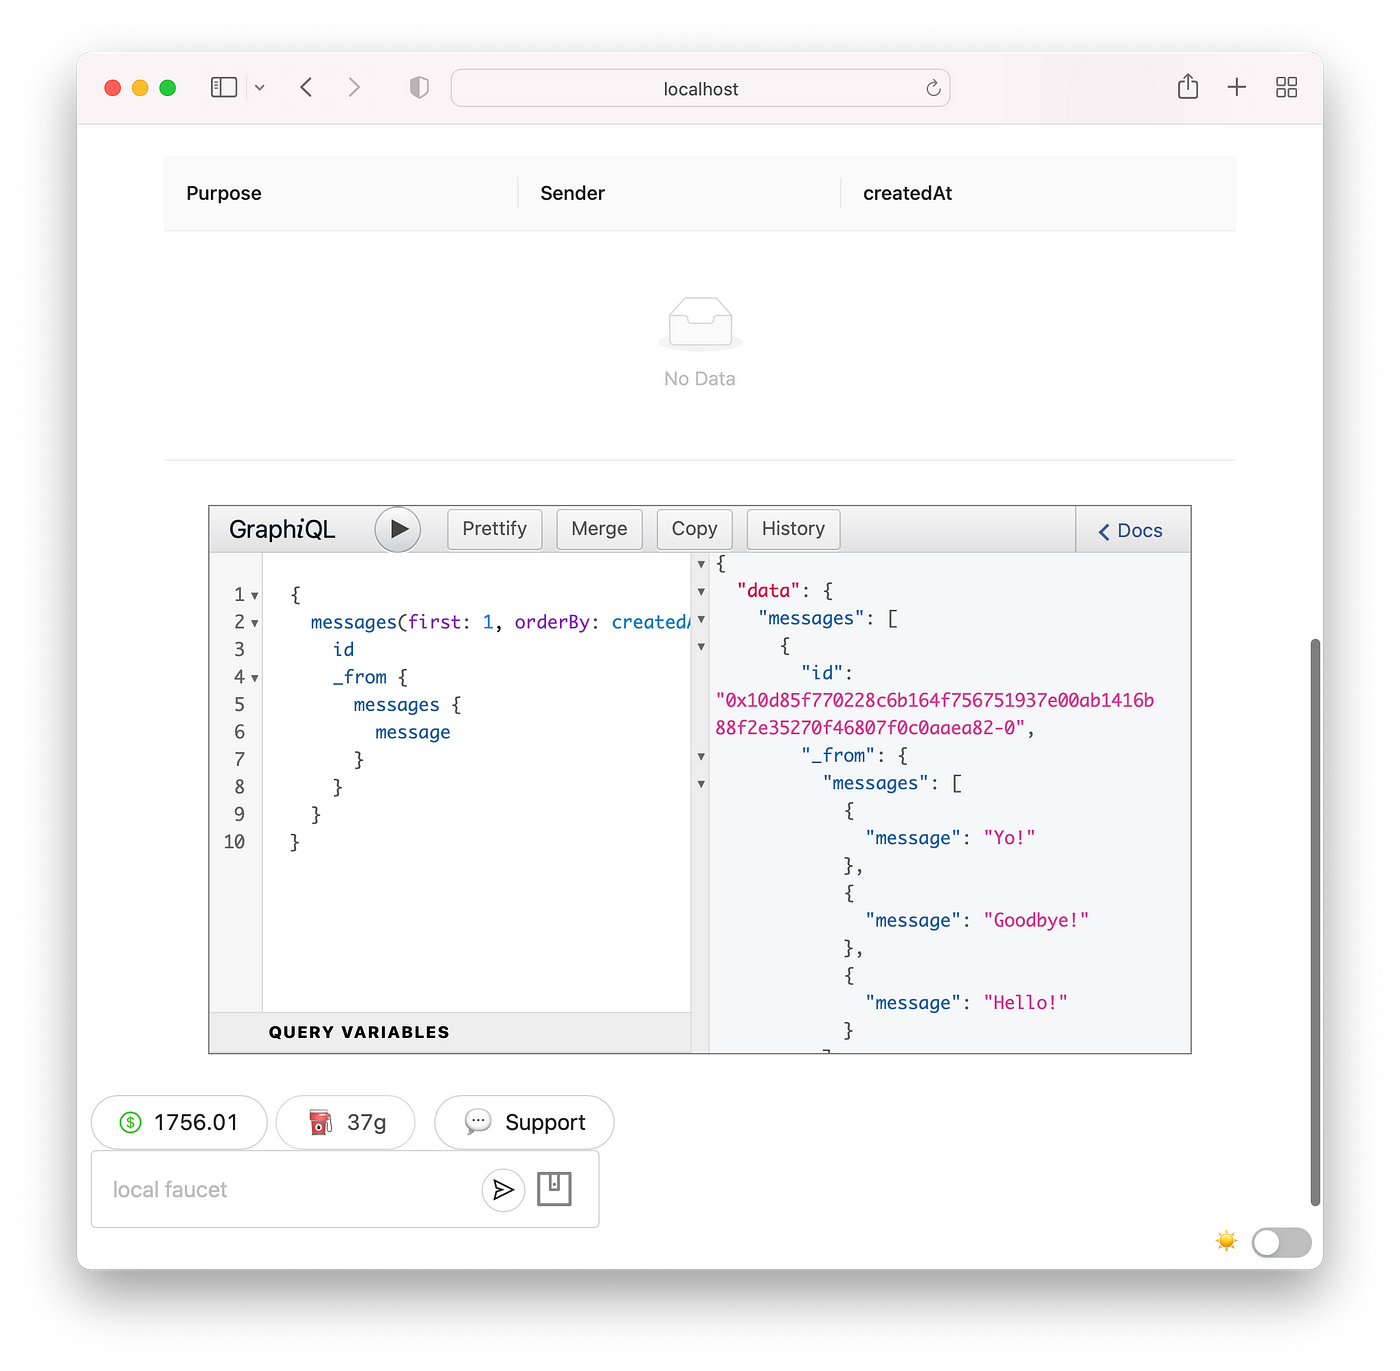
Scaffold-ETH GraphiQL Tab
In this post we walked through how you can easily spin up a local Ethereum development environment with out of the box support for The Graph. We showed how you can create a new event and configure it to be indexed by The Graph!
Thanks for reading. Please follow me to read more about Ethereum, Scaffold-ETH and other Crypto related topics!