
TheGraph indexer Deployment guide
This guide is a portal to the decentralized world of The Graph. You spin up all the necessary containers on one single machine including monitoring solutions and a CLI container that allows you to interact with the graph-nodes or the indexer-agent.
Monitoring configuration runs with Prometheus, Grafana, cAdvisor, NodeExporter and alerting with AlertManager.
The advantage of using Docker, as opposed to systemd bare-metal setups, is that Docker is easy to manipulate and scale up . You can run the whole testnet infrastructure on the same machine, including an Erigon Archive Node. The best part of using Docker is that the data is stored in named volumes on the docker host and can be exported/copied over to a bigger machine once more performance is needed.
The setup for the archive node is not included in this docker setup.
In order to become an indexer on the Graph Protocol Network, you’ll have to stake a minimum of 100,000 GRT.
This can easily be done via the Web UI, by going to The Graph Explorer.
-
Login with Metamask on the Wallet that holds your GRT -
Go to your Profile, then switch to the “Indexing” Tab and hit “Stake” -
Stake the amount of GRT that you desire, then you’re all done!

Set your Operator
The Operator is a wallet address that is entirely separate from the address which you staked your GRT from. This Operator wallet will be filled with ETH, and will be used to send transactions (such as allocations) to the network while keeping your Staked GRT safe in case of an attack on your infrastructure. It is highly recommended that you use a new wallet, generated from a new mnemonic phrase.
For this, follow the instructions here first, then head back for the rest.
Okay, assuming that you followed the instructions and you have your new Operator wallet at hand, let's go and link it up with the wallet that you used to stake your GRT.
-
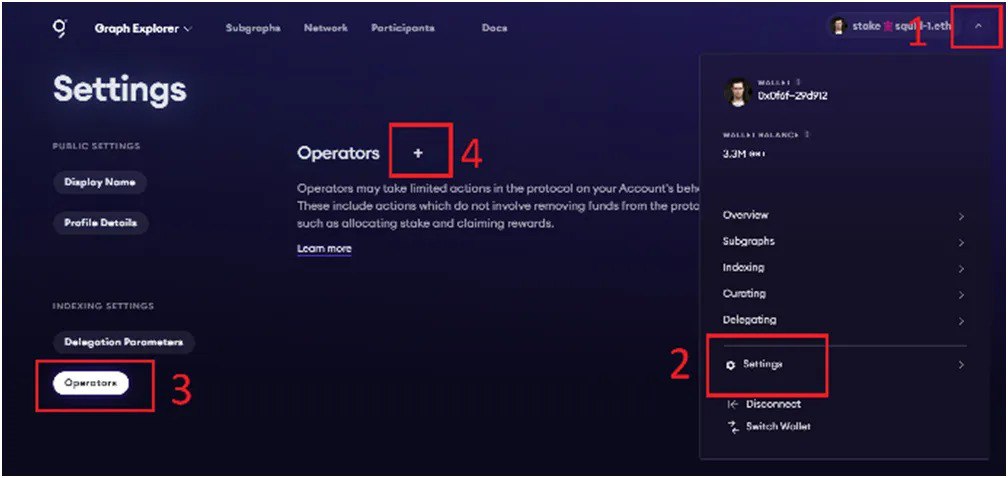
Login with Metamask on the wallet that you used to stake your GRT -
Click the Profile dropdown button, go to “Settings”, and then to the “Operators” tab -
Click the Plus (+) button and add your operator public address there -
Submit the transaction, then you’re done
Ethereum Archive Node Specs
Recommended Specs 32 vcore 64 GB 5 TB NVME
Graph Protocol Infrastructure Specs Recommended Specs 64 vcore 128 GB 2 TB NVME
The specs/requirements listed here come from our own experience during the testnet. Your mileage may vary, so take this with a grain of salt and be ready to upgrade. :)
· The minimum specs will definitely get you running, but not for long, assuming you want to serve data for more than a few heavy-weight subgraphs in the future.
· The recommended specs are a good setup for those that want to dip more than their feet in the indexing waters. Can serve a decent number of subgraphs, but it’s limited by the CPU if too many requests flow through.
· The maxed-out specs rule of thumb is basically more is better. More CPUs, more RAM, faster disks. There is never enough. IT…NEEDS….MORE!!!!11
Closing note, regarding the specs mentioned above: ideally, they need to scale up proportional to your stake in the protocol.
Software Prerequisites
Docker Engine Docker Compose git httpie curl wget jq
Install from scratch
Run the following commands to clone the repository and set everything up:
git clone git@github.com:StakeSquid/graphprotocol-mainnet-docker.git
cd graphprotocol-mainnet-docker
git submodule init
git submodule update
git config --global user.email "you@example.com"
git config --global user.name "Example User"
git branch --set-upstream-to=origin
Get a domain
To enable SSL on your host you should get a domain.
You can use any domain and any registrar that allows you to edit DNS records to point subdomains to your IP address.
For a free option go to myFreenom and find a free domain name. Create an account and complete the registration.
In the last step choose “use dns” and enter the IP address of your server. You can choose up to 12 months for free.
Under “Service > My Domains > Manage Domain > Manage Freenom DNS” you can add more subdomains later.
Create 2 subdomains, named as follows:
index.sld.tld
grafana.sld.tld
Create a mnemonic
You need a wallet with a seed phrase that is registered as your operator wallet. This wallet will be the one that makes transactions on behalf of your main wallet (which holds and stakes the GRT).
The operator wallet has limited functionality, and it’s recommended to be used for security reasons.
You need a 12-word or 15-word mnemonic phrase in order for it to work.
To make yourself a mnemonic eth wallet you can go to this website, select ETH from the dropdown and press generate.
You get a seed phrase in the input field labeled BIP39 Mnemonic.
You can find your address, public key, and private key in the first row of the table if you scroll down the page in the section with the heading “Derived Addresses”.
Make sure you save the mnemonic, private key, and wallet address somewhere safe.
If you need, you can import the wallet using the private key into Metamask
Configure the environment variables
Edit the file called .env and add your values to the following envs:
EMAIL=email@sld.tld
INDEX_HOST=index.sld.tld
GRAFANA_HOST=grafana.sld.tld
AGENT_GUI_HOST=agent.sld.tld
ADMIN_USER=your_user
ADMIN_PASSWORD=your_password
DB_USER=your_db_user
DB_PASS=your_db_password
GRAPH_NODE_DB_NAME=your_graphnode_db_name
AGENT_DB_NAME=your_agent_db_name
CHAIN_0_NAME="network-name"
CHAIN_0_RPC="http://ip:port"
TXN_RPC="http://ip:port"
OPERATOR_SEED_PHRASE="12 or 15 word mnemonic"
STAKING_WALLET_ADDRESS=0xAdDreSs
GEO_COORDINATES='69.420 69.420'
INDEXER_AGENT_OFFCHAIN_SUBGRAPHS=""
#Optional env vars depending on which services you use:
###Indexer agent GUI:
#AGENT_GUI_HOST=agent.sld.tld
#NEXTAUTH_SECRET=$(openssl rand -base64 32)
Required env vars:
-
EMAIL- only used as a contact to create SSL certificates. Usually, it doesn't receive any emails but is required by the certificate issuer. -
INDEX_HOST- your indexer public endpoint. The gateway will be sending queries to this endpoint. -
GRAFANA_HOST- your Grafana dashboard for indexer stack monitoring. -
ADMIN_USERandADMIN_PASSWORD- will be used by Grafana, Prometheus and AlertManager. -
DB_USERandDB_PASS- will be used for initializing the PostgreSQL Databases (both index/query DB and indexer agent/service DB). -
GRAPH_NODE_DB_NAME- the name of the database used by the Index/Query nodes. -
AGENT_DB_NAME- the name of the database used by the Indexer agent/service nodes. -
CHAIN_0_NAME- the name of the network that you want to index -
CHAIN_0_RPC- your RPCs (archive nodes) used by the index nodes. -
TXN_RPC- your Goerli ETH RPC used by Indexer agent/service nodes. This can be a fast/full/archive node, up to you! Please note that using Erigon as the TXN_RPC has proven unreliable by some indexers. -
OPERATOR_SEED_PHRASE- the 12/15 word mnemonic that you generated earlier. Will be used by the Agent/Service to send transactions (open/close allocations, etc) -
STAKING_WALLET_ADDRESS- the address (0x...) that you staked your GRT with, ideally living on an entirely different mnemonic phrase than your Operator Wallet. -
GEO_COORDINATESof your server - you can search for an ip location website and check your server's exact coordinates.
Optional env vars:
-
AGENT_GUI_HOST- your Agent GUI endpoint for controlling the Agent and allocations remotely -
NEXTAUTH_SECRET- used by the Agent GUI to salt your password
Note: If you want to use any of the optional env vars, you need to copy the line that you want to enable above the last line, and uncomment it.
Supporting multiple chains
To add support for multiple chains, you need to edit the config.tmpl file yourself.
For each chain you wish to support, you need to add the corresponding provider line.
Example:
By default, we only support one chain:
[chains.${CHAIN_0_NAME}]

shard = "primary"
provider = [ { label = "${CHAIN_0_NAME}", url = "${CHAIN_0_RPC}", features = ["archive", "traces"] } ]```
To add another one, simply duplicate this, and increment the chain number:
[chains.${CHAIN_0_NAME}] shard = "primary" provider = [ { label = "${CHAIN_0_NAME}", url = "${CHAIN_0_RPC}", features = ["archive", "traces"] } ] [chains.${CHAIN_1_NAME}] shard = "primary" provider = [ { label = "${CHAIN_1_NAME}", url = "${CHAIN_1_RPC}", features = ["archive", "traces"] } ]
After this, all you have to do is to include in the .env file your new environment variables.
Example:
CHAIN_0_NAME="gnosis"
CHAIN_0_RPC="http://ip:port"
CHAIN_1_NAME="matic"
CHAIN_1_RPC="http://ip:port"
Additional configs and details:
Agent/Service — networks.md
Graph-Node — environment-variables.md
Containers in each configuration:
Graphnode Stack:
Index Node Query Node Postgres Database for the Graphnode Stack
Indexer Stack:
Indexer Agent Indexer Service Indexer CLI Nginx Proxy Nginx SSL Posgres Database for the Indexer Stack
Autoagora Stack:
Indexer Service Rabbitmq Autoagora Processor Autoagora Nginx Proxy Nginx SSL Posgres Database for the Indexer Stack Posgres Database for the Autoagora Stack
Monitoring Stack:
Prometheus Grafana Alertmanager Node exporter Cadvisor Pushgateway Nginx Proxy Nginx SSL
Optional Stack:
Poifier client Indexer Agent GUI Nginx Proxy Nginx SSL
Start
Start by picking up the right stack that you want to spin up.
There are several start files used to spin up different components.
I would recommend to start with:
bash start-essential
Be aware that initially it takes several minutes to download and run all the containers (especially the cli container, that one takes a while to build), so be patient. :)
Subsequent restarts will be much faster.
In case something goes wrong, find the problem, edit the variables, and add --force-recreate at the end of the command, plus the container you want to recreate:
bash start-essential --force-recreate <container_name>
Or to recreate the entire stack:
bash start-essential --force-recreate
Start file variants:
start-essential — starts up the graphnode, indexer and monitoring stack — all you need to get up and running on the network
start-optional — starts up the optional stack (for components, read above)
start-autoagora — starts up the autoagora stack (for components, read above)
start-all — starts up the entire stack
Verify that it runs properly
To verify that everything is up and running, you need to:
docker ps
And look for containers that are crash looping — you will notice restarting and a countdown - that means those containers are not working properly.
To further debug, try looking for the container logs and see what they say. More information in the troubleshooting section.
Indexer Infrastructure Ports
Ports Overview
The following ports are being used by all components by default. Also listed are the CLI flags and environment variables that can be used to change the ports.
Working environment
To open or close allocations, we will be using the cli container.
Get into the cli container by running the following command inside the root of the repository
./shell cli
Now we have access to both graph-cli and the indexer-cli as an extension to the former.
To get more information about the available graph commands use the following:
graph --help
graph indexer --help
Understanding Subgraph Allocations
In order to get a better understanding around Subgraph Allocations as an indexer, I would highly recommend reading the following article, written by Jim from WaveFive, along with the Network Overview blog posts written by Brandon.
https://wavefive.notion.site/The-Graph-Protocol-Indexer-Subgraph-Selection-Guide-725f6e575f6e4024ad7e50f2f4e9bbad
https://thegraph.com/blog/the-graph-network-in-depth-part-1
https://thegraph.com/blog/the-graph-network-in-depth-part-2
Without a thorough understanding of the Protocol economics, you won’t be profitable. So before jumping to anything else, give those links a read.
Opening Allocations
Once you read those links above and you know exactly what your plan is, and what you’re doing, then make it to the Graph Explorer (https://thegraph.com/explorer), find the subgraphs that you want to allocate towards, and copy their IPFS hash (Deployment ID).

Now, to allocate towards your chosen subgraph, inside the cli container, run the following command:
graph indexer rules set <IPFS_HASH> allocationAmount <GRT> decisionBasis always
This will trigger the indexer-agent to send an allocation transaction on the network, and once that's confirmed, you've successfully allocated to the subgraph of your choice!
Reviewing your allocations using the indexer-cli
Review the local database of allocations
We can use the following command with the indexer-cli:
graph indexer rules get all
This will give us a table with all the allocations that we’ve set up. It doesn’t check for on-chain allocations, as it’s only displaying the allocation rules found in your agent database.
Check for on-chain allocations via the indexer-cli
We can use the following command with the indexer-cli:
graph indexer status
This will give you information about the status of your endpoints, and also display current on-chain allocations and their status.
Check for onchain allocations via the Graph Explorer and other 3rd party tools
You can easily see if you’ve successfully allocated to a subgraph by going to your indexer profile on The Graph Explorer, or other 3rd party tools.
https://thegraph.com/explorer/participants/indexers
https://graphscan.io/#indexers
https://www.graphtronauts.com/#/indexers
https://maplenodes.com/graph/indexers/
https://indexer-tools.vincenttaglia.com/
You simply have to search for your indexer address (staking wallet) to find out if your allocations are set on-chain.
Check for on-chain allocations via querying the Network Subgraph
Another, more direct, way of checking for successful allocations on-chain, would be to query the Network Subgraph for your indexer address, with the following query:
query MyQuery { allocations( where: {activeForIndexer: "<lower_case_address>"} ) { id subgraphDeployment { ipfsHash originalName } } }
Closing allocations
To close allocations, you have two options:
First option would be to run the same command that you used to allocate, but chainging the decisionBasis to never:
graph indexer rules set <IPFS_HASH> decisionBasis never
This will trigger the indexer-agent to send an allocation closure transaction on the network, and once that's confirmed, you've successfully unallocated off that subgraph!
The second option would be to just delete the allocation from the rules database. This also makes things much more nice and tidy, especially if you use the get rules all command all the time.
graph indexer rules delete <IPFS_HASH>
Or you can delete all the rules via
graph indexer rules delete all
The life of an allocation
After being created by an indexer a healthy allocation goes through four states.
· Active — Once an allocation is created on-chain (allocateFrom()) it is considered active. A portion of the indexer’s own and/or delegated stake is allocated towards a subgraph deployment, which allows them to claim indexing rewards and serve queries for that subgraph deployment. The indexer agent manages creating allocations based on the indexer rules.
· Closed — An indexer is free to close an allocation once 1 epoch has passed (closeAllocation()) or their indexer agent will automatically close the allocation after the maxAllocationEpochs (currently 28 days). When an allocation is closed with a valid proof of indexing (POI) their indexing rewards are distributed to the indexer and its delegators (see “how are rewards distributed?” below to learn more).
· Finalized — Once an allocation has been closed there is a dispute period after which the allocation is considered finalized and it’s query fee rebates are available to be claimed (claim()). The indexer agent monitors the network to detect finalized allocations and claims them if they are above a configurable (and optional) threshold, — -allocation-claim-threshold.
· Claimed — The final state of an allocation; it has run its course as an active allocation, all eligible rewards have been distributed and its query fee rebates have been claimed.
Now, if you are interested in advanced configuration, visit the official guide by StakeSquid: https://github.com/StakeSquid/graphprotocol-mainnet-docker/blob/master/docs/advanced-config.md
The whole guide is: https://github.com/StakeSquid/graphprotocol-mainnet-docker
