
Discover how to gather OSINT data from the dark web without coding. Learn point-and-click scraping tools, techniques, & essential privacy tips.
This article is also published on my Medium page.
You guys seemed to have enjoyed the last article — Python, dark web OSINT, the whole nine yards! Setting up those scripts, digging into the code… it’s the kind of stuff that makes a cybersecurity geek’s heart sing. But hey, I get it — not everyone wants to get their hands quite so dirty with code. A few of you asked, “Is there a way to snag this kind of data without the heavy scripting?” Turns out there is! For those who’d rather point-and-click their way through the dark web, GUI scraping tools are the answer (…well, sort of. We’ll still need the terminal a tiny bit).
Dark Web Scraping: Privacy is Everything
Important: Privacy and Security First! Okay, the dark web? It’s not for the faint of heart. Anonymity is the name of the game. For this kind of scraping, I absolutely recommend using the Tor network or a similar anonymization service. Tor bounces your internet traffic through a series of relays, making it extremely difficult to trace your activity back to your source. However, for those curious about alternative methods (and for illustrative purposes only!), you can often access Tor sites without being on the Tor network by adding “.ly” to the end of any onion address. This approach should be used with extreme caution. While “.ly” acts as a bridge service, allowing you to access .onion sites without Tor, using a dedicated, clean virtual machine becomes even more critical. This acts as a buffer zone, keeping your main system safe. Finally, whatever browser you choose to use should be clean of all cookies and cache and should never be used to browse anything else, as that only increases the potential for attribution. Need help setting up that virtual environment? Check out my article below:
OSINT Investigations Made Simple: Installing CSI Linux On VirtualBox
Learn how to install CSI Linux 2023 on VirtualBox with this comprehensive step-by-step guide.
If you’re interested in a deeper dive into the risks of using “.ly” services, check out the blog post on Criminal IP. They explain it all in detail.
Gather Dark Web Intel: Scrape Search Results with ParseHub and Ahmia
Last time, we zeroed in on specific dark websites — digging into those forums and marketplaces. This time, we’re going wide! Think of it as a big-picture scan of the dark web. We’ll scrape tons of search engine results for whatever terms interest us. For this, we need a few things: a sweet GUI tool called ParseHub and Ahmia, one of the heavy hitters on dark web search engines. Alright, enough talk — let’s fire up that virtual machine, grab ParseHub, and get this show on the road!
Installing ParseHub
Alright, let’s get ParseHub set up on your virtual machine. First, head over to the ParseHub quick start page (https://www.parsehub.com/quickstart). Now, time for a little terminal magic. Fire it up and let’s run these commands:
curl -L https://parsehub.com/static/client/ParseHub.AppImage -o /tmp && \
sudo mv /tmp/ParseHub /opt/ && \
sudo ln -s /opt/ParseHub /usr/local/bin/
Okay, ParseHub’s ready to go! Just type parsehub in your terminal, and it should pop right up. Now, I know you might be thinking, "Wait, I thought this was supposed to be all point-and-click?" Don't worry, that part's coming right up.
If you don’t want to use a command line on the ParseHub quick start page, click the Linux button (or whatever operating system you are using), and the .AppImage file will be downloaded to your Downloads folder.

Now, head over to your downloads folder and right-click on the ParseHub.AppImage file.


Go to Properties/Permissions, and at the bottom of the menu, check the Program box: Allow this file to run as a program. Exit the properties menu. Double-click the file, and you should be looking at the following screen:

Sign up for an account and lets get to the good stuff.
Configure ParseHub for Dark Web Scraping
Now that you have signed up, you should be looking at the following screen and ready to configure your environment.

Before we dive into tweaking ParseHub, first things first — we need those website addresses! Last time we zeroed in on specific darknet sites? Well, this time, it’s all about casting a wide net. We’re gonna scrape those search engine results for a big-picture view of what’s out there on the dark web.
Alright, let’s get some searches going! First, I’m digging for some new “Bitcoin” addresses to attribute. Then, let’s see if we can spot any cheap “EvilExtractor” ransomware tools floating around — maybe even find some new variants. Finally, let’s toss in the keyword “sale” — everyone loves a good sale, right?
Basically, we will search Ahmia for the keywords “bitcoin,” “evilextractor,” and “sale.” So, let’s create a list of those searches in a csv file that we can easily import into ParseHub.

Let’s quickly understand the structure of an Ahmia search URL. It follows the standard format of a query URL:
-
Base URL: https://ahmia.fi/ — This is the main domain for the Ahmia search engine.
-
Search path: search/ — This specifies the search function on the Ahmia website.
-
Query parameter: ?q= — This is the beginning of the query parameter where “q” stands for “query.”
-
Search terms: For instance, bitcoin, evilextractor, and sale. These are the terms that I am searching for on Ahmia.
Now that you have saved your csv file, let’s start our new project from the URL we actually want to scrape, https://ahmia.fi/search/?q=bitcoin.

Next, we load in our list of URLs by going to settings, then we click the green “import from CSV/JSON button.

Once the list is uploaded, we will see it populate the box (JSON format) in the lower left-hand corner of the screen.

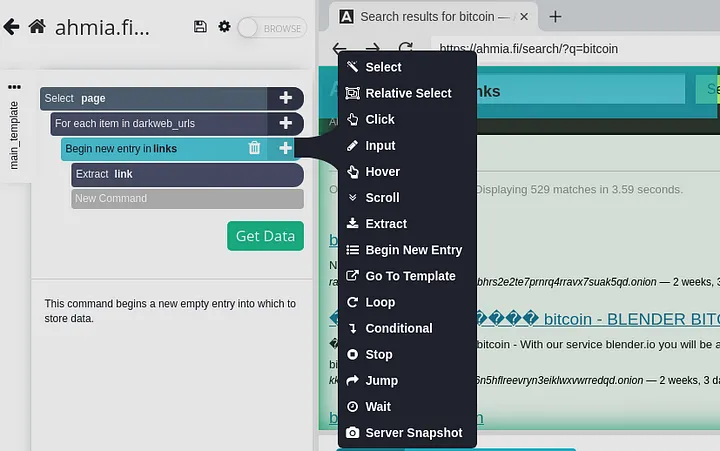
Next, go “Back to Commands” and create a loop.

We want to extract the link for each item from the list we imported. To do this, we need to create a new entry by clicking “Begin New Entry” in the dropdown menu. We can call it whatever we want, but let’s call it “links” for easy understanding.

Then, we need to extract the actual URL from each link by clicking on “Extract” in the dropdown menu, and for consistency, let’s call it “link.”

Change the default extract to “item.”

Next, lets specify what we will do with that item once we scrape it. So lets create a template by clicking on “Go To Template” in the dropdown menu.
Then, we need to extract the actual URL from each link by clicking on “Extract” in the dropdown menu, and for consistency, let’s call it “link.” Change the default extract to “item.”

Then, we need to tell it what elements to extract by clicking on the desired elements on the screen. In our example, I am clicking on the Bitcoin link on the right side of the screen.

Once that is done, go back and save the configurations you just created by clicking on the little floppy disk icon next to the project name.

We are close to finishing so lets click the green “Get Data” button.

Finally, let’s run it by clicking the green “Run” button on the next page.

Awesome! Results are in, just like that. You can grab your data in JSON or CSV format — let’s check out both options and see what we got back.

First, let’s look at JSON format.

Next, let’s look at that CSV file.

By the way, in just 30 seconds, we pulled in a whopping 1737 search results. Imagine the possibilities — threat hunting, analysis, attribution… the works! But let’s save the deep dive for another article.

The complete CSV file from our dark web scrape is available on my GitHub for further analysis. Download it here: darkweb_search_results.
Conclusion
See? Scraping the dark web doesn’t have to mean getting your hands dirty with code. With tools like ParseHub, you can unlock those hidden corners of the internet with just a few clicks and the right strategy. Of course, remember — always prioritize privacy and security. But now, imagine the OSINT insights you could uncover with those 1700+ search results! Thanks for hanging out and exploring this with me! I hope you picked up some cool new tricks. Catch you in the next one, where we’ll turn that data into actionable intel!
Note: Need a bit more help with the list setup? ParseHub has a handy guide you can check out:
For researchers working with the dark web, my GitHub repository offers a regularly updated list of onion addresses. This list is a fork of The-Hidden-Wiki-URLs, ensuring a solid base of reliable links. 2024.onion.links.
Explore Next
Discover how blockchain is transforming industries on the Blockchain Insights Hub. Follow me on Twitter for real-time updates on the intersection of blockchain and cybersecurity. Subscribe now to get my exclusive report on the top blockchain security threats of 2024. Dive deeper into my blockchain insights on Medium.