Introduction
Gemach OnChain AI is an on-chain AI agent that helps you interact with blockchain networks through a simple chat interface. In other words, it's like having a personal crypto assistant. You can talk to it in plain English, and it will help you perform blockchain operations such as sending cryptocurrency, swapping tokens, interacting with DeFi protocols, and more – all by understanding your natural language requests. The AI agent’s purpose is to make complex blockchain tasks easy for everyone, even if you’re not a developer or technical expert.
How it works in a nutshell: You chat with the AI as if you were texting a friend. The AI understands your request and translates it into real blockchain actions (transactions). For example, you could type "Send 0.5 ETH to my friend on Polygon," and the AI will figure out which transactions are needed and guide you through the process. Behind the scenes, Gemach OnChain AI combines advanced AI (similar to ChatGPT) with direct blockchain integration to execute your requests. Its intuitive design means you don’t have to manually navigate complex crypto exchanges or tools – the agent does the heavy lifting for you, across multiple blockchains, all within a chat.
How Does It Work?
Gemach OnChain AI works by bridging natural language and blockchain operations. When you type a request, the AI agent uses a powerful language model to understand what you want. It then uses built-in blockchain tools to fulfill the request. Here’s a simple overview of the process:
-
Understanding Your Request: The AI reads your message and interprets your intent. For example, “I want to swap 100 USDC to ETH and send it to Ethereum” will be understood as a request to perform a token swap and a cross-chain transfer.
-
Planning the Action: Once it knows what you want, the agent figures out the steps needed. It might consult protocol tools (for instance, a swap or bridge service) to get the best way to do what you asked. The AI essentially creates a transaction plan to achieve your goal. (If it's a simple request like checking a token price or balance, it might just fetch that information for you.)
-
Proposing a Transaction: The AI will respond in the chat, often with an explanation or confirmation of what it’s about to do. If a blockchain transaction is needed, the agent will prepare the transaction details and present them to you for approval. No transaction will actually happen until you review and approve it. The agent might say something like, “Okay, I can swap 100 USDC on Polygon for 0.05 ETH and then bridge it to Ethereum. Does this look correct?” and it will show the prepared transaction details.
-
User Confirmation: You will always have a chance to review the details. The chat interface will display the transaction information – for example, the amount, token, destination address, network, and any other relevant info. This is presented in a readable format in the app. You should carefully review these details. (The app will even remind you: “⚠️ AI agents can make mistakes. Please carefully review all transaction details including contract addresses and values before executing any transactions.”.) If everything looks good, you proceed to confirm.
-
Execution on the Blockchain: Once you confirm, Gemach’s integrated wallet system will execute the transaction on the blockchain for you. The AI agent communicates with the blockchain to send the transaction (using the funds you have provided, more on that soon). You don’t need to manually fiddle with gas settings or contract data – the agent handles it. You will see the transaction status update in real-time, and once confirmed on the blockchain, the agent will let you know the task is done.
-
Result and Follow-up: After execution, you can see the outcome in the chat or in your transaction history. If it was a token transfer, the balance on the destination will increase. If it was a swap or bridge, you’ll have the new token in the target chain. The AI can also answer follow-up questions. For example, you could ask “Did it arrive? What’s my balance now?” and the agent can check and respond accordingly.
All of this happens through a conversational interface, so you never have to write code or manually use a blockchain explorer for these tasks. The agent is designed to be beginner-friendly while leveraging powerful blockchain protocols under the hood.
Getting Started
Using the Gemach OnChain AI agent is straightforward. This section will guide you through the initial setup and first steps to start using your AI crypto assistant.
1. Prepare a Crypto Wallet
To use the AI agent, you will need a crypto wallet. This wallet is used to log in and authenticate you (proving you are the owner of a blockchain address). If you already use MetaMask or a similar Ethereum-compatible wallet, you’re all set. If not, you should install a wallet app or browser extension (like MetaMask, Trust Wallet, etc.) and create a wallet. Ensure you have access to this wallet and some cryptocurrency (like a small amount of ETH or the relevant chain’s native token) to pay for transaction fees later.
Why do you need a wallet? Your wallet serves as your identity for the AI agent. When you connect it, the app knows who you are (or rather, which blockchain address is yours) and can manage your session securely. Note: At this stage, connecting your wallet does not give the AI agent control over your funds. It’s just a login (you’ll sign a message to prove ownership of your address). The agent uses a separate internal wallet for executing transactions, which we’ll explain next.
2. Logging In (Connect Your Wallet)
Open the Gemach OnChain AI application (web app). On the home screen or header, you should see a “Connect Wallet” button. Click this to begin the login process.
-
Your wallet (e.g., MetaMask) will prompt you to connect. Select the account you want to use.
-
You may be asked to sign a message to authenticate (this is a security step to prove it’s really you). Approve the signature request in your wallet. There is no cost for this login step – it’s not a blockchain transaction, just a signature.
-
Once done, you’ll be logged in. The app will create your user profile. This includes setting up a dedicated on-chain agent wallet for you. This agent wallet is where the AI will execute transactions on your behalf. It’s a real blockchain wallet address controlled by the application for your use.
-
The first time you log in, the app might prompt you to create your agent wallet (you might even get to pick a name for it). After creation, you will have an Agent Wallet Address associated with your account. This address is where you’ll manage funds for the AI to use. The app will display a success message like “Wallet created successfully” when this is done.
-
If you log in in the future with the same wallet, it will re-use your existing agent wallet (you won’t have to create it again).
-
Now you’re authenticated and ready to interact with the AI agent. You’ll likely see the main interface with a chat window and a sidebar or menu showing your Chats and Assets.
3. Fund Your Agent Wallet
Before you start executing transactions via the AI, you need to have funds available in your agent’s wallet. Since the agent executes transactions using this internal wallet, you must deposit some crypto into it (just as you would fund any wallet) to perform actions like transfers, swaps, etc.
How to add funds: In the app interface, find your Agent Wallet Address (there may be an “Assets” tab showing balances and the address). It’s usually a long string starting with “0x…”. Copy that address. Now, use your personal wallet (the one you connected with, or any other wallet/exchange you have funds in) to send the desired amount of cryptocurrency to your agent wallet address.
-
For example, you might send some ETH or USDC to the agent wallet if you plan to use those. If you want to use multiple networks, you should send funds on those networks to the wallet. (The agent wallet address is the same across EVM networks, since it's an EOA account, but you need to fund it separately on each chain you intend to use. For instance, if you want to do Polygon transactions, send MATIC to that address on Polygon network for gas fees.)
-
Make sure to also have a small amount of the native token of each network (ETH on Ethereum, MATIC on Polygon, etc.) in that wallet for gas fees. The AI will use those funds to pay transaction fees when executing your requests.
You can always check the Assets or Balances section of the app to see what tokens and amounts are in your agent wallet. Initially, it might show “No transactions yet” or zero balances if you haven’t added anything. After funding, the balances will update (you might need to refresh or wait a moment for confirmation).
4. Starting a Chat with the AI
With your wallet connected and funded, you’re ready to chat with the AI agent! The interface will have a chat window where you can type messages. There might be a placeholder suggesting “Ask me to do something…” or simply a text box waiting for your input.
Click on the text input area and type your first query or command. For example, you can start simple:
-
“What can you do?” – The AI can give you a friendly overview of its capabilities.
-
“Show my balances” – The agent can fetch your agent wallet’s token holdings and display them for you (so you know it’s aware of what you have).
-
“Send 0.1 ETH to 0xABCD... on Ethereum” – A direct action request, if you already want to try a transaction.
After typing your message, press Enter or click the Send button (often a “▶” icon or paper plane icon in chat UIs). The AI will receive your message and start processing it. You will see the AI typing indicator (or a message saying it’s thinking).
That’s it – you’ve started interacting! In the next section, we’ll cover how to use the chat interface effectively and what to expect from the AI’s responses.
Using the Chat Interface
The chat interface is where you converse with the AI agent. It looks and feels like a messaging app: on the left (or top on mobile) are your messages, on the right are the AI’s responses. Here’s how to make the most of it:
Chatting in Natural Language
Just type what you need in plain English. The AI is capable of understanding a wide range of requests related to crypto. You don’t need to use special commands or technical terms (though using correct token names or symbols is helpful). Here are some examples of how you can phrase requests:
-
“Send 50 USDC from Polygon to Ethereum.” – The AI will interpret this as a cross-chain transfer: possibly a bridge from Polygon to Ethereum of 50 USDC.
-
“Swap 0.01 BTC to ETH.” – The AI knows BTC is on Bitcoin or maybe wrapped BTC on Ethereum; it might clarify or execute via a bridge (if supported). (If something is not possible, the AI will let you know or suggest an alternative, like using wrapped tokens.)
-
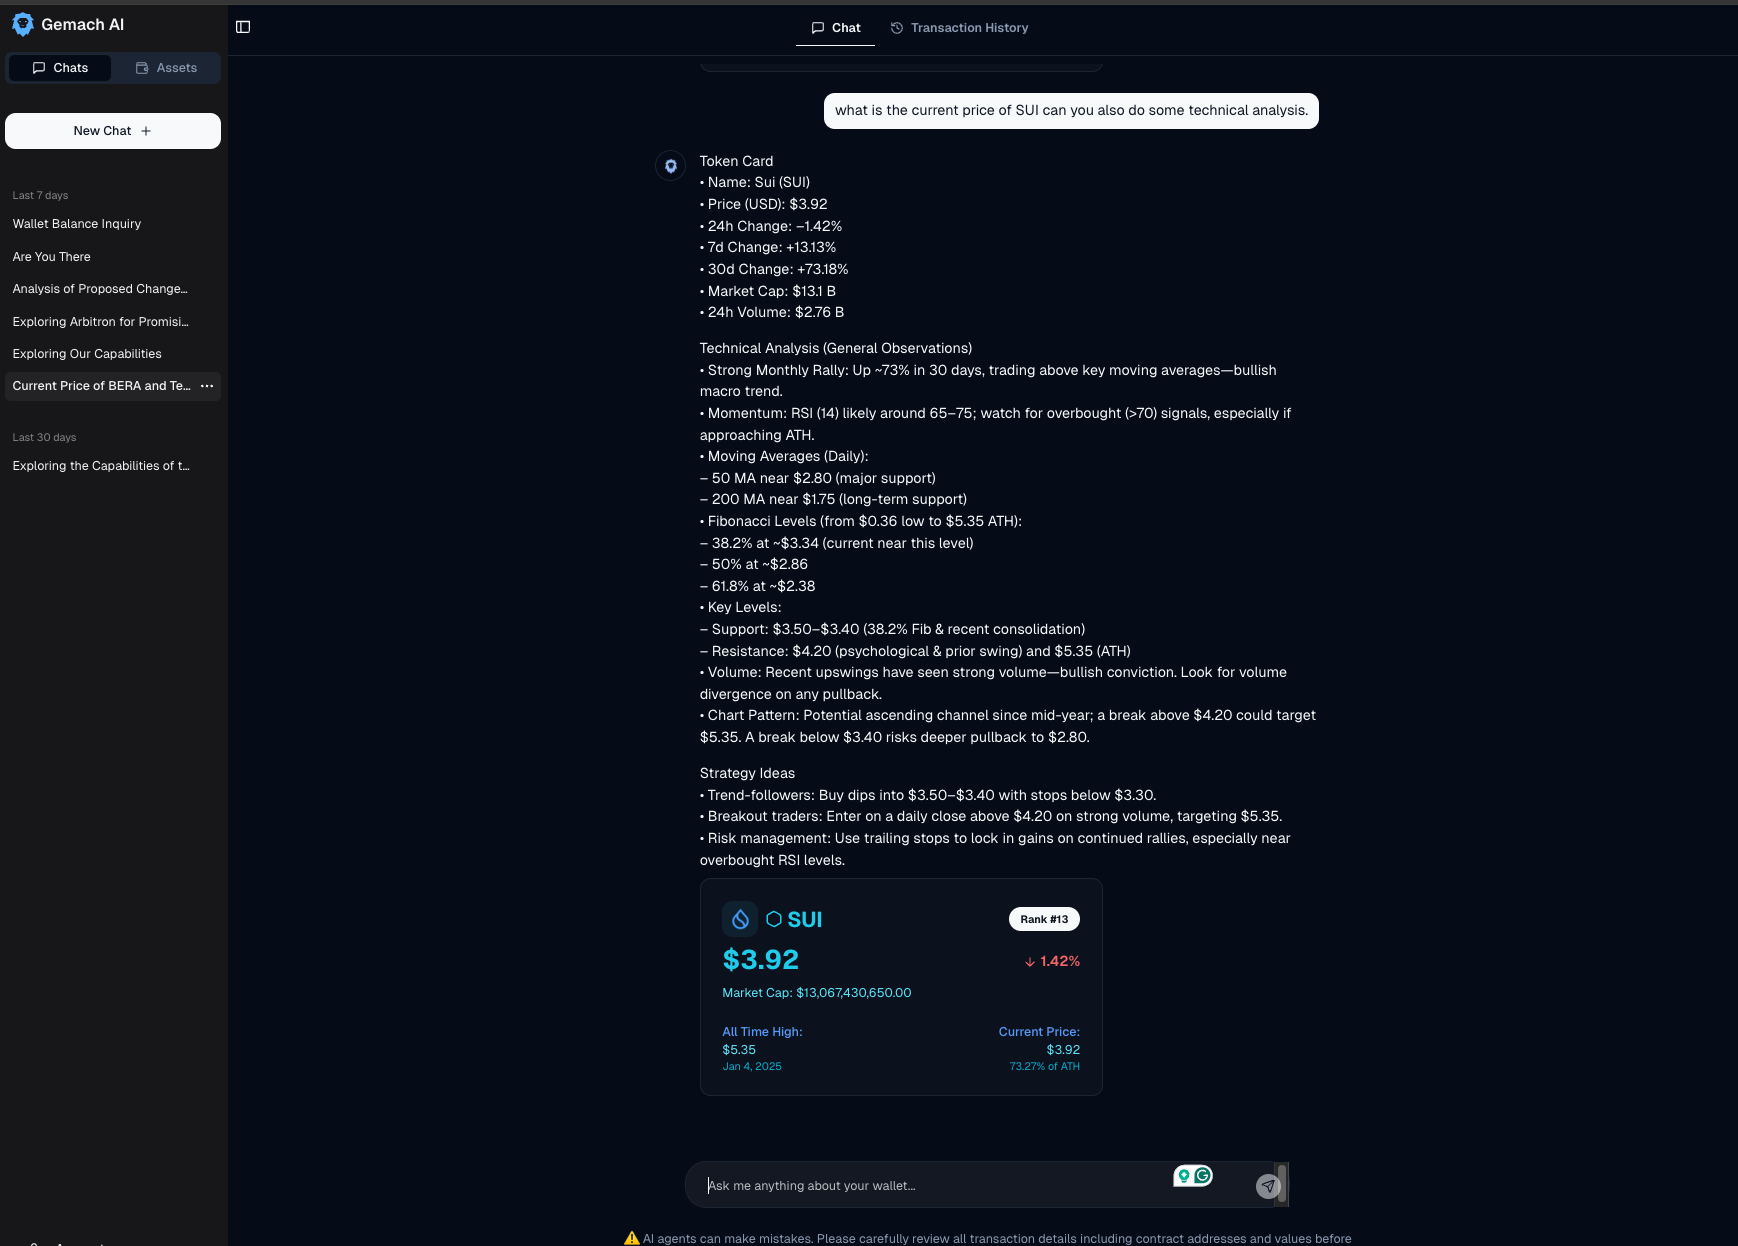
“What’s the price of SOL right now?” – The AI can fetch current token prices or token info for you. It has tools to get token data, so it might respond with SOL’s latest price and perhaps 24h change.
-
“Help me interact with a smart contract.” – The AI might ask which contract and what you want to do. For advanced users, you can specify, e.g., “Call the
deposit()function on contract 0x1234... on Arbitrum with 100 USDC.”
You can ask questions, make requests, or even ask the agent to explain something (it can explain transactions or crypto concepts too). Feel free to have a back-and-forth. If the agent’s first answer isn’t what you need, you can clarify or ask it to adjust.
Understanding AI Responses
The AI’s response will typically have two parts:
-
The Explanation/Confirmation (Text): The agent will usually reply with a message confirming what it understands or giving you information. For example, “Sure, I can send 50 USDC from Polygon to Ethereum. I will need to bridge it using a cross-chain service. Let me prepare that transaction.” This part is in the chat bubble, in plain text (often a few sentences or a step-by-step confirmation).
-
Action Details/Outputs: If your request involves an action (like a transaction), the agent will provide a preview of the transaction details in the chat. This isn’t just text – the app will show a structured output. For instance, after the example above, the interface might display a transaction card or a special section summarizing what will happen:
-
It could list something like “Action: Cross-chain Bridge\nFrom: Polygon (USDC)\nTo: Ethereum (USDC)\nAmount: 50 USDC\nEstimated Gas Fee: ...” and so on.
-
There will likely be a button to confirm or execute this action (for example, a “Confirm” or “Execute Transaction” button).
-
Think of this as the AI saying “I’ve drafted the transaction for you, here are the details.” You will see exactly what it plans to do. No funds have moved yet at this stage.
If your query was informational (like asking for a price or explanation), you will just get the answer in text or perhaps a nice formatted card with the info (for example, a token price card with the symbol, price, and logo).
Approving and Executing Transactions
When the AI proposes a transaction, you are in control of the final step. Review the details carefully. The app will show you all crucial information such as the networks involved, token amounts, receiving address, and any other relevant parameters. This is the time to double-check everything. The AI tries its best to fulfill your intent correctly, but as a rule: always verify before you proceed.
If something doesn’t look right (maybe you mistyped an address or amount), you can stop here. You can tell the AI “Cancel that” or simply not click the confirm button. You could also correct your request in a new message (“Oops, I meant 500 USDC, not 50” or “Send it to a different address”), and the AI will adjust.
If all details are correct, go ahead and click the Execute (or Confirm) button. Once you do:
-
The app will start the execution. Behind the scenes, the agent takes the prepared transaction and submits it to the blockchain using your agent wallet. You might see a small notification or message like “Starting transaction execution...” in the interface.
-
You’ll then see real-time updates. The status might change to “Pending” or “Sent” indicating the transaction is in progress on the blockchain. You can even monitor the progress. If the interface has a Transaction History tab, it will show this transaction being processed (with a label like “pending” or a spinner icon).
-
Once the blockchain confirms the transaction, the status will update to Confirmed. The chat might also post a follow-up like “✅ Transaction confirmed! 50 USDC has been bridged to Ethereum.” The history log will mark it as confirmed and usually include a transaction hash or link to a block explorer (so you can verify on-chain if you want).
-
In case something goes wrong (for example, a transaction fails due to network issues or insufficient gas), the status will turn to Failed/Error. The AI will notify you if that happens (“❌ The transaction failed: [error reason]”). You don’t lose your tokens in a failed transaction (except possibly a small network fee), and you can usually try again after addressing the issue (the AI might help diagnose, like “It failed due to insufficient gas. You may need more ETH for fees.”).
The key point is that nothing happens to your funds unless you approve the AI’s proposed action. The agent will never bypass your confirmation. Even though the AI agent has the ability to draft transactions, it cannot spend your money without your click because of how the system is designed with you in the loop.
Multi-Step Actions
Sometimes your request might involve multiple steps. For example, “Swap A and then use it to do B” could require two or more on-chain transactions (perhaps an approval then a swap, or a swap then a transfer). The AI agent can handle multi-step flows. It will show you if there are multiple actions in one request:
-
The interface might list 2 actions in the transaction preview, or show a combined plan. You might see something like “1) Approve Token, 2) Swap Token” all grouped in the confirmation dialog.
-
When you execute, the agent will carry them out in sequence automatically. You’ll see each step’s status update in the history. You may not have to approve each one individually – you approve the whole sequence upfront (the AI batches it as a “transaction sequence” for you). The agent wallet will then execute each required transaction in order.
-
You can follow along as each step completes. If any step fails, the agent will stop and report the failure, so you can address it.
Chat History and Multiple Chats
Gemach OnChain AI allows you to maintain chat history and even multiple separate chat threads. This is useful if you want to keep different conversations for different purposes (just like separate chat threads with a friend).
-
Chat History: In a given chat, you can scroll up to see everything you and the AI have said. The AI also remembers context from the conversation, so you can ask follow-up questions without repeating all details. For example, after sending funds, you could simply ask “What’s my new balance?” and it knows you mean the same account and context from earlier in the chat.
-
Multiple Chats: The interface has a sidebar (often on the left) with a “Chats” tab. Here you can start a New Chat (there’s usually a button for it). Each chat can be about a different project or goal. For instance, one chat could be about exploring DeFi options on Arbitrum, another chat could be just for checking prices and balances. The agent will keep the context separate, so information doesn’t mix between chats.
-
You can switch between chats in the sidebar, and each will maintain its history. Also, there is a Transaction History tab (often next to Chats) where you can see a log of all transactions you’ve executed across chats.
Feel free to use multiple chats or just one continuous chat – whatever you’re comfortable with. The main idea is that the AI is always available to help, and the history is there so you can review past instructions and responses.
Key Features and Capabilities
Gemach OnChain AI comes with a rich set of features designed to simplify your blockchain experience. Here are the key capabilities of the agent, explained in simple terms:
-
AI-Powered Chat Interface: You interact with Gemach through a conversational chat interface. You type requests in natural language and the AI understands and responds helpfully. This makes complex operations feel as easy as chatting with a friend. No coding or specialized commands needed – the AI figures out what blockchain actions to take from your plain English instructions.
-
Cross-Chain Operations: The agent supports multiple blockchain networks and can perform cross-chain transactions seamlessly. This means you can ask it to move assets from one blockchain to another (for example, from Ethereum to Binance Smart Chain, or from Arbitrum to Polygon) and it will handle the bridging process for you. Under the hood, it uses integrated protocols to swap or bridge tokens across chains in one go. All cross-chain operations are done in a single click (one transaction) at competitive exchange rates and costs, thanks to services like Li.Fi and Symbiosis integrated into the agent. In practical terms, if you say "bridge my USDC from Ethereum to Polygon," the AI will find a way to do that, swap or bridge as necessary, without you needing to manually juggle multiple apps or exchanges.
-
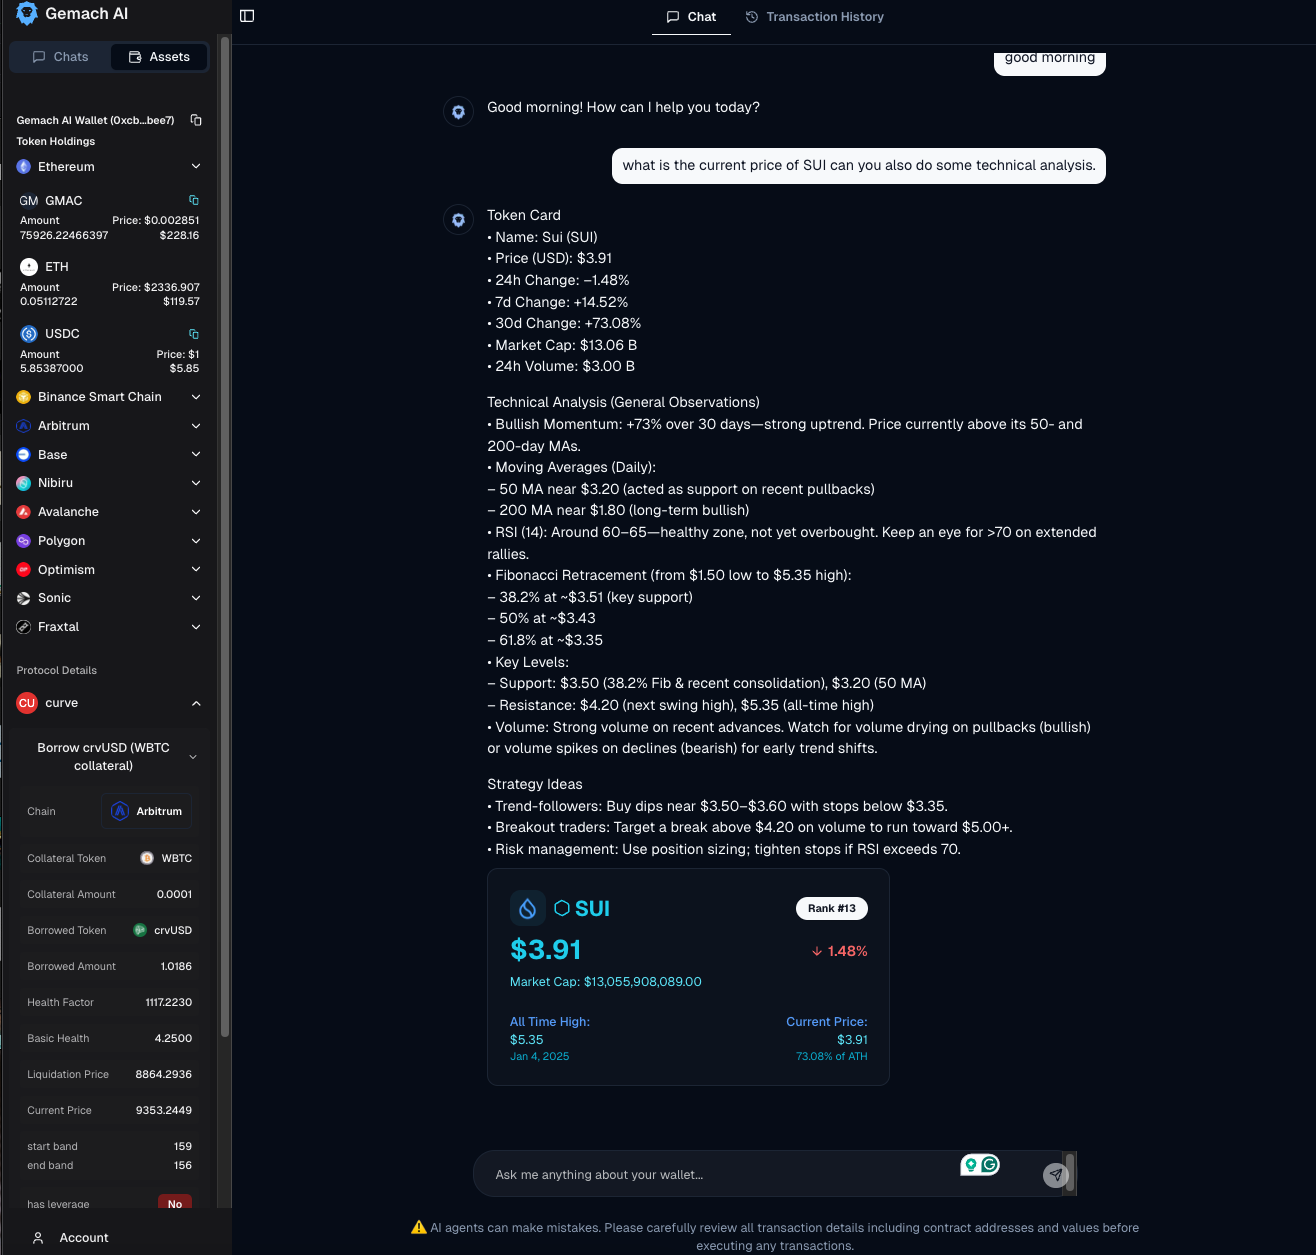
Token Swaps and DeFi Trading: You can swap one token for another easily. The agent will find the best way to execute a swap, possibly using decentralized exchanges or aggregators behind the scenes. It supports both same-chain swaps and cross-chain swaps. For example, “Swap 100 DAI to ETH on Optimism” will result in an on-chain swap on Optimism. If needed, it might also handle approvals (ERC20 token permissions) automatically as part of the process. Beyond simple swaps, the AI can interface with certain DeFi protocols – for example, it has integration with Curve Finance for lending/borrowing and with Stryke for options trading (advanced use cases). If you’re not sure what those are, don’t worry – you can use the agent without ever touching those features. But if you do want to, say, open an options position or borrow against collateral, the AI can guide you through it by interacting with those protocols behind the scenes.
-
Smart Contract Integration: The AI agent can interact with smart contracts directly. This means if you want to do something with a specific decentralized app (dApp) or contract, the agent can help. For example, you could ask “Help me stake my tokens in the XYZ protocol” or “Call function
claimRewards()on contract ABC.” The agent knows how to format calls to many known protocols, and even if it’s an unknown contract, if you provide the ABI or details, it could attempt to call it. Essentially, any on-chain action that a smart contract allows, the agent could perform given the right instructions. This feature is powerful for advanced users who might use the chat as a shorthand to do complex contract calls. -
Wallet Management (Agent Wallet): The application provides a built-in wallet (the agent wallet) associated with your account for executing transactions. You don’t have to manage private keys for it – it’s managed securely by the system, but only executes what you approve. The benefit is that the AI can carry out tasks automatically using this wallet, including multi-step transactions across different chains, without repeatedly asking you to sign each step. It’s designed with security in mind: you fund it and initiate actions, and you can withdraw funds from it anytime (simply by asking the agent to send assets back to one of your addresses). This wallet integration is what allows the platform to bundle actions and handle execution smoothly on your behalf.
-
Real-Time Transaction Monitoring: Once you execute a transaction through the agent, you can monitor its progress live. The interface will show statuses like pending, confirmed, or error in real-time. You’ll also have access to a Transaction History view that logs all past actions. Each entry in the history can be expanded to see details (what actions were taken, timestamps, transaction IDs, etc.). This means you always have a record of what the AI did for you. If you initiated multiple actions, you can see each one’s outcome at a glance. For example, if you bridged funds, you can later confirm in history that step 1 (swap) and step 2 (bridge) both succeeded.
-
Multi-Chain Support: Gemach OnChain AI supports a wide range of EVM-compatible blockchains. Some of the major networks you can use include Ethereum, Binance Smart Chain (BSC), Polygon (Matic), Optimism, Arbitrum, Avalanche, Base, and others. It even includes support for newer or specialized networks like Frax’s Fraximal (Fraxtal), Sonic, and Nibiru. The agent is aware of the differences between these chains (chain IDs, native tokens, etc.), so you can seamlessly ask it to operate on any supported chain. For instance, “Send 0.01 ETH on Arbitrum to my friend” or “Swap my tokens on Base for USDC” – it will route to the correct chain. Cross-chain operations between supported networks are also handled as described earlier.
-
Secure User Authentication: Your account and agent wallet are secured by your own crypto wallet login. There are no conventional usernames or passwords that can be leaked – you use your wallet to sign in, which is cryptographically secure. The platform uses JWT tokens under the hood for your session, and all communication is secured. The AI agent only has access to the agent wallet created for you, and cannot control your personal login wallet. This design ensures that even though the AI is “on-chain”, it acts strictly under your permission.
-
Intuitive UI and Context Awareness: The interface is designed to be clean and intuitive, similar to modern messaging apps. It also includes quality-of-life features like an asset overview (showing your balances per chain) and possibly quick access to common actions. The AI is context-aware in the chat, meaning it remembers your previous instructions and the state of your agent wallet. It might proactively warn you if you attempt something that’s not possible (e.g., not enough funds or an unsupported operation). For example, if you try to send a token you don’t have, it will check your balances and let you know there's an issue instead of blindly attempting a failed transaction.
All these features work together. In practice, you’ll experience them fluidly without necessarily realizing each one – you’ll just feel like “I asked the AI to do X, and it got it done.” The goal is to cover everything a regular crypto user might need, through one conversational agent. From simple queries to complex multi-chain operations, the Gemach OnChain AI has you covered.
Step-by-Step Examples (Common Tasks)
In this section, we’ll walk through a few common scenarios with step-by-step guidance. These examples will help you understand how to phrase your requests and what the typical interaction looks like.
Example 1: Sending Cryptocurrency to Another Wallet
Scenario: You want to send some ETH to a friend’s wallet on Ethereum mainnet.
Steps:
-
User Request: In the chat, you type: “Send 0.2 ETH to 0x1234...abcd on Ethereum.” Here, replace
0x1234...abcdwith your friend’s actual Ethereum address. You don’t have to specify gas or anything else. -
AI Response: The AI will confirm the request. It might reply with something like: “Sure! I will prepare a transaction to send 0.2 ETH to 0x1234...abcd on Ethereum network.” It will then display the transaction details: recipient address, amount 0.2 ETH, and likely an estimated gas fee. This appears as a transaction preview in the interface.
-
Review Details: You double-check the address and amount in the preview. Everything looks correct. The agent also shows a caution to review (which you do).
-
Execute: You click the Execute Transaction (or similar) button. Immediately, you see a status update: maybe an entry in “Transaction History” showing this transfer as pending.
-
Processing: The agent wallet is now sending the 0.2 ETH on-chain. After a short wait (let’s say Ethereum confirms in ~30 seconds), the status changes to confirmed. The chat might say, “✅ Transaction confirmed. 0.2 ETH has been sent to 0x1234...abcd.” It could even provide a link like “View on Etherscan.”
-
Result: Your friend will receive the ETH in their wallet. You can see in your agent wallet’s balance that 0.2 ETH (plus a bit for gas) is deducted. If you ask the AI “What’s my ETH balance now?”, it can tell you the updated amount.
What happened behind the scenes: The AI constructed an Ethereum transaction from your agent wallet to the given address with the specified amount. It had your agent wallet sign and broadcast it. Since you already had ETH in the agent wallet, it used that for both the 0.2 transfer and the gas fee. No further action from your side was needed beyond clicking execute.
Example 2: Swapping Tokens on the Same Network
Scenario: You have USDC in your agent wallet on Polygon, and you want to swap $100 worth of USDC into MATIC (Polygon’s native token), perhaps to have MATIC for gas or just to hold MATIC.
Steps:
-
User Request: “Swap 100 USDC to MATIC on Polygon.”
-
AI Response: The AI will likely clarify: “I will swap 100 USDC for MATIC on Polygon.” It will find a DEX or liquidity source (maybe Curve or Uniswap on Polygon) to perform the swap. The details shown might include the estimated amount of MATIC you’ll get for 100 USDC and any fee or price impact. It may also include an approval step if your USDC hasn’t been approved for swapping before. The preview might show two actions:
-
Action 1: Approve USDC (so the DEX can take your USDC).
-
Action 2: Swap USDC -> MATIC.
The agent might bundle these, so you just see them both listed and will execute them together.
-
-
Review Details: Check that it says 100 USDC, and check the quoted MATIC amount looks reasonable. The AI might say something like “Estimated 85 MATIC” (just an example). Everything looks okay.
-
Execute: Click Execute. The agent will first send the approval transaction (this happens in the background – the UI might not differentiate, or it might show two steps progressing). Then it executes the swap transaction on Polygon.
-
Processing: Within a minute or two, both transactions confirm. The history might show each step confirming, or just the final outcome. The chat says, “✅ Swapped 100 USDC for 85.1234 MATIC on Polygon.”
-
Result: Your agent wallet now has ~85 more MATIC and 100 less USDC. You can verify in the Assets view that USDC went down and MATIC went up. You can also ask the agent, “What’s my MATIC balance?” and it will tell you.
Note: If at any point the AI needed more information (for example, if “100” was ambiguous it might ask “Do you mean 100 USDC?” but in our phrasing we included the token so it’s clear). Usually, it won’t need to ask for clarification for straightforward swap commands.
Example 3: Bridging Assets to Another Chain
Scenario: You have some DAI on Ethereum, but you want it on Arbitrum to use there. You ask the AI to bridge it.
Steps:
-
User Request: “Bridge 500 DAI from Ethereum to Arbitrum.”
-
AI Response: The agent identifies this as a cross-chain request. It will probably use a service like LiFi or Symbiosis to find a route. It might respond: “Okay, I will bridge 500 DAI from Ethereum to Arbitrum. This will involve swapping/locking the DAI and releasing equivalent on Arbitrum. Estimated time ~2 minutes.” The details might include that it will use a particular bridge or a DEX+bridge combination. You might see:
-
From: Ethereum (500 DAI)
-
To: Arbitrum (500 DAI) – assuming 1:1 transfer, minus maybe a small fee.
-
It could also show an intermediate step if needed (like “swap to USDC and bridge via X”, but often these aggregators handle it internally).
-
-
Review Details: Make sure the networks and amounts are correct. Perhaps it notes an estimated gas fee on Ethereum (in ETH) and a bridge fee (in DAI or the destination’s gas). If you have enough ETH in your agent wallet to cover the Ethereum gas, you proceed. If you realize you don’t, you might need to top up ETH first or adjust amount (the AI might warn “You have only 0.001 ETH, this might not be enough for gas” – a helpful hint).
-
Execute: Confirm the bridge. The agent will initiate the bridging process. This often involves an outgoing transaction on Ethereum (locking or sending DAI to the bridge contract). The status goes to pending. Cross-chain bridges can take a bit longer than single-chain, so maybe a couple of minutes wait.
-
Processing: After a short wait, you get confirmation. Possibly there are two confirmations: one for the Ethereum transaction and one for the Arbitrum receipt. The UI will update when the funds are available on Arbitrum. The chat says, “✅ 500 DAI has been delivered to your Arbitrum wallet (transaction complete).”
-
Result: Check your Assets on Arbitrum in the app – you should now see ~500 DAI in the Arbitrum section of your agent wallet. The Ethereum side will have 500 less DAI. You successfully moved the funds across chains with one request.
This example shows the power of the AI agent handling multi-chain complexity. Instead of you manually going to a bridge website, the AI chose one for you and executed it, all through the chat.
Example 4: Checking Balances and Prices (Informational)
Scenario: You simply want to check what assets you have and maybe ask the price of a token.
Steps:
-
User Request: “What is my balance on all chains?”
-
AI Response: The agent will use its knowledge of your agent wallet to fetch balances on each supported chain. It might display something like: Ethereum: 0.1 ETH, 200 DAI Polygon: 85 MATIC, 0 USDC Arbitrum: 500 DAI, 0.005 ETH (and so on for each network you have balances on.) This could appear as a nicely formatted list or table. The data comes from querying the wallet address on each chain’s APIs.
-
User Follow-up: “What’s the price of DAI right now?”
-
AI Response: The AI has a token info tool, so it will likely say: “DAI is a stablecoin, roughly equal to $1 USD. Current price: $1.00.” It might also show a small card with the DAI symbol and price. You could do this for any token (e.g., “price of ETH” for a quick quote, etc.).
-
User Request: “How about the total value of my portfolio?” (This is a more complex query – the AI might or might not handle it, but let’s assume it can sum up roughly.)
-
AI Response: “Across all chains, you have approximately $600 worth of assets (500 DAI + 0.1 ETH + some MATIC, etc.).” It would add up the USD values and give you an estimate.
These info queries do not require any transactions, so they’re instant and cost nothing. The AI is leveraging read-only tools to get this data. This is a great way to use the agent as a portfolio tracker or info source.
Example 5: Advanced – Using a DeFi Protocol (Optional)
This example is for a more advanced user, just to illustrate the capability. If you’re not familiar with DeFi, you can skip this.
Scenario: You heard about an options trading protocol called Stryke integrated with the platform. You want to purchase a call option on Arbitrum for a certain asset using the AI.
Steps (simplified):
-
User Request: “Open an options position on Stryke: buy a call option for 1 ETH expiring next month.”
-
AI Response: The AI will recognize this involves the Stryke protocol (since it’s integrated). It might ask for a bit more info if needed (like strike price or which market). But let’s say it has defaults or it converses: “To buy a call option on Stryke for 1 ETH, I need to know the strike price. The current ETH price is $1800 – do you want an at-the-money call?”
-
User Clarifies: “Yes, an at-the-money call, expiring in one month.”
-
AI Response: “Alright. I will purchase a 1 ETH call option expiring on [date] with strike roughly $1800 via Stryke on Arbitrum. This will cost approximately X USDC in premium.” It then shows a transaction preview: it might involve approving USDC (or whatever token required) and then executing the purchase on the Stryke contract. It lists the details like option market, cost, etc.
-
Review & Execute: You check the details and confirm. The agent executes the necessary contract interactions on Arbitrum. After a bit, it confirms that the option is purchased and perhaps provides an ID or reference.
-
Result: You have an open options position. You could even ask the AI “Show my open positions” and since it has a protocol integration, it could list your Stryke option details (from the
ProtocolListin the sidebar or via command). When you later want to close or exercise, you could instruct the AI similarly (“exercise my option” or “close the position”), and it would handle it.
This advanced example demonstrates that the AI can serve power users too, by simplifying interactions with complex protocols. The key is the AI knows the “lingo” and steps for those specific integrated protocols (Curve lending, Stryke options, etc.), but you as a user just describe what you want in general terms.
FAQs (Frequently Asked Questions)
Here are answers to some common questions and issues you might have while using the Gemach OnChain AI agent:
Q1: Do I need to be a blockchain expert to use this? A: Not at all! The entire purpose of Gemach OnChain AI is to let non-technical users use blockchain easily. You don’t need to know how to write smart contracts or manually use DeFi platforms. If you know how to send a text message and you understand basic crypto concepts (like what ETH or Bitcoin is, what “sending” means), you can use this agent. The AI will handle the technical complexities. Of course, basic caution is advised (double-checking amounts and addresses), but you don’t need deep knowledge of how the blockchain works underneath.
Q2: What cryptocurrencies and blockchains are supported? A: The agent supports multiple major EVM-compatible blockchains (the kind that work similar to Ethereum). This includes Ethereum mainnet, Binance Smart Chain (BSC), Polygon (Matic), Arbitrum, Optimism, Avalanche, Base, and a few others like Frax (Fraxtal), Sonic, and Nibiru networks. For any given operation, you can specify the chain (“on Polygon”, “to Ethereum”, etc.). The agent also supports a wide range of tokens on those networks – essentially any ERC-20 token and some others. If a token is very obscure, the AI might not immediately recognize it by name, but you can provide a contract address if needed. For popular tokens (ETH, BTC (wrapped), USDC, DAI, etc.), it will know them. If you’re unsure, you can ask the AI something like “Do you support the XYZ token?”
Q3: How are my funds kept secure? Is this non-custodial? A: When you use Gemach, you are entrusting the platform with the funds you deposit into the agent wallet. The agent wallet is custodial in a sense – it’s controlled by the Gemach system (secured by a service on the backend). However, it cannot move funds without your explicit instructions and approval via the app. The system uses robust security measures (provided by Circle’s infrastructure and secure key management under the hood) to protect those wallets. Your login wallet (e.g., MetaMask) is never accessed by Gemach beyond the initial login signature – so the app never has your personal keys. All execution happens from the separate agent wallet which you fund as needed. Think of it like a smart bank account: you put some spending money in, the AI helps you use it efficiently. If at any point you want to withdraw your funds from the agent wallet back to full self-custody, you can just ask the AI to send everything back to an address you control, or you can manually transfer out via the assets interface. In summary: your funds are secure, but do keep in mind the agent wallet is part of the platform (with all the necessary security and encryption in place to keep it safe). No one except you (through the AI interface) can initiate transactions from it.
Q4: Does the AI have access to my personal wallet or private keys? A: No. The AI does not get your private keys, ever. Your login (personal) wallet is only used to sign a message to prove who you are. After that, all actions happen using the agent wallet created for you. The private key for the agent wallet is managed by the platform securely (it’s not stored in plaintext and transactions are signed in a secure execution environment). The AI agent only has the permissions that the backend service allows – which means it can propose transactions but only execute them via the controlled wallet when you approve. So your own wallet remains safe and separate.
Q5: What if the AI makes a mistake or I notice something wrong in the transaction details? A: You should not confirm the transaction and instead tell the AI or correct your request. The AI, while intelligent, can sometimes misunderstand or there could be an ambiguity. For instance, if you say “Send 100 ADA”, it might not know if you mean Cardano (which isn’t an EVM chain) or some token with symbol ADA on Ethereum (which could exist as a wrapped token). It might ask you for clarification. If it doesn’t and you see the plan is wrong (maybe it picked the wrong token or chain), simply do not execute. You can say, “That’s not what I meant” and clarify. Remember, no transaction happens until you hit execute, so there’s always a chance to catch mistakes. We also display a caution icon and message for every transaction preview reminding you that the AI can be wrong and to review details. Take that moment to double-check. If a mistake slips through and a transaction is sent, unfortunately blockchain transactions are usually final – so it’s important to catch issues beforehand. The good news is the AI improves with context, so the more you clarify, the better it will serve you.
Q6: Are there fees for using the AI agent? A: Gemach OnChain AI itself does not charge any extra fees for the service in the current version. You do, however, pay the normal blockchain transaction fees (gas fees) and any fees inherent to the protocols used. For example, if you swap on Uniswap via the agent, you’ll pay Uniswap’s liquidity provider fee (built into the token price, like 0.3%) and the gas fee for that swap. If you bridge via a service, there might be a fee that service charges (some bridges take a small percentage or fixed fee). The AI will often try to choose cost-effective routes, but it doesn’t add its own surcharge. In the future, if there were to be a platform fee or subscription, it would be communicated, but as of now you just pay what the blockchain or third-party protocols require. Always ensure you have enough of the chain’s native token in your agent wallet to cover gas fees.
Q7: What if a transaction fails? Do I lose my funds? A: If a transaction fails, typically the funds remain in the wallet they started in. For example, if a swap failed, you’d still have your original tokens (minus any gas spent). The AI will mark the action as failed and usually provide a reason if possible. Common reasons can be slippage too high, network congestion, or not enough gas. The AI will inform you: e.g., “The transaction failed due to XYZ. Your funds are safe. You might try again with a different setting.” In a fail scenario, you might only lose the network fee that was consumed attempting the transaction. The agent is designed to handle errors gracefully – it won’t keep retrying blindly. It will stop and ask you for input if something goes wrong. If part of a multi-step sequence fails (say step 2 fails after step 1 succeeded), the AI will alert you. You may need to manually adjust or ask it to recover (for instance, if an approval succeeded but swap failed, the approval is fine so next attempt won’t need it). The UI might show a status “error” for that sequence. From there, you can decide to retry or cancel. The AI can also “remember” partial progress and not redo steps unnecessarily.
Q8: Can I cancel a transaction after I’ve executed it? A: Once you confirm and the transaction is broadcast to the blockchain, it’s generally not possible to cancel it. Blockchain transactions are final once mined. If you realize immediately after clicking that it was wrong, unfortunately you’d have to wait and then perhaps reverse it with another transaction (for example, if you sent to the wrong address and that address is yours, you could send it back; if it’s a stranger, there’s not much you can do). The best practice is to only execute when you’re sure. However, if a transaction is taking a long time (pending) and hasn’t mined yet, advanced users can sometimes use a “cancel” or “speed up” from their own wallet control (though with the agent wallet, you’d need the platform’s help to do that). In most cases, consider executed transactions as final. The AI won’t execute anything you didn’t approve, so there’s no background transactions to worry about.
Q9: The AI says I have insufficient funds or gas – what do I do? A: This means your agent wallet doesn’t have enough of something to carry out the request. If it’s complaining about gas, make sure you have the native token of that chain in your agent wallet (e.g., ETH for Ethereum, MATIC for Polygon, etc.). If it’s insufficient token (like you asked to send 1000 USDC but you only have 500), you’ll need to fund more into the agent wallet or adjust the amount. You can deposit more by sending from an external wallet, or if you have the asset on another chain, you could bridge it over first. You can also ask the AI “How do I add funds?” and it will remind you to deposit into the agent wallet address. If you’re in the middle of a multi-step request and realize you need more funds, you can cancel, top-up, and then re-try the request.
Q10: Can I use this on my phone? A: Yes, if the Gemach AI interface is web-based and your mobile browser supports your crypto wallet (for example, via WalletConnect or MetaMask’s mobile browser). The UI is responsive (much like a chat app). You’ll still need a wallet app to log in. Many mobile wallets support connecting to dApps – look for an option like “Browser” in your wallet app, and navigate to the Gemach AI app URL through it, then connect. Once logged in, the experience is similar to desktop: you have the chat and can type requests on your phone. Just be careful with copying addresses or amounts on mobile to avoid mistakes, as small screens can be fiddly.
Q11: Who has control of the AI agent? Is it autonomous? A: The AI agent is autonomous in that it can make decisions on how to fulfill your request (e.g. choosing which protocol to use for a swap), but it is always user-driven. It does not take actions on its own. It only responds to your prompts. It also cannot bypass the confirmation step – that’s a deliberate design choice to keep you safe. So you don’t have to worry about it “deciding” to do something with your funds without asking. In a way, you are the pilot and the AI is the co-pilot: it assists and automates the tasks, but you have the final say.
Q12: What if the AI doesn’t understand my request or does something unrelated? A: While the AI is trained to handle a variety of crypto-related instructions, there might be times it gets confused. If it responds with something that doesn’t answer your question or seems off, don’t be afraid to rephrase and try again. Simplify your language if possible. If you used slang or very conversational language, maybe try a more straightforward command. For example, instead of “Yo, toss my coins to ETH chain, dude,” try “Bridge my tokens to Ethereum network.” The developers are continuously improving the AI’s understanding. In the meantime, clear, concise requests work best. Also, if the AI simply cannot do something (like, it won’t create a transaction to an unsupported chain or it doesn’t have data on a certain token), it should tell you that it can’t comply rather than going ahead incorrectly. If you find a case where it’s confused, you can also ask, “What do you need to know to do this?” It might then ask you for the missing info.
Q13: Where can I see all my past transactions or actions? A: Use the Transaction History section of the app. There’s likely a tab or toggle for “History” vs “Chat” on the main screen. In History view, you’ll see a list of past action sequences with timestamps and statuses (success/fail). You can click on each to expand details, seeing exactly what was done. This log is stored for your convenience (and possibly on the backend tied to your account). It’s a good reference if you forget whether you already sent something or to verify amounts later. It’s also helpful for troubleshooting with support if needed – you could share the details of a failed transaction, for instance.
Q14: The interface is not loading or I can’t connect my wallet – help? A: If you run into technical issues:
-
Make sure you are using a supported browser (Chrome, Firefox, or Brave typically work well) and that your wallet extension is installed and enabled.
-
If the connect button isn’t responding, try disabling any pop-up blockers or refresh the page.
-
Ensure your system time is correct (an incorrect clock can sometimes mess with wallet signatures).
-
If using WalletConnect on mobile, ensure you follow the prompts in your wallet app after scanning the QR or clicking connect.
-
If nothing works, it might be a temporary server issue – you can try again after a few minutes. Check the Gemach DAO community or status page if available for any outages.
-
You can also try clearing the browser cache (but keep your wallet logged in) and reconnect.
Q15: How do I log out, and what happens if I do? A: Logging out will typically disconnect your session (the JWT token) from the app. You can usually log out by clicking your account menu and selecting “Logout” or simply by disconnecting your wallet. If you log out, your agent wallet remains safely stored with the platform – logging out does not lose any funds (they stay in the agent wallet). When you log back in (even from another device), as long as you use the same personal wallet to authenticate, the platform will recall your account and link you back to your existing agent wallet and chats. Essentially, you can think of it like logging out of an email account – your emails (and here, your funds and history) are still on the server, and you get them back when logging in again. Always make sure you log out of shared computers so no one can use your session. On your personal device, it’s fine to stay logged in for convenience, as the session is tied to your wallet authentication.
We hope these FAQs address most of your questions. If you have any other concerns or need help, consider reaching out to the Gemach DAO support channels or community forums.
Troubleshooting & Tips
Finally, here are some quick troubleshooting tips and best practices when using the AI agent:
-
Double-Check Recipient Addresses: When sending funds, always verify the target address character by character. The AI doesn’t know if you accidentally typed the wrong address – it will send to exactly what you provide. There is no undo on blockchain sends.
-
Keep Your App Updated: If Gemach releases updates or a new version of the interface, make sure to use it. New versions might have bug fixes and improved understanding for the AI. If something isn’t working, a quick refresh can sometimes load the latest code (the platform is web-based, so it updates on refresh).
-
Sufficient Gas on Each Network: It’s worth repeating: maintain a small balance of native coin on each chain you intend to use. If you want to do a flurry of actions on Polygon, make sure your agent wallet has a few MATIC for fees. If the AI says “out of gas” or you notice transactions not going through, that’s the first thing to check.
-
Clarity in Complex Requests: For very complex or lengthy requests, break them down. Instead of writing a paragraph of instructions, do one step at a time. You can certainly ask the AI to do multi-step things, but if you notice it struggling, guiding it stepwise (“First do X…”. Once done: “Now do Y…”) can help.
-
Use Chats to Organize: Take advantage of multiple chat threads if you’re doing many different things. It keeps each context cleaner. For example, one chat for “My Investments” and another for “Paying Friends” might make the AI’s job easier so it doesn’t mix contexts.
-
Security Reminder: Treat the agent wallet like you would treat an exchange account or a hot wallet. Don’t put more funds there than necessary for your planned usage. While it’s secure, your main savings can stay in cold storage or your personal wallet. Top-up the agent wallet as needed for convenience.
-
Stay Informed: The AI is powerful, but you are the final gatekeeper. It’s wise to have a basic understanding of the actions you’re performing. If you’re using a DeFi protocol via the AI, it doesn’t hurt to know what that protocol does. The AI might not explain risks fully (e.g., impermanent loss, liquidation risk), so do a bit of research or ask the AI questions about the concept (“Explain what borrowing on Curve entails”) before executing financial decisions. It will happily educate you as well.
-
Trouble with Bridging or Delays: Some cross-chain operations take longer due to confirmations on both chains. If it’s taking a while, you can ask the AI “How long will this bridge take?” and it might give you an estimate or reassure if still in progress. If you think something’s stuck, check the transaction status on a block explorer via the provided hash to see if it’s still pending.
-
Error Messages: If you encounter an error message or something like “Error processing action sequence”, it could be a system issue. Try reloading and redoing the action. If it persists, note the exact error and contact support.
Using Gemach OnChain AI should feel empowering – you have a world of crypto possibilities at your fingertips just by chatting. With this guide, you’re equipped to use the agent confidently and safely. Enjoy the convenience of having an AI co-pilot for your blockchain adventures!