除了 Web3 领域,👨🔬 “科学家”的头衔从没有离普通人这么近过 。
一点点 Python (JavaScrip更好) 基本功、一点点智能合约基础知识、一点点项目投研分析(非必需) = Web3 科学家 。
本文作为一篇零基础教程,献给所有心怀科学家梦想的同学们。
谁是 Web3 科学家?
简单来说,通过程序的方式(Python、JavaScript等)进行合约交互、NFT Mint等的用户被统称为“科学家”。
普通用户使用 MetaMask 这样的钱包插件在项目官网进行合约交互或者 Mint NFT,“科学家”使用程序代替人工进行同样的操作 程序代替人工,机器代替人力,效率指数级增加。
科学家的优势
蒸汽机的发明将人力从繁重的劳动中解放出来,成功开启了第一次工业革命。
Web3科学家用程序代替人力,解放人力的同时,也获取了诸多优势:
✅ 效率大幅提升(常用于项目交互)
✅ 速度抢先(常用于 NFT Mint)
✅ 自动化程度高
🦾 速度快、效率高、批量化、自动化 = 收益指数级增加
科学家的工具
科学界们用程序进行合约交互的两大核心:
▪️ 交互用的程序语言
▪️ 项目合约的交互路径
本文将选用 Python 做交互程序,并选取一两个跨链桥项目做代码演示。本末会有完整的 GitHub 开源代码仓库,供大家借鉴。
用 Python 接入 Web3
Web3 Python 简单易用,第三方库丰富,对新手极其友好。
用 Python 来进行 Web3 项目交互,其桥梁便是 Web3. py,看其名字就透露着野心。
如果你的电脑已经安装好了 Python3,直接用 pip/pip3 即可来安装: 👉 pip install web3
Web3.py 的官方文档:https://web3py.readthedocs.io/en/stable/#
获取接入 Web3 世界的门票
区块链本质上是一个P2P网络共同维护的巨大账本,所有的链上交互信息都是通过某个节点广播到整个 P2P 网络。
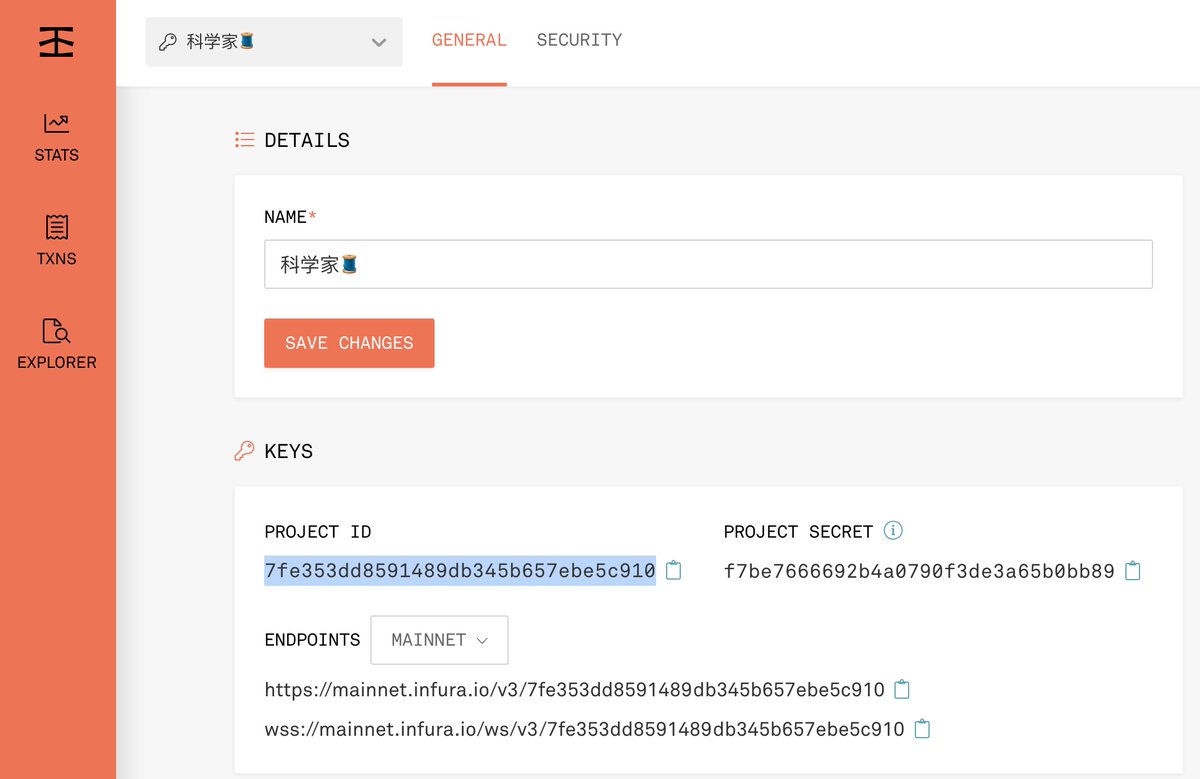
然而自建节点成本高昂,对我们大多数人而言,实无必要。我们通过"Infura"这个Web3领域的基础设施门户来接入区块链网络,更加简单便捷。
Infura的使用只需要如下三个步骤:
▪️ 注册账号
▪️ 新建项目
▪️ 获取 PROJECT ID
Infura官网链接: 👉 https://infura.io

用 Python 查询区块链数据
Infura目前提供对多条EVM 兼容链的主网、测试网接入节点,只需要切换 network 名称即可。
# get w3 endpoint by network name
def get_w3_by_network(network='mainnet'):
    infura_url = f'https://{network}.infura.io/v3/{INFURA_SECRET_KEY}' # 接入 Infura
    w3 = Web3(Web3.HTTPProvider(infura_url))
    return w3
接入后的 w3 即为我们通向区块链世界的钥匙,不论是查询链上数据,还是进行转账、合约交互,都是通过它来实现。
比如用以下代码来查询 V神 3号钱包的ETH余额,可以得到结果: 29万ETH 🤯
# V神 3号钱包地址
vb = '0x220866b1a2219f40e72f5c628b65d54268ca3a9d'

# 地址格式转换
address = Web3.toChecksumAddress(vb)

# 查询地址 ETH余额
balance = w3.eth.get_balance(address) / 1e18
print(f'V神地址余额: {balance = } ETH')

用 Python 转账 ETH
转账是所有链上交互的灵魂,是一种改变区块链状态的行为。相比较前面的“查询地址余额”,属于“写入”的操作类型。
转账、合约交互等操作,都需要用地址对应的私钥签名交易并广播。
让我们尝试在 Rinkeby 测试网上转账一点ETH测试币
# 转账 ETH
def transfer_eth(w3,from_address,private_key,target_address,amount,gas_price=5,gas_limit=21000,chainId=4):
    from_address = Web3.toChecksumAddress(from_address)
    target_address = Web3.toChecksumAddress(target_address)
    nonce = w3.eth.getTransactionCount(from_address) # 获取 nonce 值
    params = {
        'from': from_address,
        'nonce': nonce,
        'to': target_address,
        'value': w3.toWei(amount, 'ether'),
        'gas': gas_limit,
        # 'gasPrice': w3.toWei(gas_price, 'gwei'),
        'maxFeePerGas': w3.toWei(gas_price, 'gwei'),
        'maxPriorityFeePerGas': w3.toWei(gas_price, 'gwei'),
        'chainId': chainId,

    }
    try:
        signed_tx = w3.eth.account.signTransaction(params, private_key=private_key)
        txn = w3.eth.sendRawTransaction(signed_tx.rawTransaction)
        return {'status': 'succeed', 'txn_hash': w3.toHex(txn), 'task': 'Transfer ETH'}
    except Exception as e:
        return {'status': 'failed', 'error': e, 'task': 'Transfer ETH'}

❕注意:示例代码中的私钥仅作演示用,注意风险。
👉 代码: https://github.com/gm365/Web3_Tutorial/blob/main/transferETH.py
用 Python 交互 Arbitrum 测试网跨链桥
合约交互比起普通转账,又要复杂了一些。
从合约交互开始,会需要额外几个参数:
▪️ 合约地址
▪️ 合约ABI
▪️ 交互的函数名称及具体参数
一般情况下,我们可以拆解为以下三个步骤来完成:
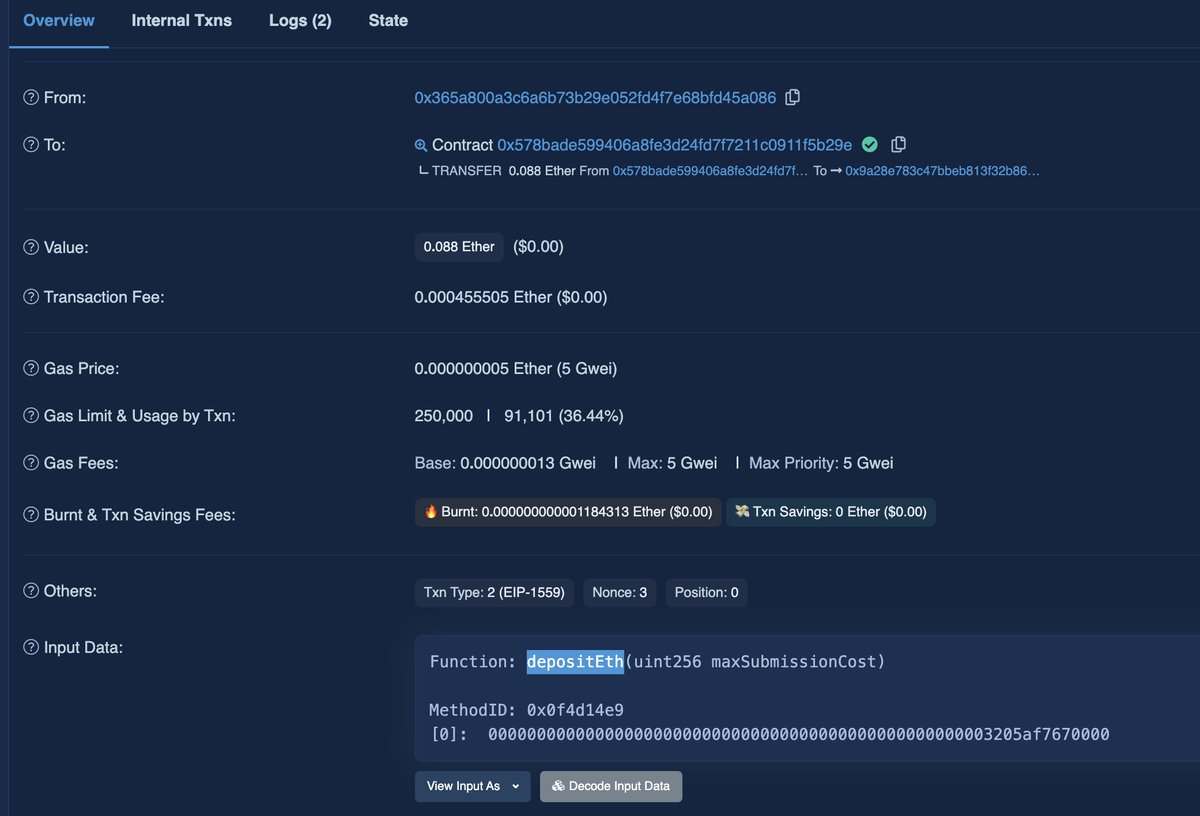
- 先在Arbitrum官方跨链桥测试网页面手工交互
- 接着从交互记录,找到 Etherscan上合约地址
- 定位到合约 "Write Contract" 中的 "depositEth" 函数,获取函数名称及对应参数

注:本例中其实是定位到 “Write As Proxy”的页面,说明当前合约是一个可升级合约
最终编写的 Python 代码如下:
# bridge eth from rinkeby to arbitrum testnet
def bridge_arbitrum_eth(w3, from_address, private_key, contract_address, amount_in_ether, chainId):
    from_address = Web3.toChecksumAddress(from_address)
    contract_address = Web3.toChecksumAddress(contract_address)

    ABI = '[{"inputs":[{"internalType":"uint256","name":"maxSubmissionCost","type":"uint256"}],"name":"depositEth","outputs":[{"internalType":"uint256","name":"","type":"uint256"}],"stateMutability":"payable","type":"function"}]'

    amount_in_wei = w3.toWei(amount_in_ether, 'ether')
    maxSubmissionCost = int(amount_in_wei * 0.01) # 定义参数值
    nonce = w3.eth.getTransactionCount(from_address)

    params = {
        'chainId': chainId,
        'gas': 250000,
        'nonce': nonce,
        'from': from_address,
        'value': amount_in_wei,
        # 'gasPrice': w3.toWei('5', 'gwei'),
        'maxFeePerGas': w3.toWei(5, 'gwei'),
        'maxPriorityFeePerGas': w3.toWei(5, 'gwei'),
        'chainId': chainId,
    }
    contract = w3.eth.contract(address=contract_address, abi=ABI)

    # 调用合约的 depositEth 函数,参数为 maxSubmissionCost
    func = contract.functions.depositEth(maxSubmissionCost)
    try:
        tx = func.buildTransaction(params)
        signed_tx = w3.eth.account.sign_transaction(tx, private_key=private_key)
        txn = w3.eth.sendRawTransaction(signed_tx.rawTransaction)
        return {'status': 'succeed', 'txn_hash': w3.toHex(txn), 'task': 'Bridge ETH'}
    except Exception as e:
        return {'status': 'failed', 'error': e, 'task': 'Bridge ETH'}
👉 完整参考代码: Arbitrum Bridge
合约ABI
合约的 ABI 即应用程序二进制接口,定义了智能合约各函数调用的参数与方法。
对于开源已验证源码的合约,直接在 etherscan 的合约页面即可查到完整的 ABI 信息
比如 Arbitrum 测试网跨链桥: https://rinkeby.etherscan.io/address/0x578bade599406a8fe3d24fd7f7211c0911f5b29e#code

合约的调用函数及参数
在你手工交互的 Hash 信息页面的最底部,可以看到 "Input Data" 区域。如果是开源合约则直接显示调用的函数名称及参数信息。
对于未开源合约的调用,可以参考之前的一个 Twitter 🧵
理论上,能通过网站交互的,就一定能通过程序来完成。

用 Python 交互 zkSync 测试网跨链桥
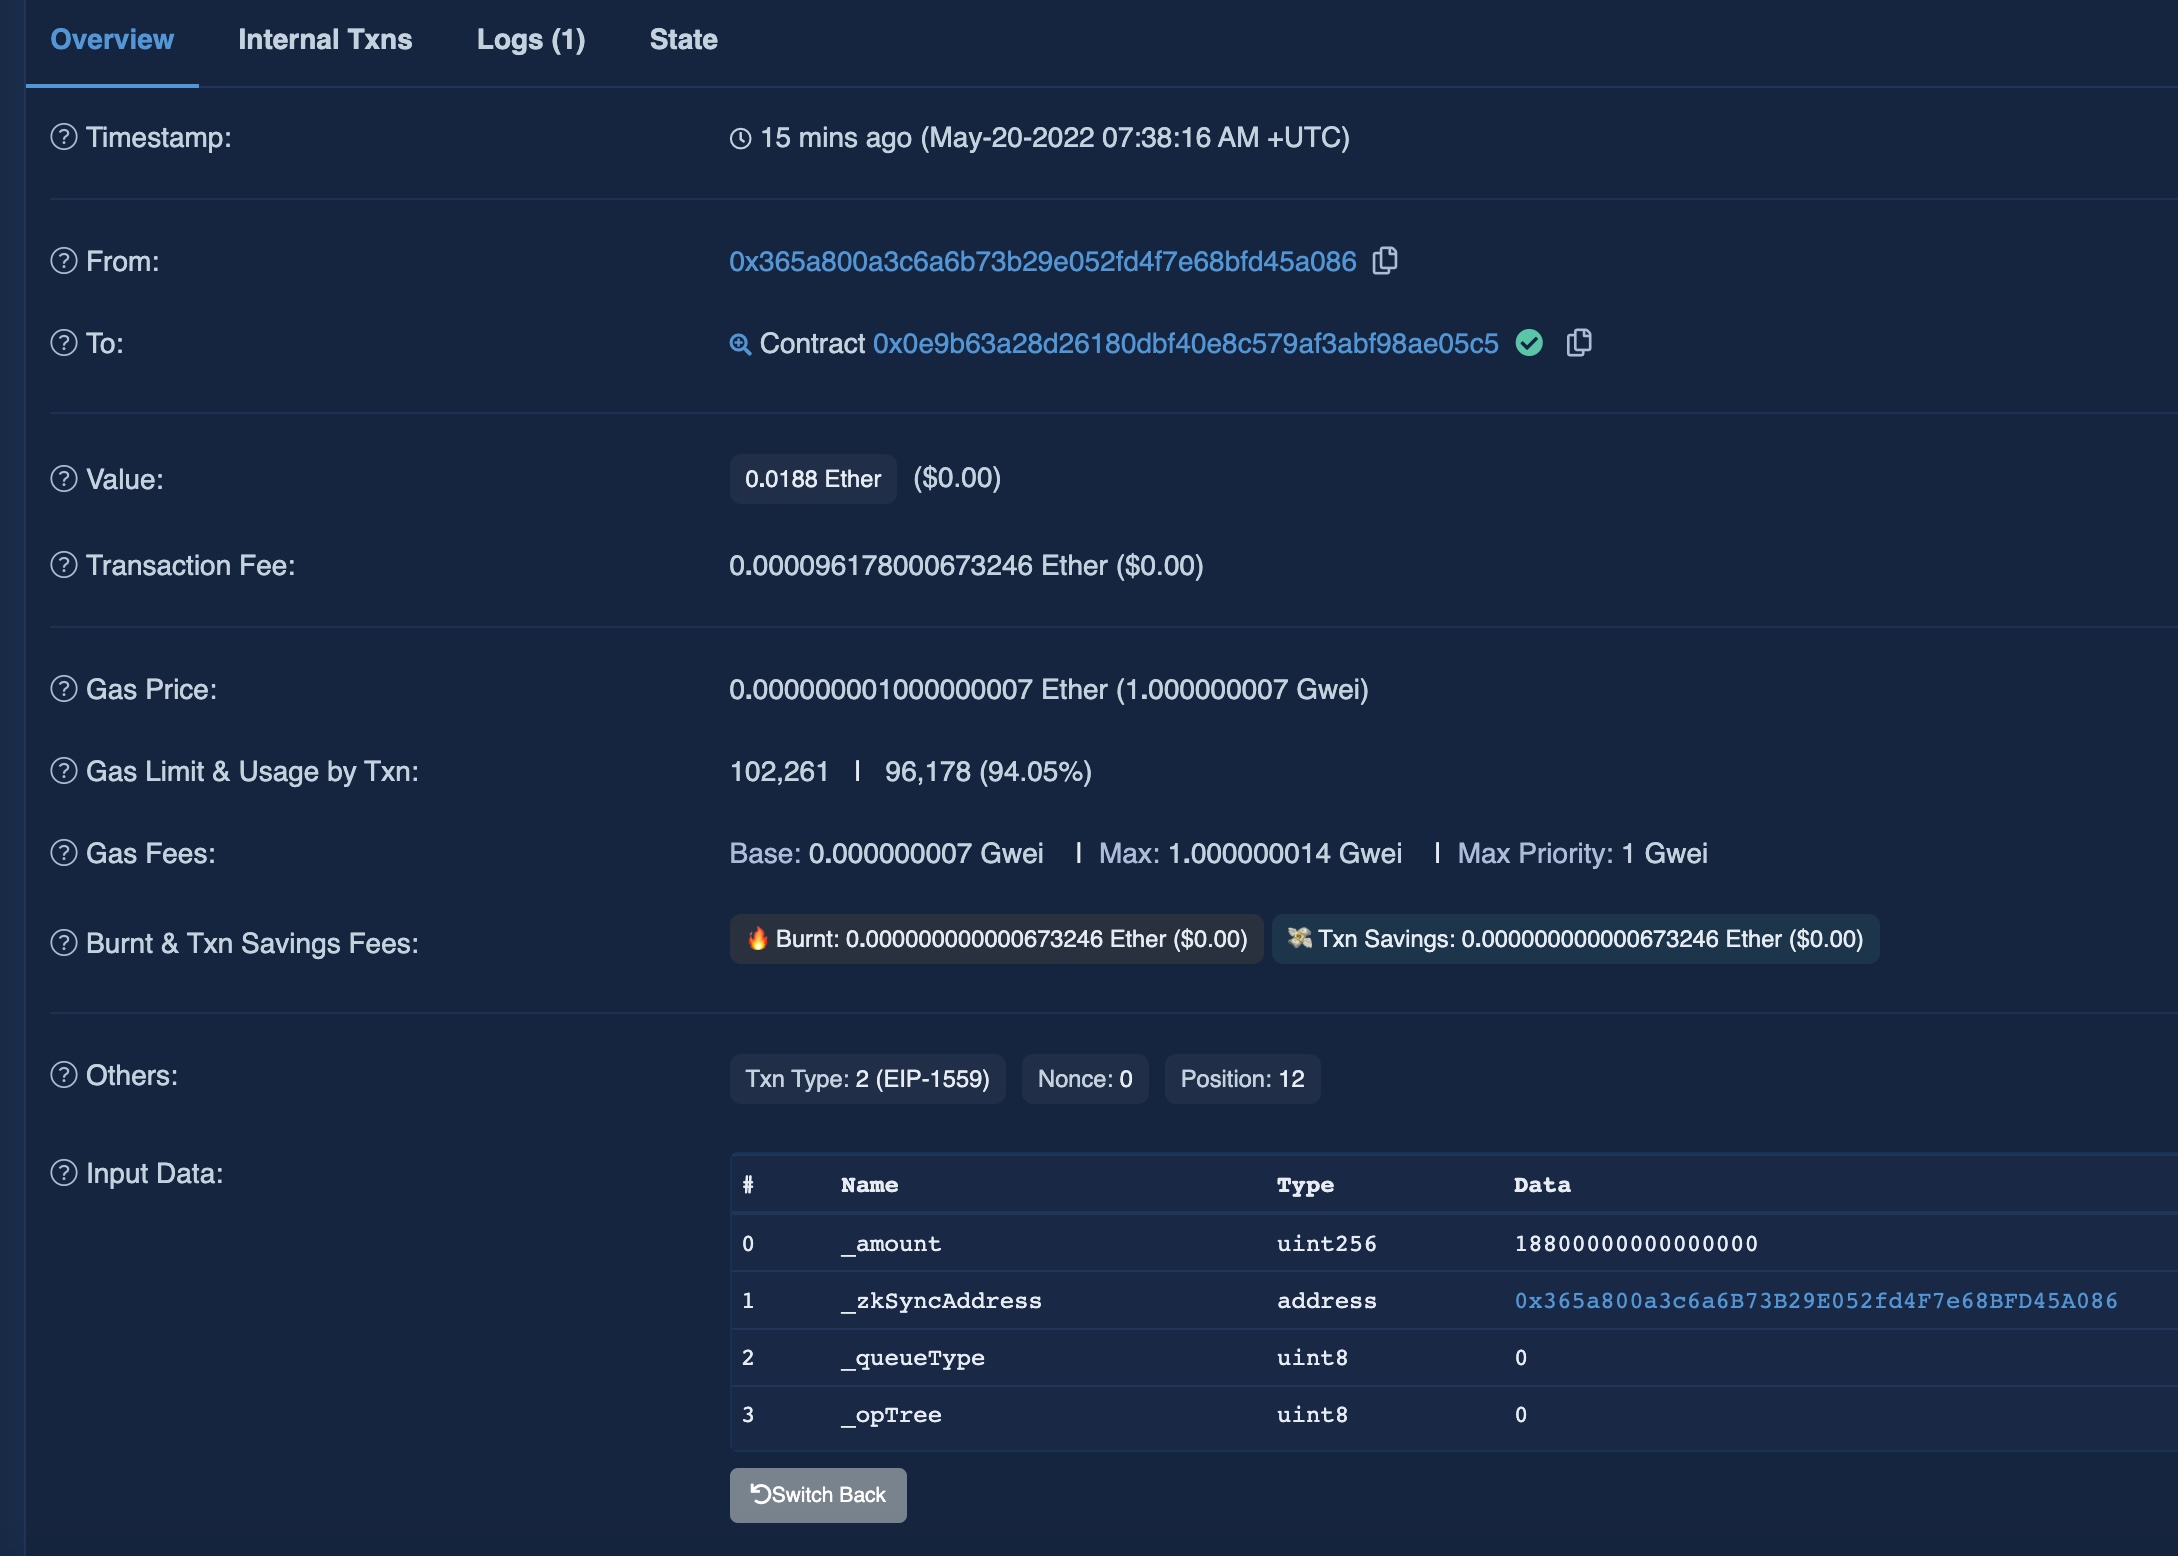
相比较于 Arbitrum,zkSync 的难度稍微高了一点。因为后者使用了一个可升级合约,导致无法在 Etherscan 网站找到确切的 ABI 信息 。
不过,通过前一条 🧵 中的方法,最终在网站 chunk-vendor-xxx.js 文件中定位到了完整的 ABI 信息。
✅ 难关攻克
示例代码:
# bridge eth from goerli to zkSync 2.0 testnet
def bridge_zkSync_eth(w3, from_address, private_key, contract_address, amount_in_ether, chainId):
    from_address = Web3.toChecksumAddress(from_address)
    contract_address = Web3.toChecksumAddress(contract_address)

    # Deposit ETH ABI
    ABI = '[{"inputs":[{"internalType":"uint256","name":"_amount","type":"uint256"},{"internalType":"address","name":"_zkSyncAddress","type":"address"},{"internalType":"enum Operations.QueueType","name":"_queueType","type":"uint8"},{"internalType":"enum Operations.OpTree","name":"_opTree","type":"uint8"}],"name":"depositETH","outputs":[],"stateMutability":"payable","type":"function"},{"inputs":[],"name":"emergencyFreezeDiamond","outputs":[],"stateMutability":"nonpayable","type":"function"}]'

    amount_in_wei = w3.toWei(amount_in_ether, 'ether')
    nonce = w3.eth.getTransactionCount(from_address)

    # goerli链:无须设置 gas, gas price , chainId, 会自动计算并配置为 EIP 1559 类型
    tx_params = {
        'value': amount_in_wei,
        "nonce": nonce,
        # 'gas': 150000,
        # 'gasPrice': w3.toWei(2, 'gwei'),
        # 'maxFeePerGas': w3.toWei(8, 'gwei'),
        # 'maxPriorityFeePerGas': w3.toWei(2, 'gwei'),
        # 'chainId': chainId,
    }

    contract = w3.eth.contract(address=contract_address, abi=ABI)

    try:
        raw_txn = contract.functions.depositETH(amount_in_wei, from_address, 0, 0).buildTransaction(tx_params)
        signed_txn = w3.eth.account.sign_transaction(raw_txn, private_key=private_key)
        txn = w3.eth.send_raw_transaction(signed_txn.rawTransaction)
        return {'status': 'succeed', 'txn_hash': w3.toHex(txn), 'task': 'zkSync Bridge ETH'}
    except Exception as e:
        return {'status': 'failed', 'error': e, 'task': 'zkSync Bridge ETH'}

交互 Bungee 的 Refuel 模块
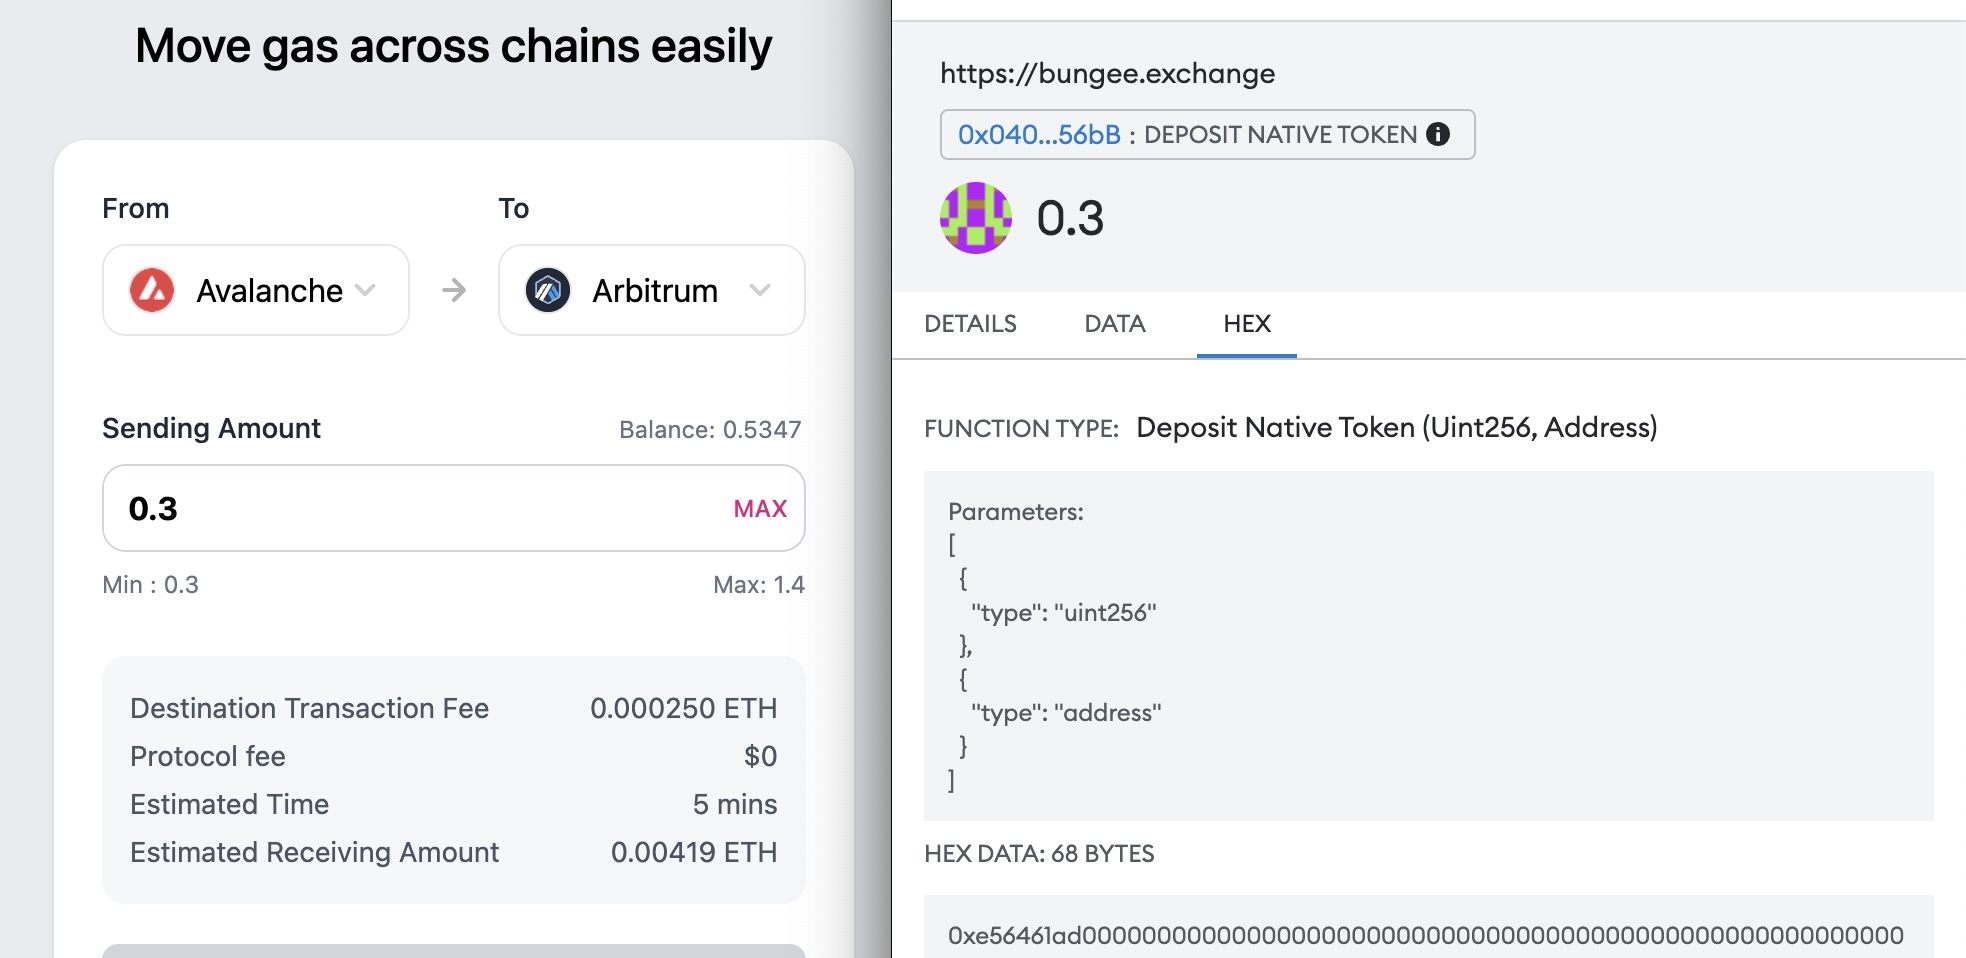
Bungee 跨链桥最近添加了一个 Refuel 模块,可以帮你把一条链的原生代币,跨链并兑换为另一条链的原生代币(用于),功能相当实用。
相比较于之前的任务,这个交互的难度在两颗 🌟
▪️ 合约开源
▪️ 参数只有两枚
唯一需要研究清楚的就只是"destinationChainId"所对应的具体数值(跨链到不同目的地,其定义的 destinationChainId 是不一样的)
具体的实现代码没有给出,留作大家的课堂作业吧。


科学家合约交互四部曲
用程序来交互合约,核心就四个步骤:
▪️ 确定合约地址
▪️ 找到合约ABI
▪️ 研究函数名及参数具体含义
▪️ 写交互代码,广播交易信息
像跨链桥这类合约开源、参数简单、 Gas磨损偏低的, 自然会成为科学家堆积成山的重灾区。
教程开源代码
本篇教程内涉及到的 4个任务及对应的完整代码已开源在 GitHub,供大家参考:
建议大家申请好 Infura 的 API Key 之后,先从测试网的几个跨链桥开始尝试。
任何涉及到主网交互的,请务必做好对密钥信息的保密工作,谨防泄漏,以免丢失资产。
👨🔬 科学家进阶之旅
👨🔬 交互科学家
测试网简单合约 ➜ 测试网复杂合约 ➜ 主网合约 ➜ 多账号单合约 ➜ 多账号多合约 ➜ 多账号切断关联 ➜ 多账号多合约模拟真实用户行为轨迹 ➜ ( Ξ ) ➜ 躺平
👩🔬 大神科学家
MEV套利 ➜ ( Ξ Ξ Ξ ) ➜ 躺平

总结
所谓 Web3 “科学家”,在大部分语境下,也只不过是用程序代替人工进行合约交互的那群人。
在传统领域,顶多也就称得上是“脚本小子”;但在 Web3 这个蛮荒领域,却被冠以如此高大上的名号,可见行业尚处早期。
然而,随着我们徐徐揭开其神秘面纱,却发现并无太大玄机。学好 Python ,你我皆可登堂入室。
👨🔬 人均科学家的时代即将来临?
任何行业领域内的机会窗口都是稍纵即逝的,越是处于行业早期,越是有较大的先发优势。同时这样的时期也是普通人“逆天改命”最好的时机,是草根阶层实现阶层跨越的绝佳时机。
让我们一起迎接 Web3 的大航海时代 !

附录: