Tutorial: On chain SVG claim page on manifold.xyz
0. Introduction
In this tutorial I explain the steps you need to take to create a claim-page for a fully on-chain svg token using the manifold.xyz creator contract.
You should be familiar with manifold.xyz and have deployed your own ERC1155 contract beforehand.
DISCLAIMER: It is not currently possible to create a claim page on testnet manifold contracts. Keep in mind following this tutorial will create a real mainnet claim page that will cost you real gas to set up. I am not responsible for loss of gas, incurred fees, etc. You are expected to at least know what you are doing.
NOTE: I suggest you read this tutorial through once or twice without executing any on-chain transactions. Once you understand the process, replace the example code with your own SVG code and metadata and do it for real.
1. Preparing your SVG and the token metadata
These steps are also outlined in the manifold documentation.
For this tutorial we’ll be using the following SVG code (776 bytes):
<svg preserveAspectRatio="xMidYMid" version="1.1" viewBox="0 0 256 256" xmlns="http://www.w3.org/2000/svg">
 <rect width="256" height="256" fill="#fff" style="paint-order:fill markers stroke"/>
 <g transform="matrix(.30702 0 0 .30702 88.701 64)">
  <polygon points="127.96 287.96 255.92 212.32 127.96 0 125.17 9.5 125.17 285.17" fill="#343434"/>
  <polygon points="0 212.32 127.96 287.96 127.96 154.16 127.96 0" fill="#8c8c8c"/>
  <polygon points="127.96 416.91 256 236.59 127.96 312.19 126.39 314.11 126.39 412.31" fill="#3c3c3b"/>
  <polygon points="127.96 312.19 0 236.59 127.96 416.91" fill="#8c8c8c"/>
  <polygon points="255.92 212.32 127.96 154.16 127.96 287.96" fill="#141414"/>
  <polygon points="127.96 287.96 127.96 154.16 9e-4 212.32" fill="#393939"/>
 </g>
</svg>
Which renders into the following image:

1.1 Strip unnecessary data
Prepare your SVG code by stripping unnecessary data — remember, the larger the file, the more you’ll have to pay in gas. I like to use OMGSVG for this purpose.
After optimizing our SVG, the resulting code is 599 bytes and looks like this:
<svg xmlns="http://www.w3.org/2000/svg" preserveAspectRatio="xMidYMid" viewBox="0 0 256 256"><path fill="#fff" d="M0 0h256v256H0z" paint-order="fill markers stroke"/><path fill="#343434" d="m127.987 152.41 39.287-23.224L127.987 64l-.856 2.917v84.636z"/><path fill="#8c8c8c" d="m88.701 129.186 39.286 23.223V64z"/><path fill="#3c3c3b" d="m127.987 192 39.311-55.362-39.31 23.21-.483.59v30.15z"/><path fill="#8c8c8c" d="m127.987 159.849-39.286-23.211L127.987 192z"/><path fill="#141414" d="m167.274 129.186-39.287-17.856v41.08z"/><path fill="#393939" d="M127.987 152.41v-41.08l-39.286 17.856z"/></svg>
1.2 Convert to URI
The next step is to convert the SVG code into a URI so that it can be easily rendered by browsers.
For this purpose we can use the tool linked from the manifold documentation:
SVG to URI on CodePen.
The resulting URI code looks like this:
data:image/svg+xml;utf8,%3csvg xmlns='http://www.w3.org/2000/svg' preserveAspectRatio='xMidYMid' viewBox='0 0 256 256'%3e%3cpath fill='%23fff' d='M0 0h256v256H0z' paint-order='fill markers stroke'/%3e%3cpath fill='%23343434' d='m127.987 152.41 39.287-23.224L127.987 64l-.856 2.917v84.636z'/%3e%3cpath fill='%238c8c8c' d='m88.701 129.186 39.286 23.223V64z'/%3e%3cpath fill='%233c3c3b' d='m127.987 192 39.311-55.362-39.31 23.21-.483.59v30.15z'/%3e%3cpath fill='%238c8c8c' d='m127.987 159.849-39.286-23.211L127.987 192z'/%3e%3cpath fill='%23141414' d='m167.274 129.186-39.287-17.856v41.08z'/%3e%3cpath fill='%23393939' d='M127.987 152.41v-41.08l-39.286 17.856z'/%3e%3c/svg%3e
If you paste this URI into a browser address bar you’ll see the SVG appear in your browser window. So far so good.
1.3 Turning your metadata into a URI
Now we need to take the SVG URI and our token metadata and turn those two into a single URI.
For this example we’ll use the following JSON metadata:
{
    "name": "Ethereum",
    "description": "The ethereum symbol",
	"attributes": [
		{
			"trait_type": "Width",
			"value": "256px"
		},
		{
			"trait_type": "Height",
			"value": "256px"
		},
		{
			"trait_type": "Format",
			"value": "svg"
		}
	],
    "image": "<YOUR_SVG_URI>"
}
Replace the <YOUR_SVG_URI> string in the above code with the URI we got from the previous step.
Once you’ve done that the next step is to minify the code once again to reduce the size as much as possible.
We can use this tool for this purpose.
Paste your JSON and hit the Minify/Compress button.
Copy the minified JSON code and paste it into the end of the following string, replacing <YOUR_JSON>.
data:application/json;utf8,<YOUR_JSON>
The resulting code would look something like this:
data:application/json;utf8,{"name":"Ethereum","description":"The ethereum symbol","attributes":[{"trait_type":"Width","value":"256px"},{"trait_type":"Height","value":"256px"},{"trait_type":"Format","value":"svg"}],"image":"data:image/svg+xml;utf8,%3csvg xmlns='http://www.w3.org/2000/svg' preserveAspectRatio='xMidYMid' viewBox='0 0 256 256'%3e%3cpath fill='%23fff' d='M0 0h256v256H0z' paint-order='fill markers stroke'/%3e%3cpath fill='%23343434' d='m127.987 152.41 39.287-23.224L127.987 64l-.856 2.917v84.636z'/%3e%3cpath fill='%238c8c8c' d='m88.701 129.186 39.286 23.223V64z'/%3e%3cpath fill='%233c3c3b' d='m127.987 192 39.311-55.362-39.31 23.21-.483.59v30.15z'/%3e%3cpath fill='%238c8c8c' d='m127.987 159.849-39.286-23.211L127.987 192z'/%3e%3cpath fill='%23141414' d='m167.274 129.186-39.287-17.856v41.08z'/%3e%3cpath fill='%23393939' d='M127.987 152.41v-41.08l-39.286 17.856z'/%3e%3c/svg%3e"}
2. Creating the manifold claim page
Before we start, save a copy of your SVG artwork in JPG or PNG format. We’ll need this to set up the claim page.
Then, start creating a claim page on the ERC1155 contract you are using for your on-chain SVG artwork. You can find information on how to do this in the manifold documentation.
When you reach the Prepare Token stage while setting up the claim page, upload the PNG version of your artwork. Manifold uses this as a background on claim pages so it is important that you do upload a PNG copy of your SVG.
The rest of the metadata you enter into the Prepare Token page will be replaced by our on-chain code so it doesn’t need to be final. Just fill in the required fields and click Next.
Continue setting up your claim page normally, then Publish it.
NOTE: You need to publish your claim page before you can update the metadata to make the token fully on-chain. As such, some people might mint your token before you update the metadata. If you think this might happen you could spend some time to make the initial metadata you configure on manifold Prepare Token step match the final metadata as closely as possible. Alternatively, warn your collectors that there’s gonna be a metadata update to move on-chain.
3. Moving the token fully on-chain
At this point all that’s left to do is to execute some functions on your contract to transfer your SVG and metadata to be stored on the blockchain.
3.1 Finding the claimIndex
In order to update the metadata for your token, we need to call the updateTokenURIParams function on the Manifold: LazyClaim extension contract.
This function has claimIndex parameter which we need to find in order to execute the function.
To find this number all we need to do is visit our wallet address (the one that owns the contract we set up the claim page on) on etherscan.io and view our recent transactions.
Find the Initialize Claim transaction (the one you pay gas for when setting up a claim page). It looks something like this:

Click on the transaction hash on the left to open the transaction details page.
Now scroll down a bit and click on Click to see More.
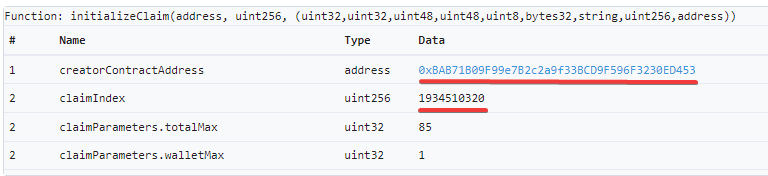
Scroll down a bit again until you find the Input Data section and click on Decode Input Data:

Now you need to copy the claimIndex and creatorContractAddress values and paste them somewhere:
3.2 Updating your claim-page token URI
Now scroll back up the page to the From/To section, and click on the Manifold: Lazy Claim contract address link:

Click on the Contract tab:

Then on the Write Contract button:
Click the Connect to Web3 button and connect your wallet to etherscan.io (100% safe).

Now click the updateTokenURIParams button to expand the interface for executing this smart-contract function:

Copy and paste your creator contract address that we saved earlier into the creatorContractAddress field.
Copy and paste the claim index number we saved earlier into the claimIndex field.
Enter the number 1 into the storageProtocol field.
Copy and paste the code we obtained at the end of section 1 in this tutorial into the location field.
When done it should look something like this:
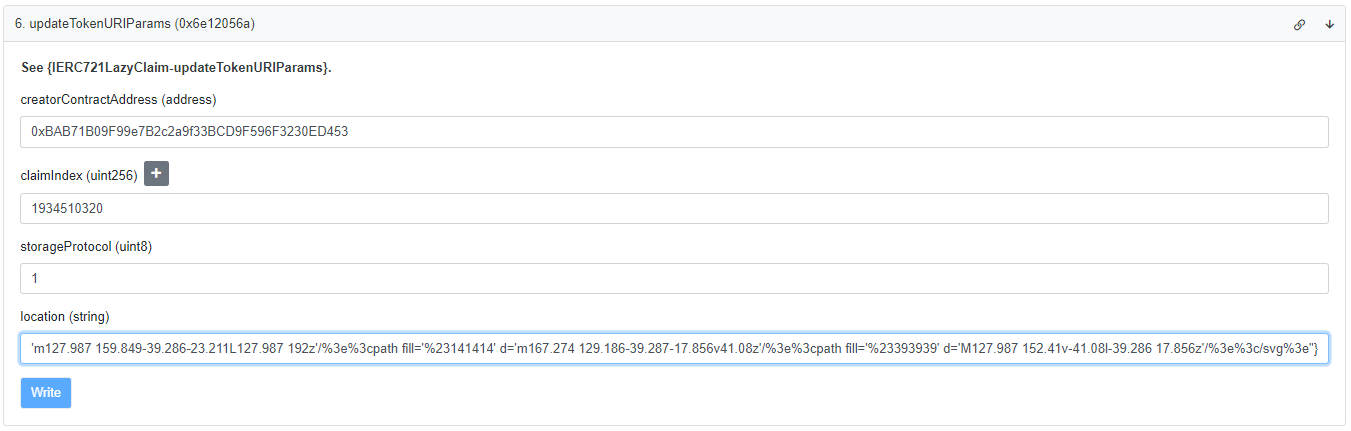
Double check everything is correct before clicking the Write button, and approving the transaction in your wallet.
4. Done
That’s it. Once the transaction goes through, any tokens minted on that claim page will point to the new metadata and will be entirely on-chain.
Remember to refresh metadata on OpenSea if you or a collector already minted a token.
There is currently 1 drawback with using this method: the claim page will display some URI code under Arweave URL, like so:
However, I think this is a small price to pay, and hope manifold will add a better, more straightforward way to create on-chain NFTs in the future.
But for now,
Enjoy being fully on-chain!