
TLDR? Watch the video of this tutorial!
Final repo of this tutorial:
Documentation on Data Source Templating with Subgraphs:
Intro
Do you have a child?
Imagine having ten more. Then fifty more after that. Then imagine you have ten thousand.
Whelp, in this shoehorned metaphor, it turns out that YOU are responsible for the information, safety, and whereabouts of each and every single child!
Good luck!
So what does this have to do with decentralized data you might ask?
It all comes down to smart contracts.
Smart contracts aren’t just incredibly powerful executable warrior-files securely deployed to countless nodes throughout earth, hell-bent on disrupting the entrenched extractive ethos of web2…
Smart contracts, when lovingly set up and are in the mood, can also have children.
Lots and lots and LOTS of children. Infinite children!
Wouldn’t it be nice to be able to keep track of your children, no matter how infinite they may be?
I think so!
Welcome to a walkthrough tutorial on how to deploy and index factory pattern contracts using Remix IDE and The Graph’s subgraphs
Who This Tutorial Is For
-
Web2 devs curious about getting started in web3
-
Web3 devs looking to take their dapp to the next level by allowing their smart contracts to replicate and keep track of those replications’ actions.
Requirements
-
A low to moderate level of understanding of Solidity, Typescript, and APIs
-
Here are a few of my favorite resources:
-
-
A low to moderate level of understanding of how blockchain functions
-
A decentralized wallet like Metamask
Objectives
-
Deploy a gas-efficient Factory Pattern using clones
-
Deploy a subgraph that features templating to index and search the contract and any children it produces
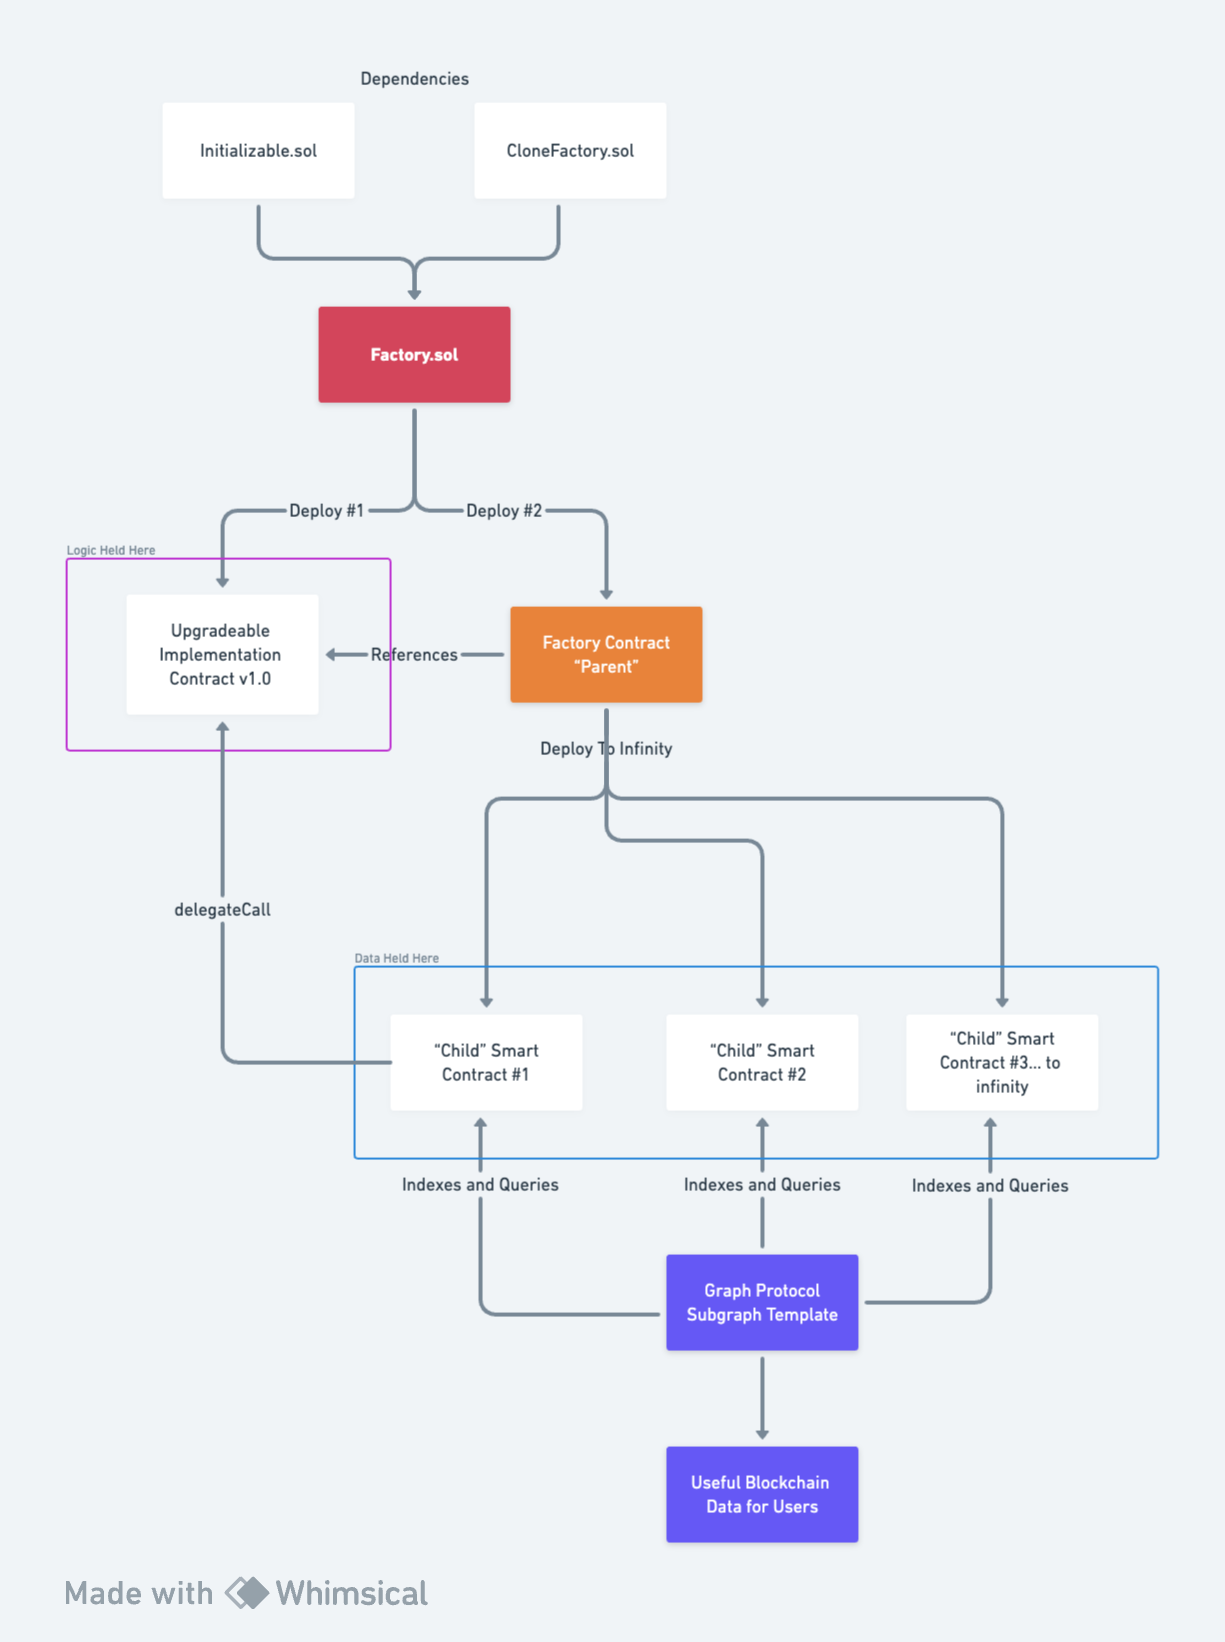
What We are Building:
We are going to be building a gas-efficient Factory Pattern smart contract and deploy it on the Goerli testnet. We will first build it locally before deploying on-chain.
We’ll then index and query the parent and any child created from the parent efficiently with a Graph Protocol Subgraph Template.
This is an high-level preview of what we will be building. Keep this diagram handy ! If you ever feel lost, refer to this!
Section 1: Building a Factory Pattern Efficiently
A Factory Pattern in solidity is ideally going to be a different pattern than a traditional Factory Pattern in other programming languages due to gas.
The typical Factory Pattern involves cloning the logic every time a cloned smart contract is made, which adds more data to every transaction, which wastes gas.
But no worries, there is a solution!
The EIP-1167 specification allows us to create a cloned proxy (aka ‘child’. The technical term is proxy, but ‘child’ is going to be used in this tutorial for the sake of shoehorning the metaphor) to forward all of the logic to an initial “implementation contract” through delegateCall, and then any calls other child smart contracts make will communicate with this implementation contract, call the function there, then relay the return value back to the caller!
I personally learned a TON about this pattern with these two resources:
https://www.youtube.com/watch?v=7H7GVI1gsTc (The beginning 5min of this is amazing and critical for you to understand!)
Please read the article and watch the video if you are unsure about these concepts.
Building an Implementation Contract for your Factory to Clone
In this tutorial, I’m going to be using Remix IDE which was specifically designed for interacting with Solidity and the blockchain.
Create a new file in Remix named Factory.sol
Let’s first write out a very basic contract of what we will want to create as our very first implementation contract that future child contracts will be based off of.
Factory.sol
//SPDX-License-Identifier: MIT
pragma solidity ^0.8.0;
import "@openzeppelin/contracts-upgradeable/proxy/utils/Initializable.sol";

contract Child {
   string public message = 'Default message';
   function initialize(string memory _message) public initializer {
       message = _message;
   }
}
You may be wondering why we are using initialize instead of a constructor .
initialize is used instead of constructor because this contract will be an implementation contract and should only be run once on this implementation contract.
The import Initializable has some great helper code that only allows initialize to run once on the implementation contract, then never again on the children.
To read more about initialize, check out the official OpenZeppelin documentation on “The Constructor Caveat.”
Now that this contract can be created, let's give it a basic set of functionality.
Factory.sol
//SPDX-License-Identifier: MIT
pragma solidity ^0.8.0;
import "@openzeppelin/contracts-upgradeable/proxy/utils/Initializable.sol";

contract Child is Initializable {
   string public message = 'Default message';
   uint256 updatedMessageTally = 0;

   event MessageUpdated(string message, uint256
updatedMessageTally);

   function initialize(string memory _message) public initializer {
       message = _message;
   }
   function updateMessage(string memory _message) public {
       message = _message;
       updatedMessageTally++;
       emit MessageUpdated(_message, updatedMessageTally);
   }
 }
First, each child will have a tally of how many times the message has been updated.
Second, we define the MessageUpdated event that will eventually be emitted when the message is updated.
Next, the function updateMessage updates this message stored on the child, triggers an increase in the child’s tally, as well as emits a MessageUpdated event to be indexed by our (not yet written) subgraph that we will work on in Section 4.
Amazing! You’ve created a simple smart contract that can only be initialized once and is ready to be copied into infinite ‘child’ or proxy contracts by way of a Factory.
Building the Factory!
Create a new file named “CloneFactory.sol”.
Read up on the EIP-1167 standard, copy the standard into your CloneFactory.sol file, then import it into your main Factory.sol file.
CloneFactory.sol
//SPDX-License-Identifier: MIT
pragma solidity ^0.8.0;

import './CloneFactory.sol';
import "@openzeppelin/contracts-upgradeable/proxy/utils/Initializable.sol";

contract Factory is CloneFactory {
    Child[] public children;

    address implementation;

   constructor(address _implementation) {
       implementation = _implementation;
    }

    event ChildCreated(uint date, string message, address childAddress);

    function createChild(string memory message) public {
       Child child = Child(createClone(parent));
       child.initialize(message);
       children.push(child);
       emit ChildCreated(block.timestamp, message, address(child));
    }

    function getChildren() external view returns(Child[] memory){
        return children;
    }
}

contract Child is Initializable {
   string public message = 'Default message';
   uint256 updatedMessageTally = 0;

   event MessageUpdated(string message, uint256 updatedMessageTally);

   function initialize(string memory _message) public initializer {
       message = _message;
   }

   function updateMessage(string memory _message) public {
       message = _message;
       updatedMessageTally++;
       emit MessageUpdated(_message, updatedMessageTally);
   }
 }
Our factory is ready to start making proxies!
Let’s highlight a few key things to go over here for your understanding:
-
The
constructoris being used as opposed toinitializeas this will not be an implementation contract when deployed. This is the Factory contract that will not carry any data, just logic for the implementation to reference upon its deployment. -
An event
ChildCreatedis made and is emitted in the function callcreateChild. This will be very helpful when we are trying to index these events with our subgraph in the next section! -
createClone(parent)is called as its clones the parent address of the implementation contract that's imported upon its creation. This is an important part of the EIP-1167 standard as we are not creating a new child, but a CLONED child.
Now that we have our two smart contracts (Factory and Child) ready, lets deploy!
Section 2. Deploying Our Two Smart Contracts In the Correct Order
First thing’s first, go back to your Remix IDE and choose your virtual environment to test out your code.
Make sure your environment is set to Remix VM to keep the deployment local before we go deploy on Goerli.
Deploy your contracts and perform the following steps in this order:
-
Childis your Implementation Contract as its the first one! Every Child after that will not be the implementation as its not the first!You’ll need to initialize it with whatever word or phrase you'd prefer. I’ll put in “Blockchain!”. Remember, this can only be done once on the implementation contract. Feel free to try it on any future Child contracts (you won't be able to!).

Now that the implementation is active, you’re ready to create your Factory based on the address of this implementation!
2. Copy the address of the deployed Implementation contract and put it into the address_parent input field of Factory - contracts/Factory.sol, then click Deploy.

Your Factory is now deployed its first Child based off the initial Child Implementation contract!

Now let's make another child!
3. At your deployed Factory, create a child by inputting a string into createChild, then press the button! Perform this as many times as you’d like. Feel free to give them names or many words to identify each differently!
After you’ve created your children, go ahead and click “getChildren.”
Every time you create a child with your factory, a new address will pop up here! See how the addresses grow every time I add a new Child.


If you ever want to see how your children are doing and interact with their contracts directly as opposed to just listing them out, take the address and input it into the Deploy “At Address” field and make sure the contract you’ll be deploying is a Child.

Click “AtAddress” and boom! You can start interacting with your child!

If you try to Initialize your Child, you should see an error message as it has already initialized with the message you fed into it, and initialize can only be run once!

However, you CAN update the message of the contract using “updateMessage”, then check on the message using “message”.

Congratulations!
Now that you’ve been able to deploy your Factory Pattern onto your test environment, go ahead and change your environments from Remix VM to “Injected Provider”, then deploy it again on the test network Goerli!
Let's take a moment to appreciate how amazing this journey has been so far. you have created two smart contracts, you have understood and built an interesting little piece of software architecture, and have now deployed your smart contracts on the blockchain!
Now that your smart contract children are on the blockchain, let's create a dynamic subgraph that can index your Children, no matter how many of them are created from the factory!
To do this your subgraph will need to have templating enabled. Let’s go do that right now.
Section 3: Indexing Our Infinite Children With Subgraph Templating
Web2 has Google to index and search web2.
Web3 has The Graph to index and search the blockchain.
The Graph (www.thegraph.com) has done the hard work of creating a self-sustaining ecosystem that allows developers easy and affordable access to this data.
You access this blockchain data through an API they developed called a Subgraph.
Subgraphs can access different parts of the Ethereum blockchain depending on how the Subgraph is designed.
Read more about The Graph, Subgraphs, and more at https://thegraph.com/docs/en/
Let’s create a subgraph to index our Factory and dynamically created Children!

Go to www.thegraph.com and click on Subgraph Studio.
Click on Create a Subgraph, give it a title, and ensure you are on the Goerli Network.

You’ll see a list of instructions on the right of the screen.
If you haven’t installed graph-cli, do so in your terminal, then run graph init by copy/pasting the code and then follow these instructions:
1. Choose the ethereum network
2. Confirm the prenamed subgraph slug as well as the prenamed directory
3. Choose Goerli network, then init your subgraph with the code in the website by copy/pasting it into your terminal.
4. When it asks for your contract’s address, go back to remix and choose the contract address of your Factory from the Remix IDE

5. Get the ABI of your Factory from the Remix IDE as well, and save it as a json file anywhere on your computer (I saved mine in the working folder itself). Write the path into this portion of the CLI when it asks for it.
6. Also get the ABI for your Child contract and save it as well. You’ll need this later!

7. Name the contract “Factory”
8. Say Yes to indexing the contract events, after which it will install all dependencies.
9. When it asks you if you want to add another contract, add your Child contract address you previously deployed!

10. Remember saving the ABI for the child contract? Link that path now.
11. Name the second contract “Child”
12. Do not add any more contracts
13. After the installation, go back to your subgraph’s page at www.thegraph.com and copy/paste the “authenticate in CLI” code into your terminal.
14. cd into your folder as instructed.
15. Do NOT continue with graph codegen && graph build commands. We’ll do those in Section 4.
Another congratulations! You have set up 90% of a subgraph to be ready to index your smart contracts that are active on the blockchain! Now we need to implement subgraph templates by altering a little bit of code prior to deploying.
Section 4: Subgraph Templating
Read the official documentation on subgraph templating here.
By default, a subgraph indexes a single hard-coded smart contract’s events. It is also able to index many hard-coded smart contracts.
But what happens when a smart contract can dynamically create many smart contracts and hard-coding is impossible as each child has a new address?
Enter subgraph templating!
Subgraph templating allows for any dynamic creation of new smart contracts to be indexed automatically by the subgraph without changing any code!
And lucky for us, implementing a subgraph template is super easy.
First, lets open up subgraph.yaml that was generated from your amazing use of the CLI.
This file gives us a high-level perspective of what our subgraph is going to be indexing.
subgraph.yaml
specVersion: 0.0.5
schema:
   file: ./schema.graphql
dataSources:
   - kind: ethereum
     name: Factory
     network: goerli
     source:
         address: "0xCd5282c80fC3829db19743628D02d0e4281D74A4"
         abi: Factory
     mapping:
         kind: ethereum/events
         apiVersion: 0.0.7
         language: wasm/assemblyscript
         entities:
             - ChildCreated
         abis:
             - name: Factory
               file: ./abis/Factory.json
         eventHandlers:
             - event: ChildCreated(uint256,string,address)
               handler: handleChildCreated
         file: ./src/factory.ts
The two edits we need to do are as such:
-
Edit the startblock
-
Implement templating
Editing the Startblock
Editing the start block will significantly accelerate the performance of your subgraph, as your subgraph will not have to search very old blocks, only the recent relevant blocks where your smart contracts have since been deployed!
Go to your Remix IDE and copy the Factory’s address:

Go to www.etherscan.io and enter that address in the search bar.
After entering the address, click on the “B” to find your smart contract on Goerli.

See how the initial startblock was “8328718”?
That is when we should start indexing our subgraph!
Copy/paste that number as such into subgraph.yaml:
subgraph.yaml
{...^ Previous Code ^ ...}
- kind: ethereum
   name: Factory
   network: goerli
   source:
     address: "0xCd5282c80fC3829db19743628D02d0e4281D74A4"
     abi: Factory
     startBlock: 8328718
Implementing Subgraph Templating
We are ready to index and query our Factory smart contract, but what about the children!?

Don’t fear! Let’s give the subgraph.yaml a “template” portion so any children that are created will dynamically be indexed!
Templating is simple.
-
Add ‘templates’ to your Child portion of your subgraph.yaml file
-
Remove the “address” from the Child portion (see the “source” of the Child and compare that source to the one above. The child has their source address removed).
subgraph.yaml
specVersion: 0.0.5
schema:
   file: ./schema.graphql
dataSources:
   - kind: ethereum
     name: Factory
     network: goerli
     source:
         address: "0xCd5282c80fC3829db19743628D02d0e4281D74A4"
         abi: Factory
         startBlock: 8328718
     mapping:
         kind: ethereum/events
         apiVersion: 0.0.7
         language: wasm/assemblyscript
         entities:
             - ChildCreated
         abis:
             - name: Factory
               file: ./abis/Factory.json
         eventHandlers:
             - event: ChildCreated(uint256,string,address)
               handler: handleChildCreated
         file: ./src/factory.ts
templates:
   - kind: ethereum
     name: Child
     network: goerli
     source:
         abi: Child
     mapping:
         kind: ethereum/events
         apiVersion: 0.0.7
         language: wasm/assemblyscript
         entities:
             - Initialized
             - MessageUpdated
         abis:
             - name: Child
               file: ./abis/Child.json
         eventHandlers:
             - event: Initialized(uint8)
               handler: handleInitialized
             - event: MessageUpdated(string,uint256)
               handler: handleMessageUpdated
         file: ./src/child.ts
The next step is to now generate your template!
Go to your terminal and enter
graph codegen
This will generate typesafety to use in our subgraph as well as a Child.ts template file based off of your subgraph.yaml updates that will be stored in your generated/templates/Child/ folder!
Lets bring that Child.ts template logic into your factory.ts mappings.
Go to your src/factory.ts file. This file is where your subgraph will handle the data emitting from the event that has occurred on the blockchain.
Here is the base factory.ts in our subgraph:
src/factory.ts
import { ChildCreated as ChildCreatedEvent } from "../generated/Factory/Factory"
import { ChildCreated } from "../generated/schema"


export function handleChildCreated(event: ChildCreatedEvent): void {
 let entity = new ChildCreated(
   event.transaction.hash.concatI32(event.logIndex.toI32())
 )
 entity.date = event.params.date
 entity.message = event.params.message
 entity.childAddress = event.params.childAddress


 entity.blockNumber = event.block.number
 entity.blockTimestamp = event.block.timestamp
 entity.transactionHash = event.transaction.hash


 entity.save()
Update the file with these two lines of code:
import { ChildCreated as ChildCreatedEvent } from "../generated/Factory/Factory";
import { ChildCreated } from "../generated/schema";
import { Child } from "../generated/templates";  { THIS LINE }


export function handleChildCreated(event: ChildCreatedEvent): void {
 let entity = new ChildCreated(
   event.transaction.hash.concatI32(event.logIndex.toI32())
 );
 entity.date = event.params.date;
 entity.message = event.params.message;
 entity.childAddress = event.params.childAddress;


 entity.blockNumber = event.block.number;
 entity.blockTimestamp = event.block.timestamp;
 entity.transactionHash = event.transaction.hash;


 entity.save();


 Child.create(event.params.childAddress) { THIS LINE }
}
These edits import the Child template, then pass in the childAddress to that Child template.
The template in subgraph.yaml now has that childAddress which means it can begin indexing that brand new address any time ChildCreated is run!
Now run this in terminal:
graph codegen && graph build
Now you’re ready to deploy the subgraph!
Go back to your www.thegraph.com subgraph page and copy/paste your “deploy subgraph” code into your terminal.
You’ve done it!
To start playing around with your subgraph, head over to the subgraph Playground. Use the Explorer button on the right to identify the events you’d like to query.
Design your query and you’ve got your data coming from the blockchain!
You can see what your Factory is doing by looking up “childsCreated”.
You can see what your children have been doing by looking up “messageUpdateds”.

These exact same steps you used in this tutorial can be used to deploy this on Ethereum mainnet if you’d like your contract and subgraph to be officially recognized on the Ethereum blockchain and not on a testnet.
Thank you for taking the time to go through this tutorial and learning about factory patterns and dynamic templating within subgraphs.
I hope you enjoyed learning as much as I enjoyed writing this up.
Feel free to watch the video version of this tutorial here and reach out to me on twitter if you have any further thoughts or questions:
Take care!
Marcus Rein
