One of the things that helps a network development team to test the network, in addition to interacting with contracts and operations such as swaps, bridges and adding liquidity, is contract deployment. So if you like to help new networks and blockchains, be sure to read this article to the end.
In this article you will learn how to deploy a simple smart contract -as it’s not a solidity tutorial- on Ethereum Virtual Machine compatible networks (eg Taiko, Scroll) without any programming knowledge.
1- for the first step you should choose an IDE to develop your smart contract. I suggest Remix. Remix IDE, is a no-setup tool with a GUI for developing smart contracts. Open this link in your browser: https://remix.ethereum.org

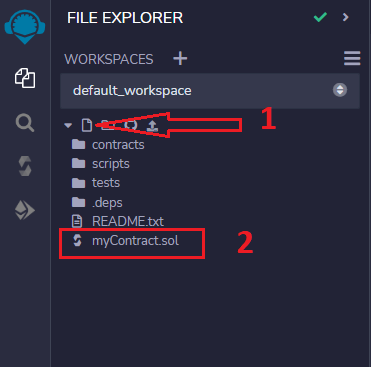
2- From the left menu, click on the new file icon (no. 1 in the image below), then choose a name for that with “.sol” extension like the image (no. 2). After creating the file it would be opened on the right side of the browser.
**You can create your contract in each directory you want.
3- The next step is to write the code. but wait, you don’t know coding? no problem. just copy and paste the code below into the coding section in the right side of your browser. If you don’t see the coding section, click on the file you already created to open it.
//SPDX-License-Identifier: MIT

pragma solidity ^0.8.0;

contract myContract {
    //as we just want to deploy a simple contract, no need to write anything here.
}

4- Now, we should compile the code. Click on the icon marked no. 1 in the image. If you copied the code above, make sure the compiler version is the same as the image (no. 2). Then click on the compile button (no. 3). After your code has been compiled correctly, you should see a blue tick next to the icon no. 1

5- In this step we should connect MetaMask to the app to deploy our contract. First click on the icon no. 1 in the image below to open deploy section. Then click on “ENVIRONMENT” drop-down menu and select “Injected Provider - MetaMask”. MetaMask popup should be appeared. Confirm and connect your wallet.

6- After connecting MetaMask to the app you should see your wallet address and its balance in the “ACCOUNT” list (no. 1). Select the network you want to deploy the contract on it from your MetaMask (as you see I selected goerli testnet), select the contract you want to deploy (no. 2) -maybe you compiled more than one contract-, then click on “Deploy” button (no. 3) and confirm the transaction in your wallet.
**As this transaction costs some gas, make sure your wallet is connected to a testnet network.

After the transaction is completed, you should be able to see the contract address as shown in the image (scroll down). To deploy this contract on different networks, just change the network in your wallet, click on “deploy” button, and confirm the transaction.

Note:
-
This tutorial does not guarantee any reward or drop, so do it if you want to help to test new networks
-
The code above is a simple piece of solidity code and has no efficiency. To deploy more complex contracts, you need to learn solidity programming.
-
It is not recommended to try on mainnet chains.