
作者:团长(https://twitter.com/quentangle_)
我们直接从代码层面来看看一个Ordinals Inscription的交易过程是怎样的。首先我们需要明确一些概念:
- OutPoint
比特币中的交易是基于 UTXO(未花费的交易输出)模型构建的,这意味着每个交易输出都有一个唯一的 OutPoint,可以被引用作为未来交易输入的来源。当一个交易被确认后,它的输出被解锁,并成为新的未花费的交易输出,可以被之后的交易引用。所以OutPoint是一个引用之前交易中的一个输出的结构体,它由两个字段组成:
-
TxHash:这是一个 32 字节的哈希值,表示之前交易的哈希值。 -
Index:这是一个 4 字节的整数,表示之前交易中的对应输出的索引。
- SatPoint
Ordinals协议通过对比特币的最小单位进行编号来实现对每一个单位进行区分,而所有Satoshi都是通过UTXO实现的,SatPoint就是在UTXO上定义不同的sat,它的结构是:
-
OutPoint即上面定时的输出点 -
offset在输出点之上的偏移量
通过OutPoint和offset,就能唯一的定位到任何一个sat。
#1 首先需要准备铸造的内容和可以用的utxo
let inscription = Inscription::from_file(options.chain(), &self.file)?;
let mut utxos = index.get_unspent_outputs(Wallet::load(&options)?)?;
#2 接下来就是构建铭文交易,用到的参数有:
satpoint: Option<SatPoint>, // 指定铭文所在的OutPoint,如果不指定则会中utxo中选取
inscription: Inscription, // 铭文内容
inscriptions: BTreeMap<SatPoint, InscriptionId> // 用于检查satpoint是否已经有铭文铸造
network: Network, // 比特币网络
BTreeMap<OutPoint, Amount> // utxo
change: [Address; 2] // 找零地址
destination: Address, // 目标地址
commit_fee_rate: FeeRate, // commit交易费率
reveal_fee_rate: FeeRate, // reveal交易费率
no_limit: bool, // 设置为默认值即可
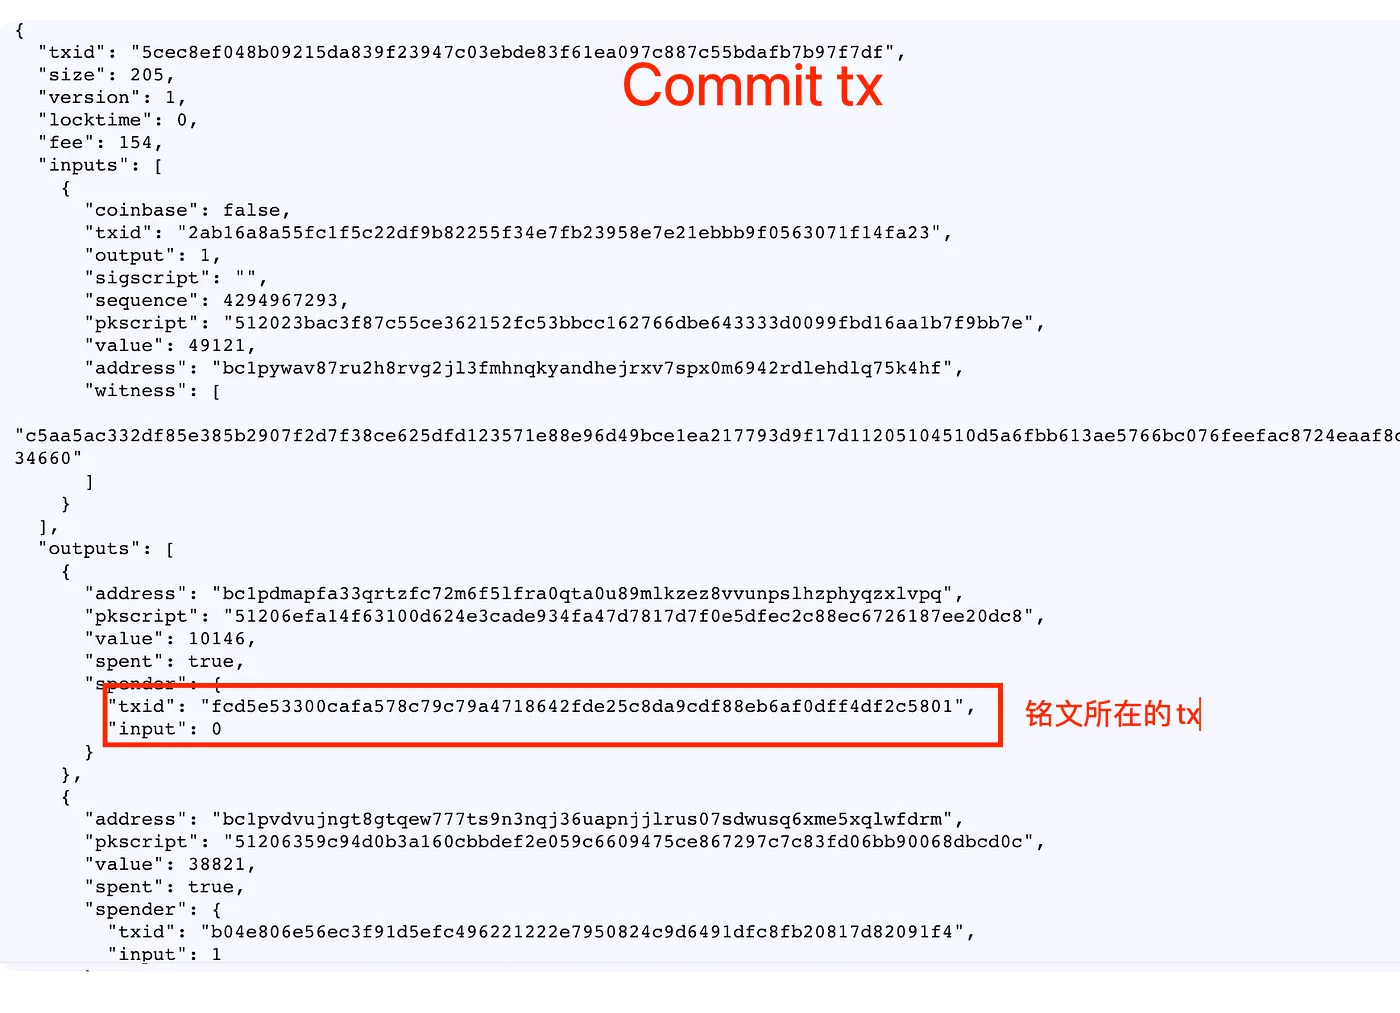
铭文交易是由两部分构成commit_tx和reveal_tx。其中commit_tx用于提交锁定脚本,reveal_tx用于揭示脚本内容。
详细来讲:由于自来taproot脚本的花费只能从现有的taproot输出中进行,所以铭文是用一个两阶段的提交commit/揭示reveal程序来进行的。首先,在Commit交易中,创建了一个提交给包含铭文内容的脚本的taproot输出。其次,在reveal交易中,由commit交易创建的输出被花费,揭示链上的铭文内容。
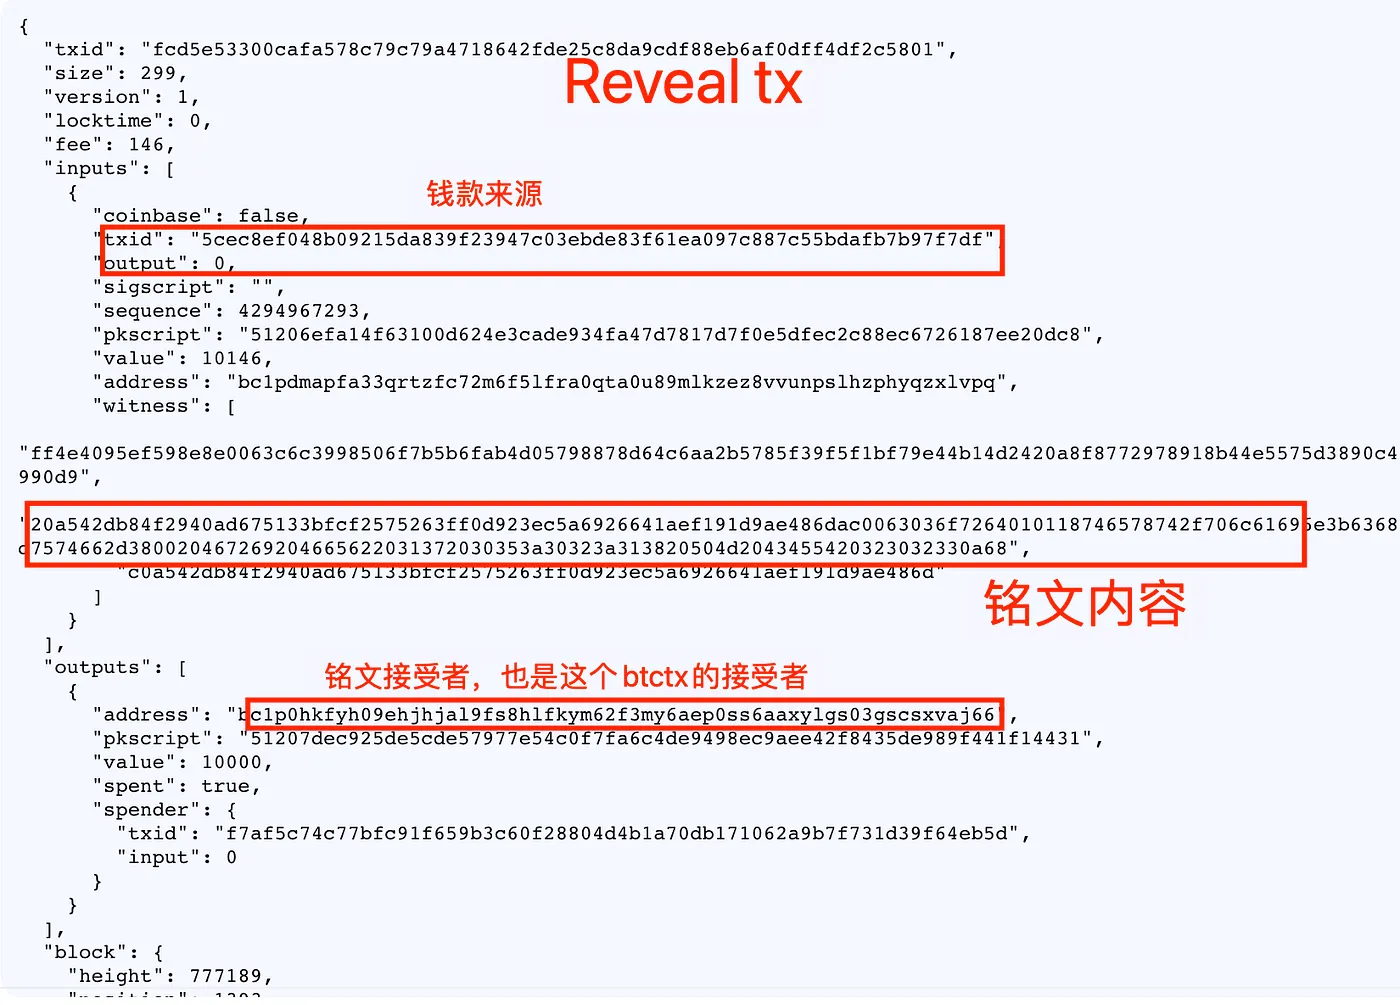
比特币基于UTXO的交易模型有一个特点,就是在输出方,只会包含证明,这个证明可以是公钥哈希(P2PKH),也可以是脚本哈希(P2SH),在ordinals交易中是(P2TR)。而验证的过程是会放在输入方一侧,也就是在花费的时候去验证。所以构建真正的Ordinals数据内容是在reveal脚本中可以查看到。比如在这笔交易(fcd5e53300cafa578c79c79a4718642fde25c8da9cdf88eb6af0dff4df2c5801)中,input中的witness字段包含有铭文内容,而这个花费的来源则是上一笔普通的交易的输出:
这个方法的返回值就是两个交易变量和构建taproot交易产生的密钥(unsigned_commit_tx, reveal_tx, recovery_key_pair)
#3 create_inscription_transactions 我们来看一下创建铭文的交易中的逻辑。首先需要获得一个SatPoint,也就是铭文所在的OutPoint。
let satpoint = if let Some(satpoint) = satpoint {
    satpoint // 如果参数中指定则直接使用
  } else {   // 如果没有指定则在UTXO中获得一个不包含铭文的OutPoint
    let inscribed_utxos = inscriptions
      .keys()
      .map(|satpoint| satpoint.outpoint)
      .collect::<BTreeSet<OutPoint>>();
    utxos
      .keys()
      .find(|outpoint| !inscribed_utxos.contains(outpoint))
      .map(|outpoint| SatPoint {
        outpoint: *outpoint,
        offset: 0,
      })
      .ok_or_else(|| anyhow!("wallet contains no cardinal utxos"))?
  };
#4 接下来需要检查这个OutPoint是否铭刻过:
for (inscribed_satpoint, inscription_id) in &inscriptions {
    if inscribed_satpoint == &satpoint {
      return Err(anyhow!("sat at {} already inscribed", satpoint));
    }
    if inscribed_satpoint.outpoint == satpoint.outpoint {
      return Err(anyhow!(
        "utxo {} already inscribed with inscription {inscription_id} on sat {inscribed_satpoint}",
        satpoint.outpoint,
      ));
    }
  }
#5 接下来获取一个secp256k1的密钥对,用来构建reveal_tx:
let secp256k1 = Secp256k1::new();
let key_pair = UntweakedKeyPair::new(&secp256k1, &mut rand::thread_rng());
let (public_key, _parity) = XOnlyPublicKey::from_keypair(&key_pair);
#6 接下来重头戏,构建reveal脚本,铭文内容就是写在这个脚本里面。需要先创建一个脚本构建者script::Builder。这个builder需要首先包含基础的转账交易内容:
script::Builder::new()
  .push_slice(&public_key.serialize()) // 上一步的创建的密钥对中的公钥
  .push_opcode(opcodes::all::OP_CHECKSIG)
#7 然后需要将铭文内容以Ordinals协议定义的格式写入到脚本中:
builder = builder
  .push_opcode(opcodes::OP_FALSE)
  .push_opcode(opcodes::all::OP_IF)
  .push_slice(PROTOCOL_ID); // b"ord"

if let Some(content_type) = &self.content_type {
  builder = builder
    .push_slice(CONTENT_TYPE_TAG)
    .push_slice(content_type);
}if let Some(body) = &self.body {
  builder = builder.push_slice(BODY_TAG);
  for chunk in body.chunks(520) {
    builder = builder.push_slice(chunk);
  }
}builder.push_opcode(opcodes::all::OP_ENDIF)
这里的脚本构建过程就是Ordinals文档中定义的格式写入到脚本中:
OP_FALSE
OP_IF
  OP_PUSH "ord"  // PROTOCOL_ID
  OP_1
  OP_PUSH "text/plain;charset=utf-8" // content_type
  OP_0
  OP_PUSH "Hello, world!"   // body
OP_ENDIF
#8 接下来需要构建taproot花费脚本(taproot spend script),将刚才构造的reveal脚本添加到脚本的leaf上
let taproot_spend_info = TaprootBuilder::new()
  .add_leaf(0, reveal_script.clone())
  .expect("adding leaf should work")
  .finalize(&secp256k1, public_key)
  .expect("finalizing taproot builder should work");

let control_block = taproot_spend_info
  .control_block(&(reveal_script.clone(), LeafVersion::TapScript))
  .expect("should compute control block");
#9 接下来需要从这个花费脚本中获得tweaked key。当一个 Taproot 交易被广播到比特币网络中时,它需要提供一个用于验证的公钥。这个公钥被称为“Taproot 输出公钥”(output public key),它是通过对 Taproot 花费脚本的公钥进行调整(tweak keypair)生成的。这个调整的过程使用一个随机数(tweak)进行计算,从而生成一个新的公钥。这个新的公钥与传统的公钥相比,具有更高的隐私和灵活性,因为它可以根据不同的条件和限制生成不同的公钥,这是属于shnorr签名的内容,想要详细了解这部分内容请参阅文末的参考链接。
let commit_tx_address = Address::p2tr_tweaked(taproot_spend_info.output_key(), network);
#10 接下来是计算reveal交易的费用,由于只是计算费用,不实际构建交易,所以参数中的input传入的是空的OutPoint。
let (_, reveal_fee) = Self::build_reveal_transaction(
  &control_block,
  reveal_fee_rate,
  OutPoint::null(), // null input
  TxOut {
    script_pubkey: destination.script_pubkey(),
    value: 0,
  },
  &reveal_script,
);
#11 接下来是用上面几步得到的一些参数构建commit交易:
let unsigned_commit_tx = TransactionBuilder::build_transaction_with_value(
  satpoint,     // from #3
  inscriptions, // function input param
  utxos,        // function input param
  commit_tx_address.clone(), // from #9
  change,       // function input param
  commit_fee_rate, // function input param
  reveal_fee +  // from #10
  TransactionBuilder::TARGET_POSTAGE, // 交易转账数额
)?;
#12 commit交易是reveal的交易的输入,reveal交易会解锁commit交易的脚本,所以我们可以利用commit交易来构建reveal交易:
let (vout, output) = unsigned_commit_tx
  .output
  .iter()
  .enumerate()
  .find(|(_vout, output)| output.script_pubkey == commit_tx_address.script_pubkey())
  .expect("should find sat commit/inscription output");

let (mut reveal_tx, fee) = Self::build_reveal_transaction(
  &control_block, // from #8
  reveal_fee_rate, // from #10
  OutPoint { // real input outpoint(utxo)
    txid: unsigned_commit_tx.txid(),
    vout: vout.try_into().unwrap(),
  },
  TxOut {
    script_pubkey: destination.script_pubkey(),
    value: output.value, // real output value, which is reveal_fee + TARGET_POSTAGE
  },
  &reveal_script,
);
#13 下面需要对reveal_tx进行数量检查,确定commit_tx提供的费用超过dust最低值并且足够支持交易费和:
reveal_tx.output[0].value = reveal_tx.output[0]
  .value
  .checked_sub(fee.to_sat())
  .context("commit transaction output value insufficient to pay transaction fee")?;
if reveal_tx.output[0].value < reveal_tx.output[0].script_pubkey.dust_value().to_sat() {
  bail!("commit transaction output would be dust");
}
#14 下面需要计算签名哈希
let mut sighash_cache = SighashCache::new(&mut reveal_tx);
let signature_hash = sighash_cache
  .taproot_script_spend_signature_hash(
    0,
    &Prevouts::All(&[output]),
    TapLeafHash::from_script(&reveal_script, LeafVersion::TapScript),
    SchnorrSighashType::Default,
  )
  .expect("signature hash should compute");let signature = secp256k1.sign_schnorr(
  &secp256k1::Message::from_slice(signature_hash.as_inner())
    .expect("should be cryptographically secure hash"),
  &key_pair,
);
#15 将签名哈希推入见证数据
let witness = sighash_cache
  .witness_mut(0)
  .expect("getting mutable witness reference should work");
witness.push(signature.as_ref());
witness.push(reveal_script);
witness.push(&control_block.serialize());
#16 最后,用钱包对commit_tx进行签名,然后吧commit_tx和reveal_tx发送到btc节点即可
let signed_raw_commit_tx = client
  .sign_raw_transaction_with_wallet(&unsigned_commit_tx, None, None)?
  .hex;
let commit = client
  .send_raw_transaction(&signed_raw_commit_tx)
  .context("Failed to send commit transaction")?;let reveal = client
  .send_raw_transaction(&reveal_tx)
  .context("Failed to send reveal transaction")?;
总结(by Notion AI):
这个文档介绍了使用 Ordinals 协议铸造铭文的过程。铭文是一段文本或数据,可以通过 Ordinals 协议对其进行编号,然后将其铸造成比特币的未花费交易输出。在铭文交易中,commit_tx 用于提交锁定脚本,reveal_tx 用于揭示脚本内容。铭文交易是由两部分构成的,其中 reveal 脚本包含了铭文内容。
铭文交易的构建过程包含以下步骤:
-
准备铸造的内容和可用的 UTXO。
-
构建铭文交易,包括 commit_tx 和 reveal_tx。
-
创建一个 SatPoint,也就是铭文所在的 OutPoint。
-
检查这个 OutPoint 是否已经铭刻过。
-
获取一个 secp256k1 的密钥对,用于构建 reveal_tx。
-
构建 reveal 脚本,将铭文内容写入其中。
-
构建 Taproot 花费脚本(taproot spend script),将 reveal 脚本添加到脚本的 leaf 上。
-
从花费脚本中获取 tweaked key。
-
计算 reveal 交易的费用。
-
构建 commit 交易。
-
用 commit 交易构建 reveal 交易。
-
对 reveal 交易进行数量检查。
-
计算签名哈希。
-
将签名哈希推入 witness 数据。
-
用钱包对 commit_tx 进行签名,发送 commit_tx 和 reveal_tx 到比特币网络。
铭文交易的构建过程非常复杂,需要涉及到多个参数和计算,但是这个过程也非常精妙和有趣。
参考: