Just like interacting with the internet requires some tools, interacting with the blockchain will require a few things to get started.
Take a look at the above illustration, as the Ethereum blockchain is designed to allow for the execution of any kind of smart contract, any kind of application can live on top of the Ethereum blockchain. The goal for us end-users is to be able to interact with these applications.
Hot wallets (non-custodial)
The easiest starting point is by creating an internet-facing wallet i.e. hot wallets. You can start by creating an EOA (Externally Owned Address) for the Ethereum blockchain. There are plenty of popular solutions for this which comes in many forms. However, an EOA wallet is signified by its need to be controlled with private keys. When you derive a new wallet from a set of private keys or mnemonics you can interact with the blockchain by signing a transaction for example.
By market share, Metamask is the most popular and most integrated by any app in the Web3 ecosystem. See here for an example of a guide to creating a new MetaMask wallet.
By default, Metamask is connected to the Ethereum mainnet blockchain, however other Ethereum Virtual Machine (EVM) compatible chains such as Polygon, Avalanche Binance Smart Chain, and Fantom are accessible by adding their respective chain details, see Umbria easy connect page.
There are other popular wallet solutions out there including Coinbase wallet, Trust wallet, or Portis that offer multi-chain support. However, in the end it depends on your use case and where you are looking to interact.
Cold / Hardware Wallets (non-custodial)
In contrast to hot wallets, cold wallets such as hardware wallets by default are not connected to the internet to mitigate risks of infiltration. Creating an account on a physical hardware wallet follows a similar process to a hot wallet, which is software-based. There are a few popular hardware wallets such as Ledger, Trezor, or Lattice1. A hardware wallet is a device equipped with a secure enclave (a separate location from the application) where the private keys of your wallet securely live. The private keys of your wallet never leave the hardware during any approval process such as signing a transaction, which protects your assets when interacting with any application/platform on the web (note: this does not protect you from willingly approving or signing transactions on shady or suspicious platforms).
Wallet security best practices and pitfalls
BadgerDAO exploit occurred due to a front-end issue that was accessible on the Badger website. Unsuspecting end-users provided additional approval upon interacting with the front-end and gave permissions for the attackers to drain the user’s funds.
OpenSea phishing drama - signature approval farming was timed well by the perpetrator by exploiting people’s expectations of OpenSea's legitimate contract migration. The idea was the attacker targeted unsuspecting high profile wallets of “bluechip” collections or newcomers to the NFT space by providing a fake migration page and contract interaction. They were able to harvest legitimate approvals (as described in more detail in this tweet) and waited as close to the end date for the OpenSea migration cut-off before commencing his operation of mass transfer of the NFTs from the collected wallet addresses and approvals.
You must always be aware of what permission you are providing or approving during any blockchain interaction. See the below tweet on how to get smarter about it.
Currently, the Web3 space is very much a wild wild west, and foolproof measures and safety precautions are still very much tied to the improvement of the overall UX/UI, which can be a big issue for newcomers. I recommend taking the time to understand some technical aspects related to technology and crypto in general because of the financial stake at hand. Invest not only money but time into learning what you are getting yourself into.
Always double and triple check what you are clicking and approving, be it during your day-to-day or specifically during interactions within crypto platforms. Learn to review your tokens approval at popular platforms such as revoke.cash or etherscan’s token approval checker.
CEX provided wallets (custodial)
An even easier path to take is to register with a Centralised Exchange provider. Once you have created an account with your preferred platform, you can fund your wallet by directly transferring money from your bank account through direct deposit or using a Credit/Debit Card where applicable. See an example here from Binance on topping up your account with fiat currency.
Exchanges like Binance offer a more flexible and easy way of being introduced to digital assets and payments. Similar to how China’s younger generation and most businesses now utilise mostly digital payment, places like Argentina have opted to adopt Binance as means of payments and daily transactions due to the volatility of their native currency.
Another point against custodial services is a situation like what has happened in Canada where the government decided to exclude specific groups from financial freedoms and custodial services who are legally bound by each country’s legal system and will have to comply if requested to freeze assets.
Funding your crypto wallet - Receiving and Sending
Once you have configured your choice of wallet, funding your wallet comes next. An example of this can be found here or here. Once funded, sending and receiving money is easy.
For non-custodial options, you need to ensure that you record your wallet address correctly, and provide it to the sender by copy-pasting to avoid any typing mistakes. It is also possible to provide a screenshot of the QR Code as an alternative if that is preferred.
Transaction confirmation for simple transfer of funds usually will be confirmed in the next block when your transaction is picked by a miner and included in a block. However, when sending or receiving to and from an exchange platform, they would wait for a longer period of confirmation (usually a few blocks) to ensure there are no changes to the head of the chain due to re-orgs / finality issues.
Trading crypto assets - Spot and Leveraged
Many forms of trading can occur; just like stocks, there are multiple ways you can invest your money in the crypto ecosystem. Exchanges make this type of investing easy by consolidating all these features into one location; their application. This not only makes learning simple by not having to worry about going to different places to perform multiple trade functions but it also helps Exchanges facilitate better return on some of their products by providing more pathways for end-users to funnel funds through their system.
A simple purchase of crypto assets can occur using the spot trading function on most Exchanges, there is also leveraged trading available for people who are more experienced and adventurous or less risk-averse.
If you are more inclined to take things into your own hands you can start investing by connecting your wallet to a trading platform such as Uniswap, PancakeSwap, Bancor or if you prefer to try an aggregator, places like 1inch and Matcha.xyz allow for better trade with minimal slippage. You may also look into trading on Layer 2 solutions such as DyDx or Loopring, however, earlier solutions like Uniswap are also getting deployed on Layer 2 as the onboarding process for applications on popular Optimistic Rollups is getting more streamlined. Further breakdown of what is Layer 2 will be provided on a different page.
Save, Lend, Borrow - DeFi
Compared to the traditional banks, which do not offer even remotely good interest rate, it is much more attractive to make your money work within the DeFi ecosystem. Please understand that any platform on the blockchain has an inherent smart contract risk(s) that you will have to assess and come to a conclusion by yourself.
You may select a more popular platforms, which have been operating for a longer time as a safer option, or if you are less risk-averse then you may opt in for young or upcoming platforms that could yield better interest.
Alternatively, you can also utilise the CEX platform saving and borrowing features; they are generally tied to the DeFi money protocols to be able to provide you with the returns they advertise in the first place.
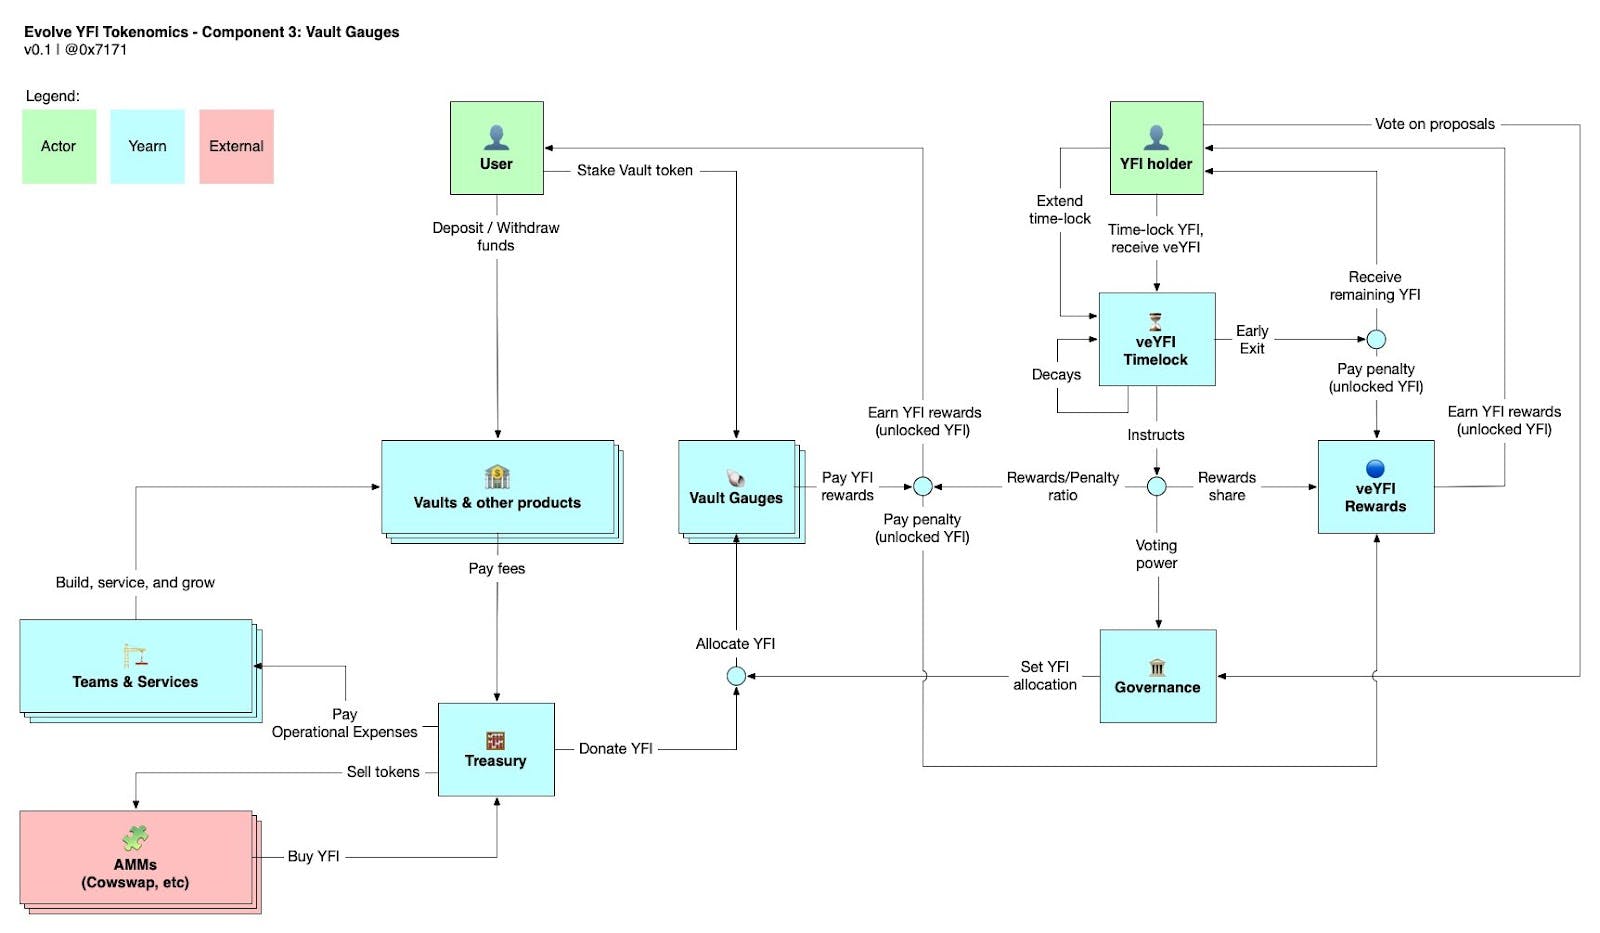
See below’s example of how yield could be generated within DeFi; multiple things are moving together to generate the advertised interest rate and YFI is one example of how that could be achieved.

See also this example of yield farming video on stablecoins via Curve Finance or this article by Ceazor on how Curve 3pool works.
Purchasing an NFT from a marketplace
For you to start purchasing an NFT from a marketplace, your wallet needs to be funded. It is also good to note what wallets are supported on the particular platform you are attempting to purchase from. Most Ethereum compatible chains will support MetaMask wallet, however other wallets generally also support the Wallet Connect open protocol if your preferred wallet is not natively supported by the platform.
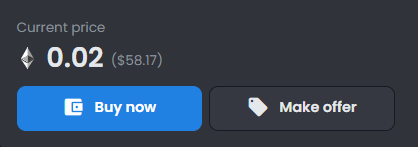
Let’s take OpenSea as an example, when you are on the listing page of an NFT you intend to purchase, you can confirm the price both in USD and also in ETH. Bear in mind that you will be paying the cost of the NFT plus the gas cost to process your transaction on-chain.

Minting an NFT from the team project
An NFT project would generally advise you when they plan on releasing their NFTs for minting. I have seen a few where they would promise to time it with a certain block number, but the most common process would be to provide the exact time in multiple timezones. Discord also supports conversion to your local timezone — the below image provides direct conversion of the exact time when the mint window will start by the presence of highlighted time and date as specified.

Once the minting window opens up, you would be required to access the mint page (please ensure you are clicking the official project mint page). Once arrived at the mint page you need to connect your wallet to allow for their smart contract to initiate the mint transaction request.

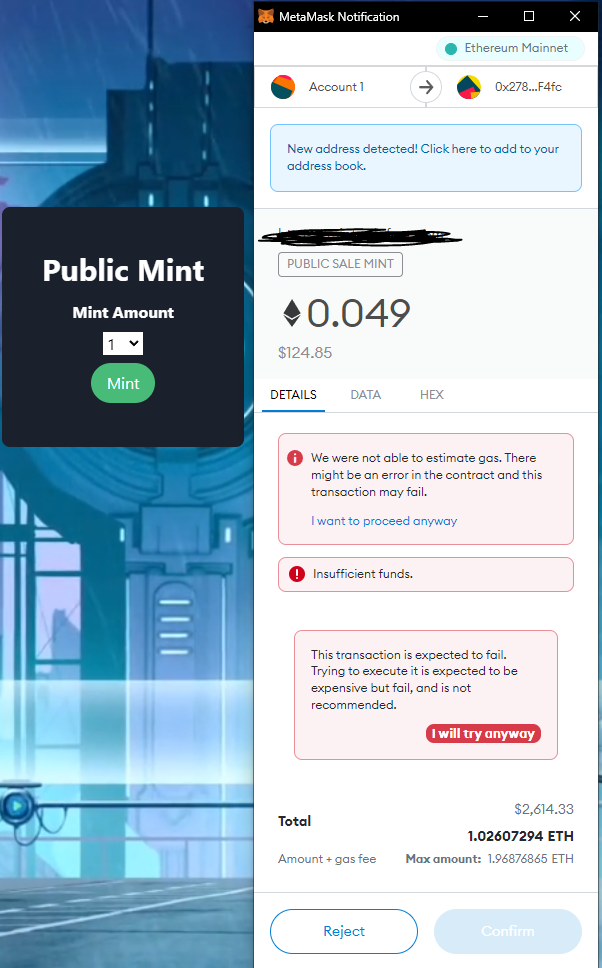
Once you are connected, then you can select the mint button to initiate the mint transaction, and pay attention to the current gas fee. Use blocknative, etherscan or any other platform that provides gas estimation.
IF when you attempt to mint an NFT and the total estimated amount far exceeds the mint cost, this normally occurs due to insufficient balance to account for mint cost + gas cost.

Please ensure you have enough funds to account for both costs, sometimes this is due to the sudden spike in base fee for gas; if you are still willing to mint despite the high gas cost, be sure to not curse the blockchain as that is the cost of decentralisation (move to rollups!).
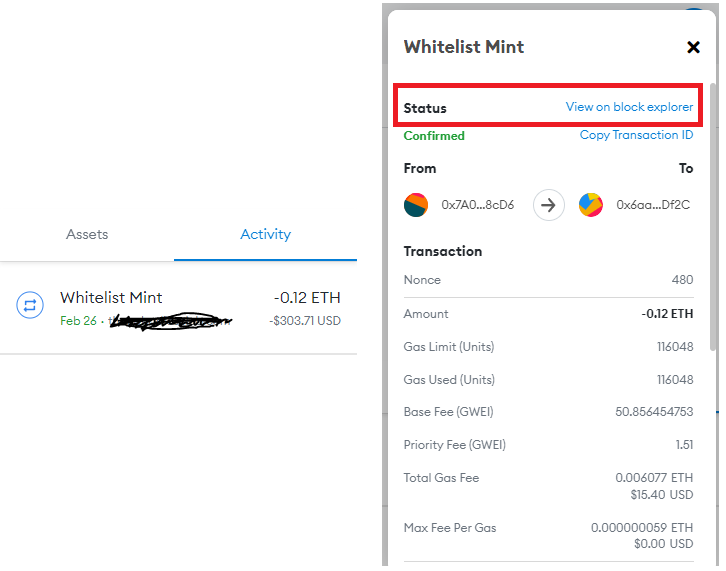
When your transaction is submitted, you should be able to view the progress by accessing the transaction ID from your wallet.

Bridging assets between ecosystem
If you are interested in exploring different blockchain ecosystems you will need to familiarise yourself with bridging your assets. This could theoretically be done using a Centralised Exchange platform, so the simplest way would be to pool your funds on your preferred service provider and convert your funds to your new blockchain e.g.
Send ETH from Metamask wallet to CEX wallet
Convert ETH to USDT in CEX > Purchase SOL with USDT in CEX
Send SOL from CEX wallet to Phantom wallet
The above example is the easiest way to mitigate risks by relying on the Exchange to perform those liquidity transfer processes. However, there are other ways to bridge your assets, for example within the Ethereum ecosystem you can bridge your assets from Ethereum to Polygon by accessing their bridging page.
Bridging asset from one chain to another carries certain risks, since native assets living in each blockchain is not directly represented on either ecosystem, the value of the tokens may suddenly disappear. See the 2021 Polynetwork exploit or the more recent Wormhole exploit. Generally when you are transferring your asset across using first-party tools implies you are locking your existing funds on the originating chain and being given the same amount of tokens on the destination chain as an IOU.
This is why instant liquidity bridges are becoming more popular. Platforms such as Hop Exchange or Umbria Network will provide you with liquidity when bridging to avoid IOUs as liquidity providers have come to support the ability to bridge seamlessly. Bear in mind as cross-chain interoperability becomes more ubiquitous, bridges will likely become a bigger target for an exploit, so it is important to always weigh your risks prior to selecting your bridging methods.
Useful Links