For Worldwide Webb to run smoothly in your browser, we need to make use of the browser’s best graphical processing abilities. On desktops and laptops, browsers have a setting to turn on and off to make use of graphics processing hardware that may be present on the machine. These settings are usually turned on by default, but occasionally may have been turned off. This post describes how to check and turn the setting on.
For laptops that have a dedicated graphics card, it is also possible for the browser to default to the weaker integrated graphics, and not give you the full capabilities of your machine. At the bottom of this post are instructions for how to check for this and fix it on Windows 11
Chrome
How to check for Hardware Acceleration in Chrome
Type chrome://gpu into the URL bar. This will bring up a page that displays the hardware acceleration status of the machine. The following screenshot is an example of what the page looks like when hardware acceleration is off, and would indicate that it needs to be turned on

The following screenshot is an example of what the page looks like when hardware acceleration is on, if yours looks something like this, then you don’t need to adjust hardware acceleration settings

How to turn on Hardware Acceleration in Chrome
Go to “System” in the Chrome settings, and make sure “Use Hardware acceleration when available” is checked. You can also get to this setting by searching settings for “hardware acceleration”. Relaunch the browser.

Brave
How to check for Hardware Acceleration in Brave
Type brave://gpu into the URL bar. This will bring up a page that displays the hardware acceleration status of the machine. This looks the same as Chrome, so see the section above for more information.
How to turn on Hardware Acceleration in Brave
In the Browser settings. Go to the System settings, where you will find “Use Hardware acceleration when available”. Make sure this option is checked, then relaunch the browser.

Opera and Opera GX
How to check for Hardware Acceleration in Opera and Opera GX
Type opera://gpu into the URL bar. This will bring up a page that displays the hardware acceleration status of the machine. This looks the same as Chrome, so see the section above for more information.
How to turn on Hardware Acceleration in Opera GX
In the Browser full settings (Alt+P on Windows, or via the top-left O menu, or via the last “Go to full browser settings” in the top-right Easy Settings menu). Go to the Browser settings, and scroll down to System, where you will find “Use Hardware acceleration when available”. You can also get to this setting by searching settings for “hardware acceleration”. Make sure this option is checked.

Edge
How to check for Hardware Acceleration in Edge
Type edge://gpu into the URL bar. This will bring up a page that displays the hardware acceleration status of the machine. This looks the same as Chrome, so see the section above for more information.
How to turn on Hardware Acceleration in Edge
In the Browser full settings (Alt+P on Windows, or via the top-left O menu, or via the last “Go to full browser settings” in the top-right Easy Settings menu). Go to the Browser settings, and scroll down to System, where you will find “Use Hardware acceleration when available”. You can also get to this setting by searching settings for “hardware acceleration”. Make sure this option is checked.

Firefox
How to check for Hardware Acceleration in Firefox
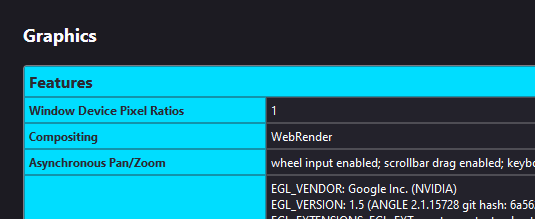
Type about:support into the URL bar. Scroll down to the “Graphics” section, and look for “WebRender”. If it says “WebRender (Software)” then the hardware acceleration is turned off:

If hardware acceleration is turned on, it will just say “WebRender”
How to turn on Hardware Acceleration in Firefox
In the settings, settings, in the Performance section, ensure “Use recommended performance settings” is checked. OR ensure “Use hardware acceleration when available” is checked if you don’t wish to use recommended performance settings. Restart the browser after changing this setting.


Laptops with discrete GPUs, or eGPUs
There are some situations where a machine with both discrete and integrated GPUs, such as Laptops that have discrete GPUs (e.g. if your laptop has an additional Nvidia or Radeon graphics card), or machines with external GPUs, where the OS decides to use the weaker integrated GPU for the browser, rather than the more powerful discrete GPU.
On Windows, you will be able to tell if you have both discrete and integrated GPUs if your Task Manager shows two GPUs.

Also in Task Manager, you can usually see which GPU is being used by the browser. In the below screenshot, Chrome can be seen using GPU 0, which on this machine is the integrated Intel Iris graphics, which is far weaker than the available nVidia 3060 RTX card available at GPU 1.

On Windows 11, it is possible to set a preference for which GPU is used. The menu is in Windows Settings > System > Display > Graphics:

In the “Custom options for Apps” section, click “Browse”

Navigate to the executable for your browser. For example, Chrome is often installed at C:\Program Files\Google\Chrome\Application\chrome.exe, but other browsers and other installations may vary.
This adds a Google Chrome option to the app list. Click on Options

This brings up the Graphics preferences for the browser, where you can select to use the “High performance” GPU

Once this is selected, restart the browser.
